It’s Autumn here in New Zealand so I thought I’d work on a project that reflected the changes going on outside in this part of the world. New Zealand is interesting with respect to the foliage that covers it’s many rolling hills. It’s a mixture of both hard woods and tropical plants. It’s one of the first characteristics of this place that struck that chord in me telling me that I was “Not in Kansas anymore”!
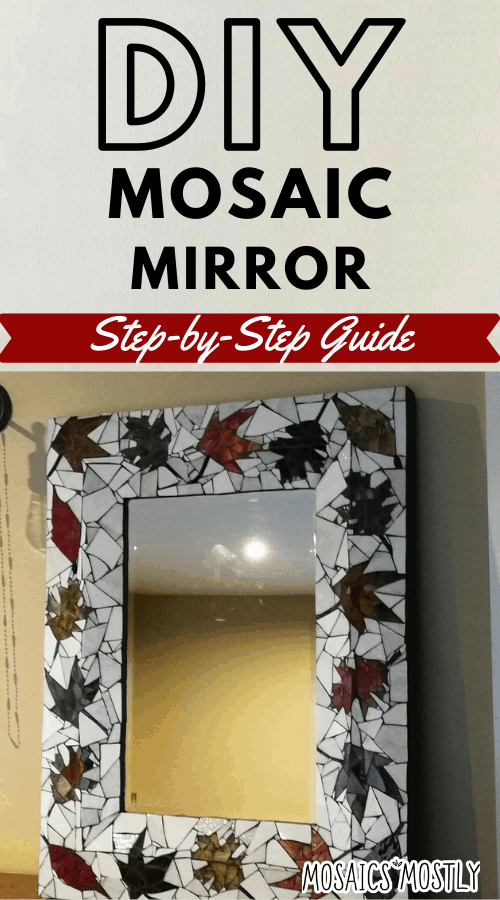
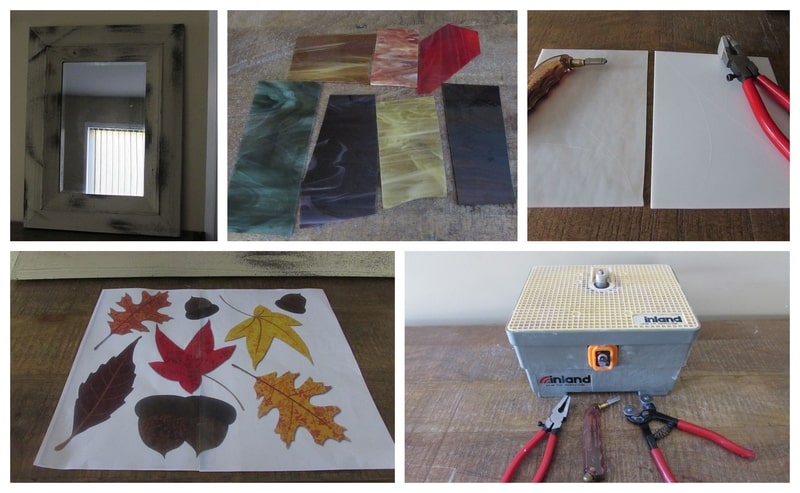
We have a trading site here called “Trade Me” which is equivalent to the USA Craig’s list. I found this mirror for sale on this site for $35! It’s a perfect wooden wide framed mirror for a lovely stained glass mosaic design. I decided on an Autumn leaf theme and found a site with free downloadable leaf images and away we go.
*Tip: I also selected this mirror for my project because of the light color of the frame. The reason for this is so that when you glue the lighter shades of stained glass on the frames surface, you’ll see the true color of the glass as is the case for the two shades of amber glass I’m using. If the frame were dark brown or black, the amber glass wouldn’t appear amber but merely a dark brown color.
If you’re going to use a dark frame for this project, my suggestion is to paint the frame white or a light color so that the true colors of your stained glass are visible once the project is complete.
Materials Needed for DIY Mosaic Mirror
- Wooden mirror with a wide frame for mosaic coverage.
- Leaf patterns
- Scrap stained glass pieces
- Clear water resistant adhesive
- Glass cutter
- Mosaic cutters
- Running pliers
- Glass grinder (if you wish to smooth your edges)
- Black Grout
- Latex additive
- Sponge, towels, bowl and mixing spoon
- Black paint
- Safety glasses
- Garden gloves
- Scrap paper for covering the mirror when grouting and when painting
How to Make Your Very Own DIY Mosaic Mirror
Below you’ll find the step-by-step instructions on how to make a gorgeous mosaic mirror at home. Let’s get started!
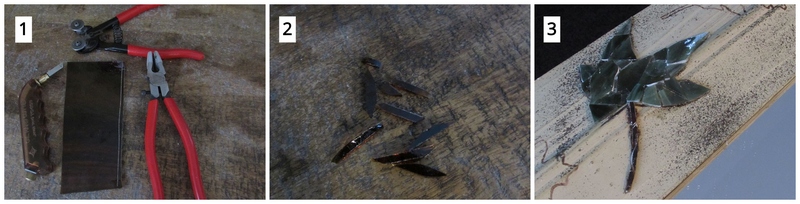
Step 1: Gather Your Materials and Tools
Before we get started, let’s make sure that everything we need for this project is within arms reach.
I’ve selected six different colors of scrap stained glass for my leaves and a dark brown piece for the stems. I’ve also selected two different shades of white stained glass for the background as I thought that would create a fantastic contrast with the different colored leaves and the black grout.
I also downloaded some free printable images of autumn leaves that I will trace onto my wooden mirror frame. Let’s get started!
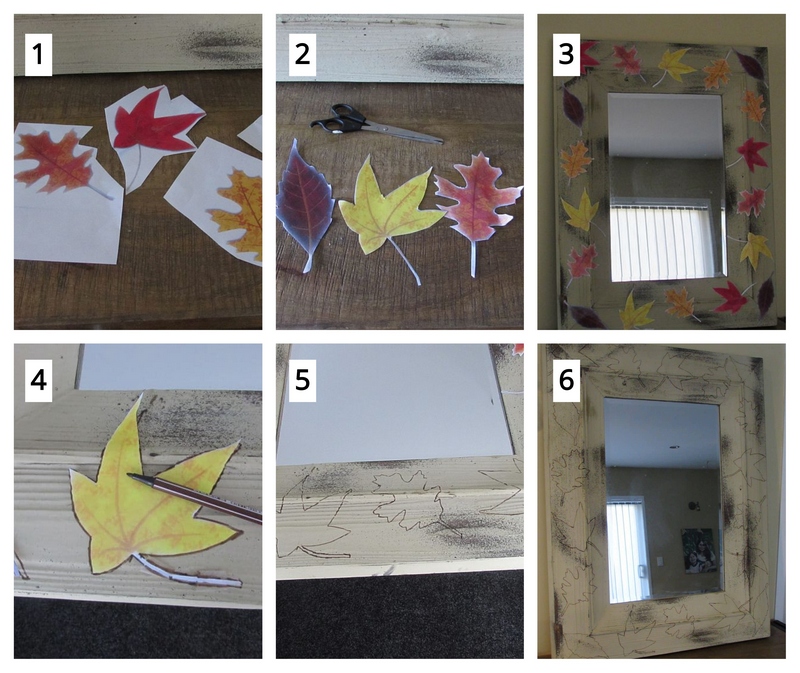
Step 2: Cut Out Your Leaves and Trace them on Your Mirror Frame
Resize the leaf patterns using a color copier to the proper size to fit your frame. Cut the individual leaves out.
Tape the leaves on the mirror frame however you’d like….remember…these are simply floating randomly through the air:) Then trace around each leaf with a marker. Remove the paper leaves and tape and “oila!” You’re ready to start your mosaic design.
*Tip: Mosaic leaves are one of the simplest mosaic designs to achieve as leaves themselves are naturally irregular in shape so creating a leaf out of irregular small pieces of glass is easier than you might think.
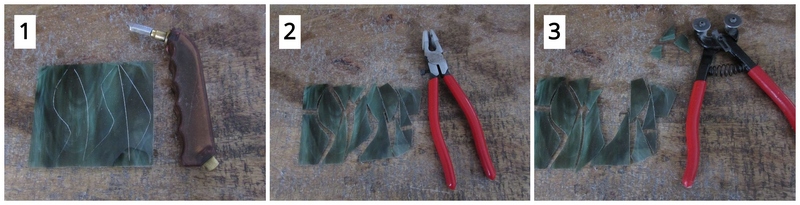
Step 3: Cut Your Glass
Select scrap pieces of autumn colored stained glass for creating the individual leaves.
Using your glass cutter, score the glass irregularly to create interesting curved pieces for your leaves.
Next, use your running pliers to break the score lines. Always line the center of the tip of your running pliers up with your score line when breaking the glass. Continue cutting pieces of glass with your mosaic cutters creating smaller pieces.
If you’ve never cut glass before, check out my post on how to cut stained glass here.
Step 4: Glue Your Glass Leaves on Your Mirror Frame
Begin gluing on your nipped pieces of glass to form the leaf’s edges.
Mark a piece to fit as a large tip piece. Cut the piece with your mosaic cutters and glue it in place. Depending on how long the score line is, dictates whether you need to use your glass cutter and running pliers to achieve your shaped piece or your mosaic cutter.
Mark an interior curved piece. Score the curved mark with your glass cutter and then break the score line with your running pliers. Glue the piece in place.
Continue gluing on individual pieces until you achieve the shape of your leaf,
*Tip: My mirror frame is not flat, it’s beveled, but this is not a problem. You simply allow your leaf design to roll over the beveled section of the frame. You’ll be doing the same thing with your background off-white pieces that you will surround the leaves with.
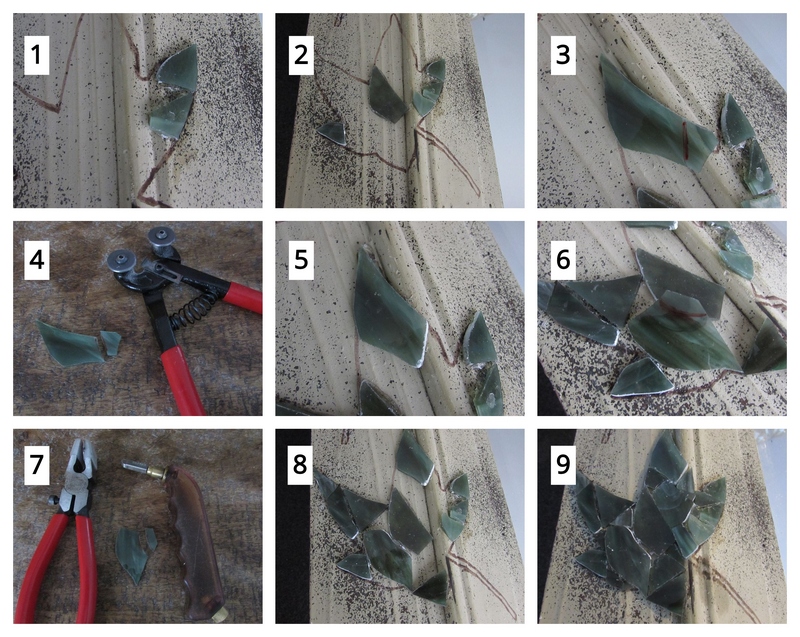
For your stem, score long thin lines on your dark brown scrap glass and attempt to break them out with your running pliers or use your mosaic cutters. Then glue on individual pieces of the glass to create your stem.
Your first leaf is now complete.
*Tip: It’s near impossible to break out a long narrow strip in one piece with your running pliers. Your objective is really to just achieve a pile of narrow thin pieces that you can combine to create your stem.
Complete this process of marking, cutting and gluing on until all of your leaves are completed.
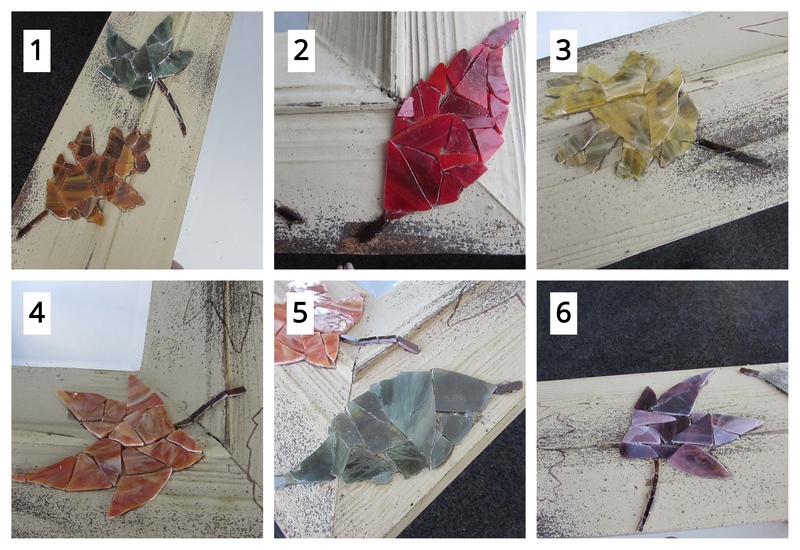
You’re now ready for your back ground glass!

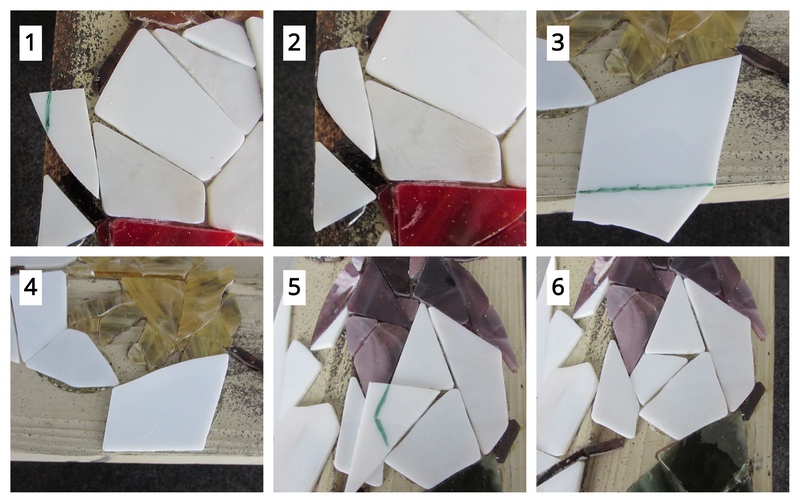
Step 5: Cut Your Background Glass for Your Mirror Frame
Score 2 different shades of off-white glass irregularly with your glass cutter for your background. Break the score lines with your running pliers. As you can see below, I’ve cut the glass into larger piece than the glass used for the leaves as the majority of your background pieces will be larger than the pieces used to create your leaves.
Remember to always line the center of your running pliers up with your score line when breaking the score.

Step 6: Glue on Your Background Glass
Begin gluing on pieces of the background glass making sure to intermix both colors.

Just as with the creation of each leaf, the background pieces need to be marked, cut with your mosaic cutters or scored with your glass cutter, broken out with your running pliers and glued in place. Make certain to tightly fit each background piece around each leaf. This will ensure that your leaf design, once the piece is grouted, is clearly visible. Remember, wherever there is not a piece of off-white background glass or your colored leaf glass, there will be black grout. So in saying this, specifically with your darker colored leaves such as the plum colored and dark green, make sure the entire outline of the leaf is framed with the off-white glass so as not to distort the shape of the leaf with the black grout.
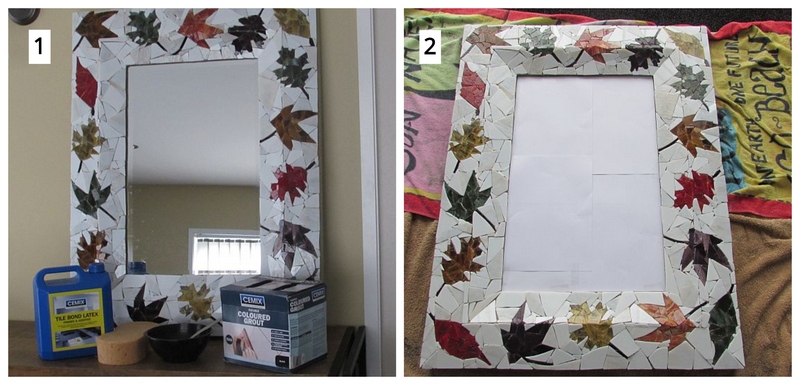
Total mosaic coverage achieved!
Step 7: Gather Your Materials for Grouting
To grout, you will need your box or bag of dry grout, latex additive, a mixing bowl, spoon, old towels and rags, sheets of paper, a sponge and water. Make sure to cover the surface that you’ll be grouting the mirror frame on with old newspaper or towels to prevent any of the grout mixture from staining your surface.
Also, cover the mirror itself with your sheets of paper so as not to scratch the mirror with your abrasive grout mixture.
Step 8: Mix, Apply and Clean off Your Excess Grout
You’re ready now for the actual grouting process. First, let’s create your grout mixture. You want to slowly add the latex additive in to the dry grout mix until you achieve the consistency of oily peanut butter. Don’t worry if you mix if you make the mixture too runny as you can always add more dry grout to achieve the proper consistency.

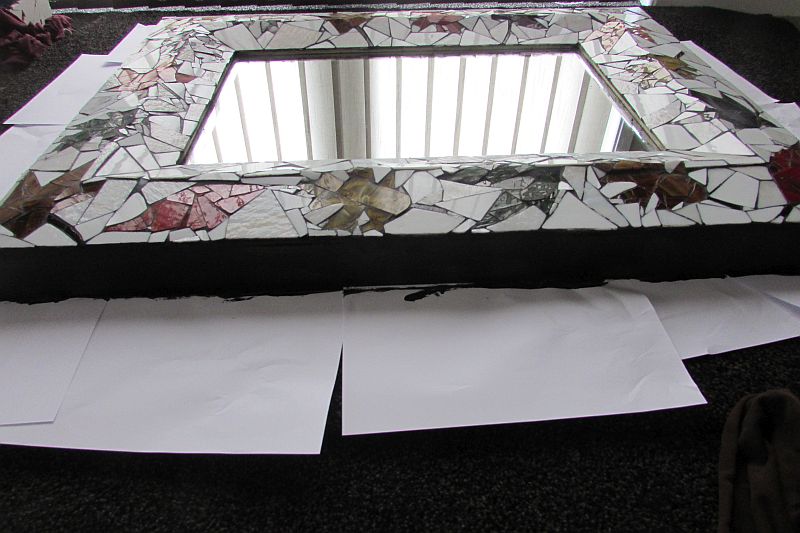
Time to cover your mirror frame with grout. There’s really no incorrect way to do this as you simply need to completely cover the entire surface with the grout and then wipe the excess off with a moistened sponge. Continue cleaning until the mirror frame is completely free of surface grout.
*Tip: Make sure you’re situated near a water source as you’ll be rinsing your sponge out repeatedly. Also, if you’ve never grouted before, check out my post on how to grout your DIY mosaics here.
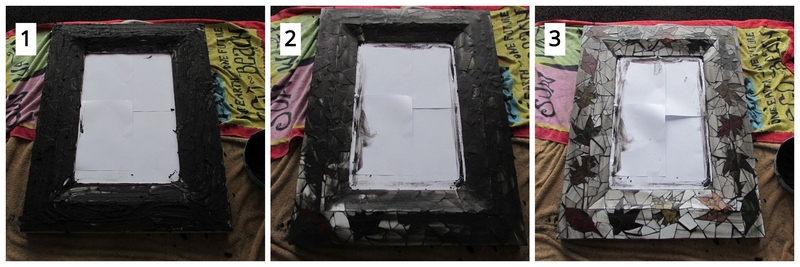
Step 9: Paint the Edges of Your Mosaic Frame
Lay the cleaned mirror on paper and paint the edges black to match your grout. A finishing touch that pulls everything together.
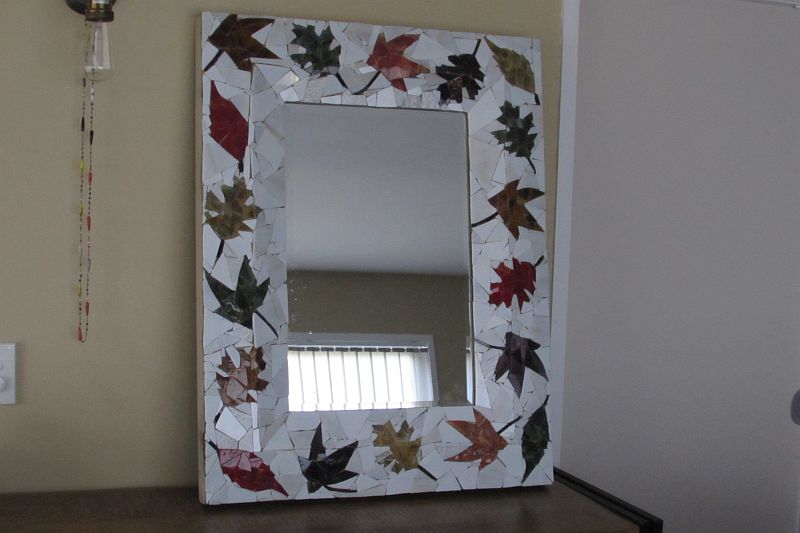
Your Autumn Leaf Mosaic Mirror is Completed!
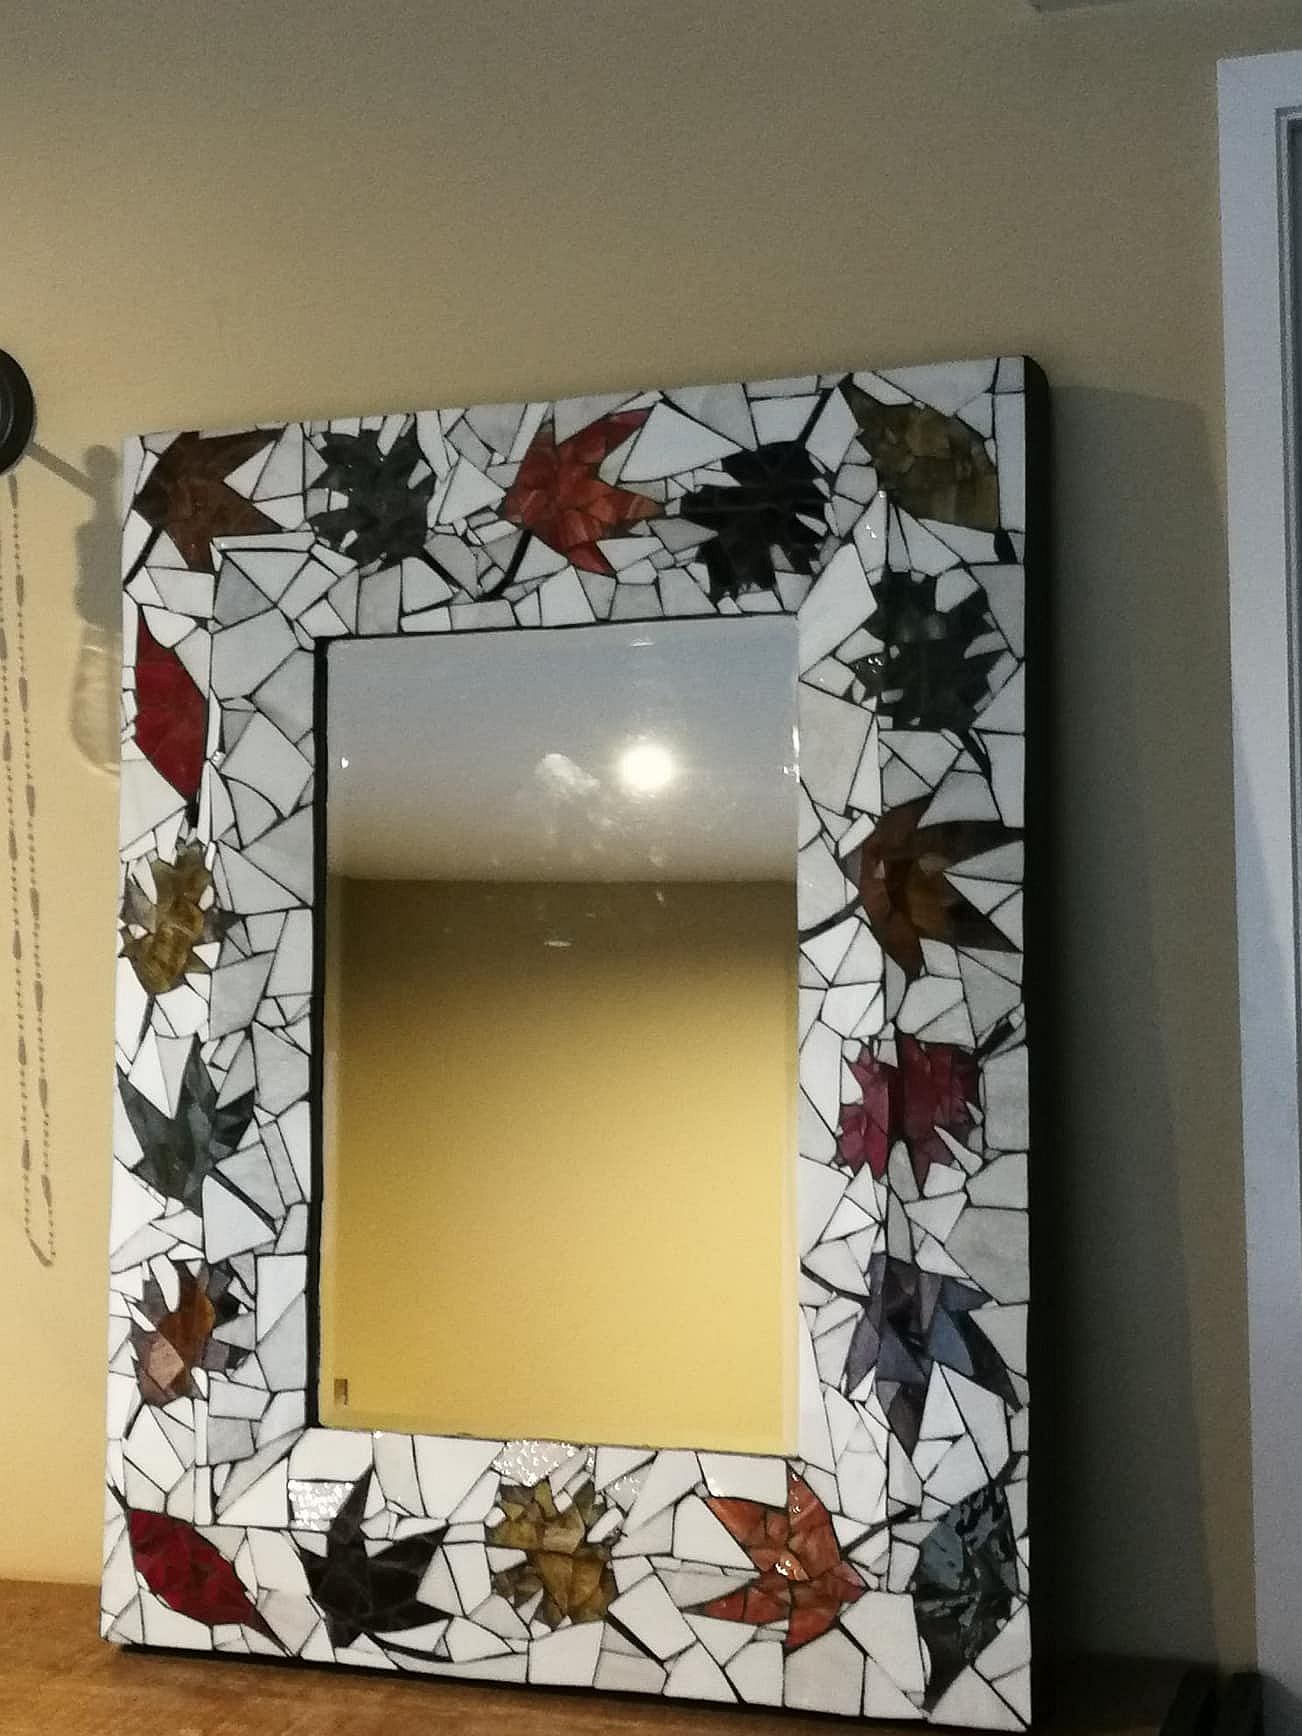
I hope you enjoyed making this stunning contemporary stained glass mosaic mirror! Always keep in mind that this process of resurfacing with stained glass lends itself to a variety of other exceptional pieces that you could create. It’s only a matter of time before you begin to envision transforming other objects in your home in this same way as mosaics are addicting!

Danielle is the mosaic artist and teacher behind Mosaics Mostly. She has been creating mosaics for over 25 years, and has taught hundreds of people to create their very own mosaic DIY projects at home. She has been featured in multiple galleries and magazines, and has even had her own beginner mosaics book published! She loves crafts, and is always working on something new!
