Grouting your mosaics, in my opinion, is the most exciting part of any mosaic project! Once you’ve filled all your joints with your grout mixture and cleaned it thoroughly, you breath life into your mosaic as your design becomes prominent and clearly visible ready for all to enjoy. You’ll need to purchase the materials necessary to create your grout mixture, prepare your mixture, apply it to your mosaic surface and clean it thoroughly. Let’s get started!
Step 1: Gather Your Materials
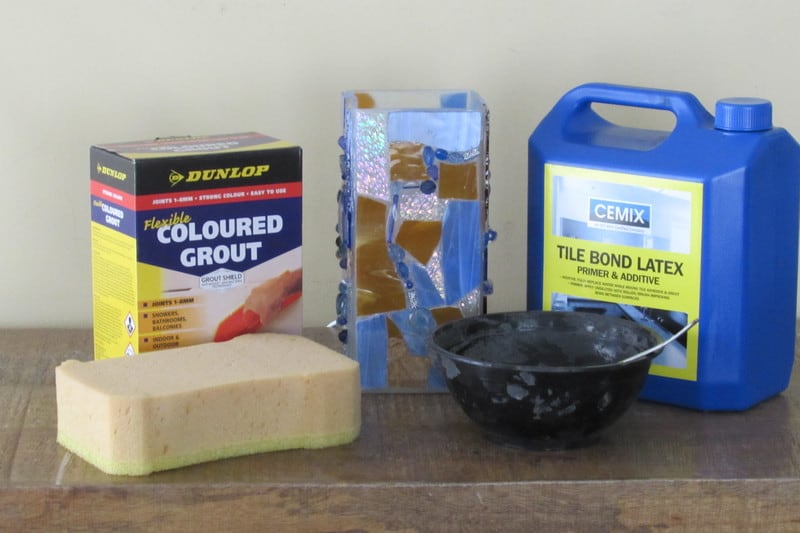
For this post, I’ve decided to show you how to grout a DIY lit glass project, but the exact same process applies to grouting all your tile mosaics and non lit glass mosaic projects. In order to grout this lovely stained glass mosaic table lamp you’ll need your dry grout, latex additive, mixing bowl, spoon, sponge, garden gloves, old towels, water and of course, your project. I’m using black grout for this project as I’m wanting each side to resemble a leaded and soldered stained glass window. Black grout dries to a very dark gray which is the same color as soldered lead. You need to add liquid latex instead of water to your dry grout to that the grout mixture adheres to your glass base. If you don’t use latex additive the grout will not adhere as well to your glass base and you may have cracking and even pieces of grout loosening from the joints. Prior to grouting any mosaic, make sure you remove as much of the excess water resistant glue that may have seeped out from underneath a piece and filled a joint that needs to be filled with grout. With lit stained glass mosaics, removing the excess glue is critical as it will distort your design when the piece is lit.
Step 2: Prepare Your Piece to Be Grouted
This step is not necessary for many mosaic projects, but for this mosaic lamp project it is. You want to tape the top edge of your lamp with masking tape or painters tape as you want to keep that edge all clean and free of grout. Plus, you don’t want excess grout falling inside your lamp base as this base is an open design. 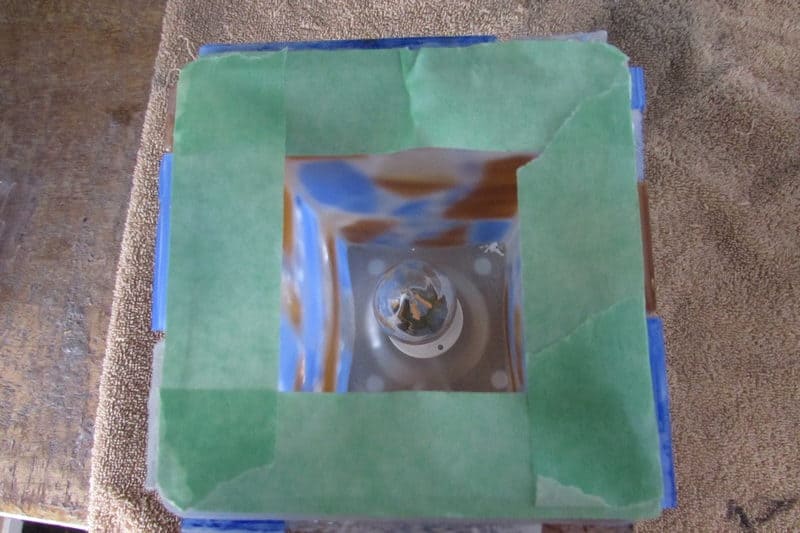
Step 3: Mix, Apply and Clean Off Your Excess Grout
You’re ready now for the actual grouting process. First, place some dry grout into your mixing bowl and add enough latex additive to achieve the consistency of oily peanut butter. Don’t worry if you accidentally add to much latex, simply add more dry grout to the mixture until you achieve the proper consistency. 
Once your grout mixture is ready, cover the first side of your lamp with grout. Make certain you cover the entire surface and get the mixture into every crevice. Don’t be afraid to use too much grout and you’ll be cleaning the excess off little by little. After you’ve covered the side completely, take a moistened sponge and begin wiping off the excess grout. Make certain you’re near water source as you will need to rinse your sponge repeatedly. After you’ve cleaned the majority of the grout off, clean it thoroughly with a old towel or rag. Repeat this process for the other three sides of your lamp. Make sure you are grouting and cleaning one side at a time to prevent any excess grout from drying on the surface of your pieces. If you’re grout dries up a bit, simply add more latex additive to it to regain the proper consistency of your initial mixture. Make sure to create an nice transition edge along each side of your lamp by applying grout to the edge and smoothing it with your finger.
. 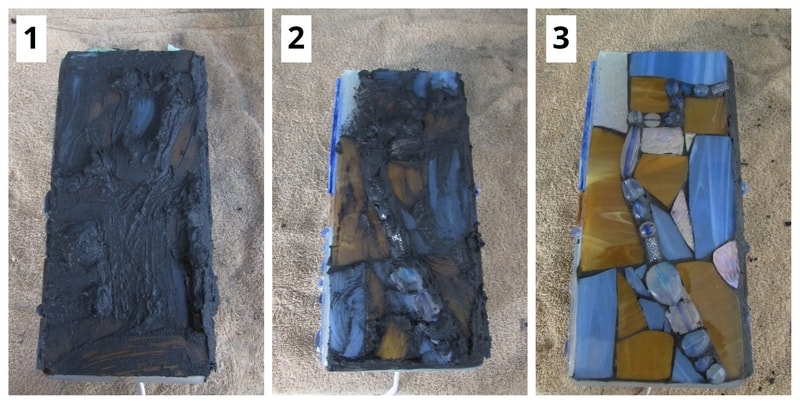
Take a look at the finished product after cleaning thoroughly! 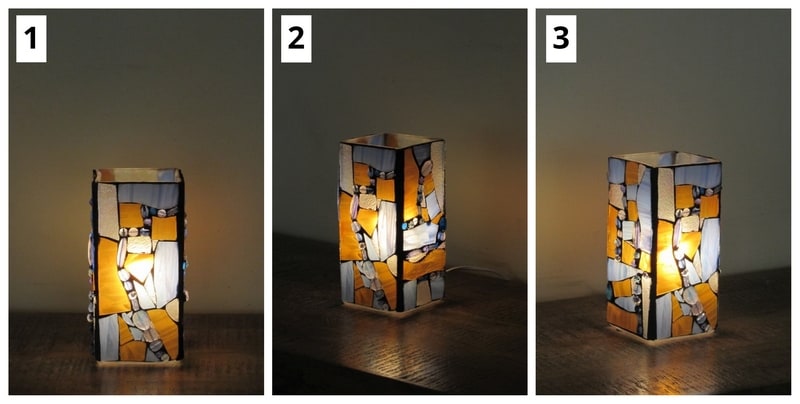

Danielle is the mosaic artist and teacher behind Mosaics Mostly. She has been creating mosaics for over 25 years, and has taught hundreds of people to create their very own mosaic DIY projects at home. She has been featured in multiple galleries and magazines, and has even had her own beginner mosaics book published! She loves crafts, and is always working on something new!

You are doing great job.
Danielle, please l went to ask if l can have on line class with you. On glass mosaics because l dont actually no how to work with glass so much. Special cutting and smoothing and the machine used in smoothing the stain glass before placing it on object you want to work it.
I went you to train me on stain glass mosaics.
So you can tell me what tale takes for you to train me online.
My names are Kate Ada Ejiofor. I am from Nigerian l am mosaics Artist , but l dont know how to use stain glass to mosaics.
Do l went you to train because I find out that you have many experiences on mosaics and your work are great job.
I will drop my phone number and email address at the bottom. Thanks so much for what you share with on the group. I will be glad to hear from you.
Kate.
Hi Kate:) I am gearing up to teach an online course…just not quite there yet. I’d be more than happy to teach you glass mosaic technique:)
Let me have a think about and perhaps we can work something out prior to me doing an online course where a group would be involved a couple of times a week for several weeks.
I’ll get back to you:) Thanks so much for your love of the art!!!
Cheers,
Dani
Hello. This post was extremely interesting, especially because I was looking for ideas
on this subject last Thursday.
King regards,
Boswell Raahauge
Awesome!!! So glad it helped:)
Saved as a favorite, I love your blog!
Thanks so much!! Please enjoy!
Good article. I’m going through some of these issues as well..
I’m so glad:) Enjoy the projects!
Major thankies for the article.Really thank you! Really Great. Gaynelle Shimabukuro
You’re welcome Gaynelle:) Please enjoy the site:)
Thanks for sharing, this is a fantastic article. Awesome. Willian Koscielniak
Thank you so much! enjoy the site! Cheers, Dani
Hi Dani,
My daughter passed on one of your do it yourself projects to me, hence here I am.
I have been teaching myself the lovely art of mosaics for the last 4 years. But, of all the choices I have found myself loving pavers and steppers.
At age 60, I finally got brave to share my art with the public via local Farmers Markets. Ive received an overwhelming positive response that that couldn’t be more motivating.
I’ve got a lot more to learn specially on technique, I lack the shortcuts, the tricks and simply a mentor.
I have been looking for someone whom can give me highlights to better my craft and give me that edge to produce even better stunning pieces.
Any chance we can chat via email or text. Just to speak with someone whom shares the passion would be heartfelt.
Thanks so much for sharing yourself, it’s educating and very appreciated!!.
Ah!! That is wonderful to hear! You can email me at [email protected] as that is my local business email address:) Would love to hear from you:)
Outstanding post, you have pointed out some superb points, I likewise believe this s a very superb website. Elly Bartholomeo Brody
Thank you:) Enjoy the site! Cheers, Dani
There is certainly a lot to know about this topic. I really like all of the points you have made. Erin Murdock Radferd
Glad you enjoyed! Cheers, Dani
“Hey, thanks for the blog article.Really looking forward to read more. Awesome.” Raphael Farace
You’re very welcome! Please enjoy the site:) Cheers, Dani
Hi, I do believe this is an excellent web site. I stumbledupon it 😉 I’m going to return yet again since i have book-marked it. Money and freedom is the best way to change, may you be rich and continue to guide others.
Thank you so much!!! Please enjoy the site!!
May I simply say what a relief to find an individual who truly understands what they are discussing on the web. You certainly realize how to bring a problem to light and make it important. More people must check this out and understand this side of your story. I can’t believe you aren’t more popular since you most certainly possess the gift.
What a lovely comment! Thank you so much! Please enjoy the site:) I will be starting a facebook group soon if you’d like to join:) It will be called Mosaics Mostly:)
Quality posts is the important to interest the people to pay a quick visit the web site, that’s what this web site is providing.|
So glad you are enjoying it!!! Thank you for the compliment:)
Undeniably consider that that you stated. Your favorite reason appeared to be on the net the simplest factor to understand of. I say to you, I definitely get irked whilst other folks consider worries that they plainly don’t realize about. You managed to hit the nail upon the highest and outlined out the entire thing with no need side effect , other people could take a signal. Will likely be back to get more. Thank you|
Thanks so much!!! Please enjoy all the projects!!!
Thank you for any other excellent article. Where else may just anybody get that kind of information in such a perfect manner of writing? I have a presentation next week, and I am at the look for such info.|
Thanks so much!!! That means alot:) Please enjoy the website!
Right now it appears like WordPress is the top blogging platform out there right now. (from what I’ve read) Is that what you’re using on your blog?|
Yes I am:)
I could not resist commenting. Exceptionally well written!|
Thanks so much! Please enjoy all the projects!
I would like to thank you for the efforts you’ve put in writing this blog. I’m hoping to see the same high-grade content from you later on as well. In truth, your creative writing abilities has motivated me to get my own site now ;)|
Thanks so much! and Awesome with you wanting to create your own website!
Hello there! This blog post couldnÃt be written any better! Looking at this article reminds me of my previous roommate! He constantly kept talking about this. I most certainly will send this post to him. Fairly certain he’s going to have a very good read. Thank you for sharing!
Thank you so much! Please enjoy all the projects!
I’ve been surfing online greater than three hours these days, yet I never found any fascinating article like yours. It is lovely value enough for me. Personally, if all webmasters and bloggers made excellent content as you probably did, the web will probably be much more helpful than ever before.|
Please enjoy the site!! and thank you for the lovely compliments:)
I have been exploring for a little bit for any high-quality articles or blog posts in this sort of space . Exploring in Yahoo I finally stumbled upon this site. Reading this info So i am happy to exhibit that I’ve a very good uncanny feeling I discovered just what I needed. I most indubitably will make certain to do not put out of your mind this site and provides it a glance on a continuing basis.|
I’m so happy you’re enjoying the site!! Thanks so much for the compliments!
I truly love your website.. Great colors & theme. Did you make this amazing site yourself? Please reply back as IÃm wanting to create my own personal website and want to know where you got this from or what the theme is called. Kudos!
Thank you so much:) My daughter created it in WordPress:) Please enjoy the site!!
I need to to thank you for this great read!! I definitely loved every bit of it. I’ve got you book marked to look at new things you post횜
Thank you!!! Enjoy the site!
Excellent post however , I was wanting to know if you could write a litte more on this topic? I’d be very grateful if you could elaborate a little bit more. Many thanks!|
Hi there:) Please email me and I’ll answer whatever questions you might have:)
Hi there! This is my first visit to your blog! We are a team of volunteers and starting a new initiative in a community in the same niche. Your blog provided us beneficial information to work on. You have done a marvellous job!|
Awesome!!! Thanks so much for the compliment. Please enjoy the site.
An impressive share! I’ve just forwarded this onto a coworker who has been doing a little research on this. And he in fact ordered me lunch because I stumbled upon it for him… lol. So allow me to reword this…. Thank YOU for the meal!! But yeah, thanks for spending time to talk about this issue here on your web page.
Awe!! You’re very welcome!!! Please enjoy the site!
This is a topic that’s near to my heart… Thank you! Where are your contact details though?
I can be reached at [email protected] or on my other website [email protected]. Please feel free to contact me with any questions.
You ought to take part in a contest for one of the most useful sites online. I most certainly will recommend this web site!
Awe thank you so much:) Can you tell me more about this contest? you could email me at [email protected] or at my other site [email protected]. Thanks so much and enjoy the site:)
We are a group of volunteers and opening a new scheme in our community. Your site offered us with valuable info to work on. You have done a formidable job and our entire community will be grateful to you.|
That makes me so happy!!! Please enjoy!