Boxes are very personal things. They keep safe our most personal and cherished belongings. They also house those special gifts for your favorite people. Or sometimes they’re just a lovely visual piece to enjoy on our bedroom dressers or our coffee tables. But nothing is more special than a handmade box that someone has made specially for you.

For this project, we’re going to take the most basic of dollar store craft boxes and turn it into a dazzling stained glass mosaic trinket box using scrap stained glass and glass beads.
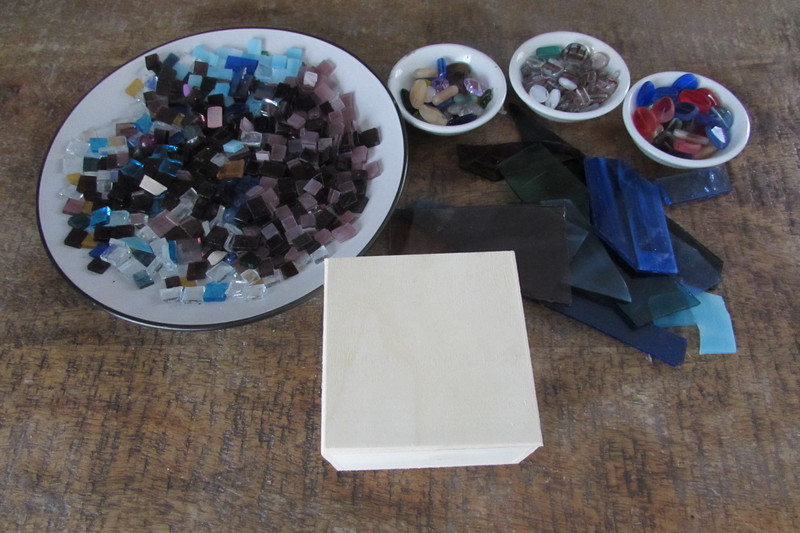
Materials Needed for DIY Mosaic Box
- Small wooden craft box without hardware
- Blue and plum colored scrap stained glass pieces
- Glass/acrylic beads
- Clear water resistant adhesive
- Black grout
- Latex fortified additive
- Dark gray acrylic paint
- Fine and medium paint brush
- Sponge, mixing bowl, spoon and old cloths
- Garden gloves
- Safety glasses
- Scissors, ruler/straight edge and craft paper or cloth of your choosing to line the box
How to Make Your Very Own DIY Mosaic Box
Below you’ll find my step-by-step instruction on how to create your own lovely mosaic box at home. Let’s get started!
Step 1: Gather Your Materials and Tools
Before you get started, make sure that you have everything you need for your project close by.
For this particular box project, I decided to use a $2 craft box that I bought at my local craft store, but feel free to use what ever wooden box you’d like.
My color theme will be blue and plum and I’ll mix in some glass beads among the squares I’ll be cutting out of the scrap glass.
Tip: Scrap stained glass can be purchased by the pound or bag at all stained glass shops. Most craft shops sell bags of scrap glass now for mosaic projects and you can also order bags of scrap glass from Amazon.
Additionally, gorgeous acrylic and glass beads can be found at any craft shop and purchased off Amazon. When incorporating beads into your design, always select beads that can be glued down on their sides so that once grouted, the holes in each bead are not visible.
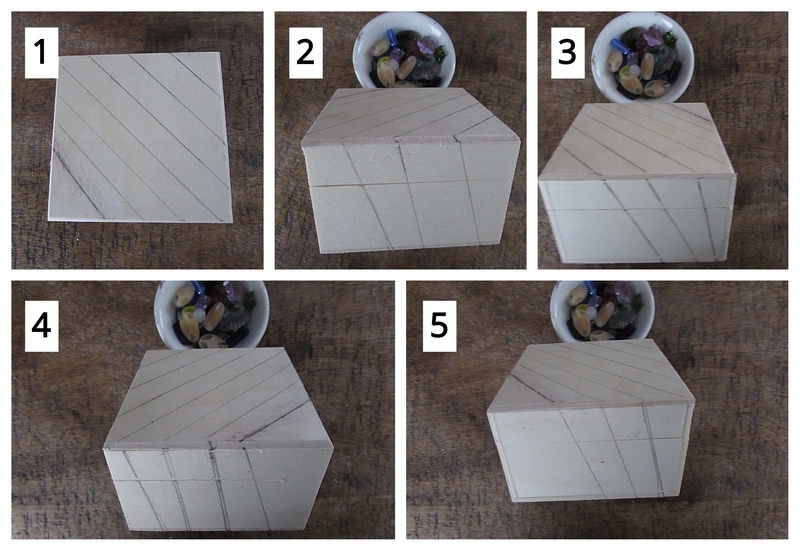
Step 2: Draw Your Design on Your Box
Take your straight edge and draw diagonal lines across the top of your box.
Turn the box on it’s side and continue the design. This will lend a continuity to your mosaic. Repeat this on the other 3 sides of your box.
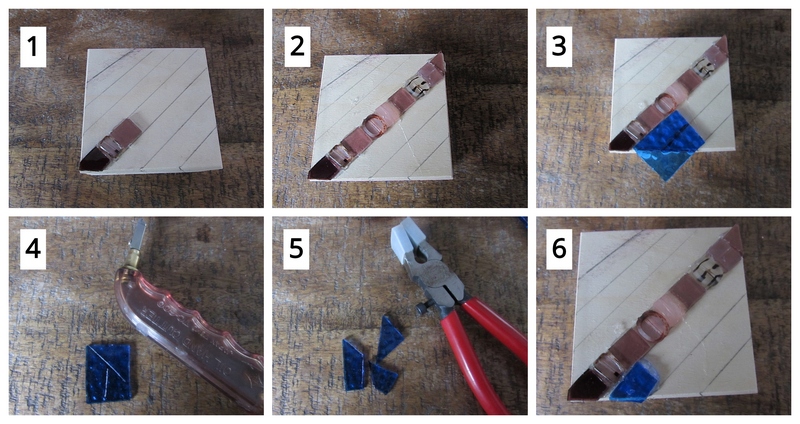
Step 3: Cut Your Glass
Score a piece of dark plum colored glass and light plum colored glass with your glass cutter both horizontally and then vertically creating irregular squares.
Note that I created score lines that are on the diagonal as my design is on the diagonal also.
Break the scored lines with you running pliers both vertically and then horizontally to create irregular squares. Always line up the center of the tip of your running pliers with the scored line itself. Apply just enough pressure to break the score.
Repeat this process with your blue glass.
*Tip: If you’re new to creating mosaics and need to learn how to cut glass properly, check out my post on how to cut stained glass here.

Step 4: Glue on Your Glass Pieces and Your Glass Beads
Begin your first row of glass and beads. The color scheme for this project is plum and blue. Colors will be alternated for each row.
When you need an angled piece for the edges, simply mark it and cut it with our mosaic cutters.
After completing your first plum row, begin your blue row by marking a piece of blue glass to fit within the row.
Score the glass with your glass cutter and break the scored marks with your running pliers. Glue the piece in place.
Continue gluing on pieces.
Mark a blue piece for your corner.
Cut it with your mosaic cutters and glue the piece in place.

To complete your next row, mark a blue piece of glass to fit your edge.
Score your mark with your glass cutter and break it out with your running pliers.
Glue the piece in place and finish your row.
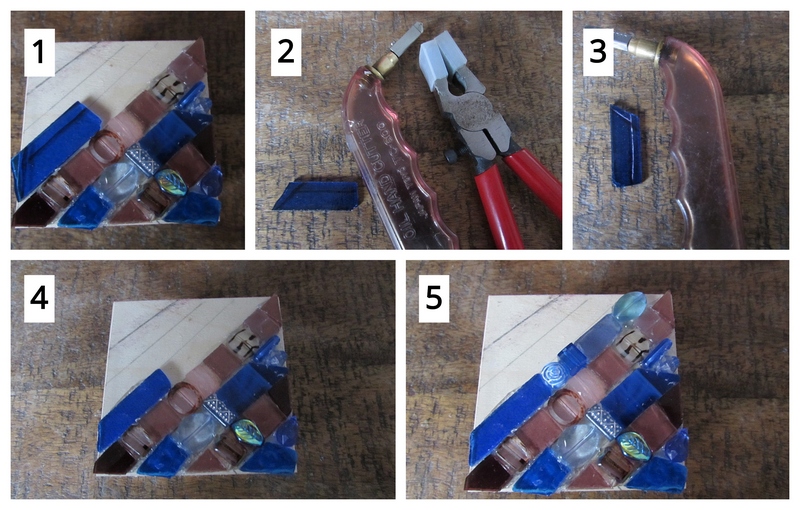
Complete the top of your box by repeating this process.

Continue your design down the first side of your box.
Make certain that you keep the design separate on the top of your box from the base of your box allowing you to open and close the box.
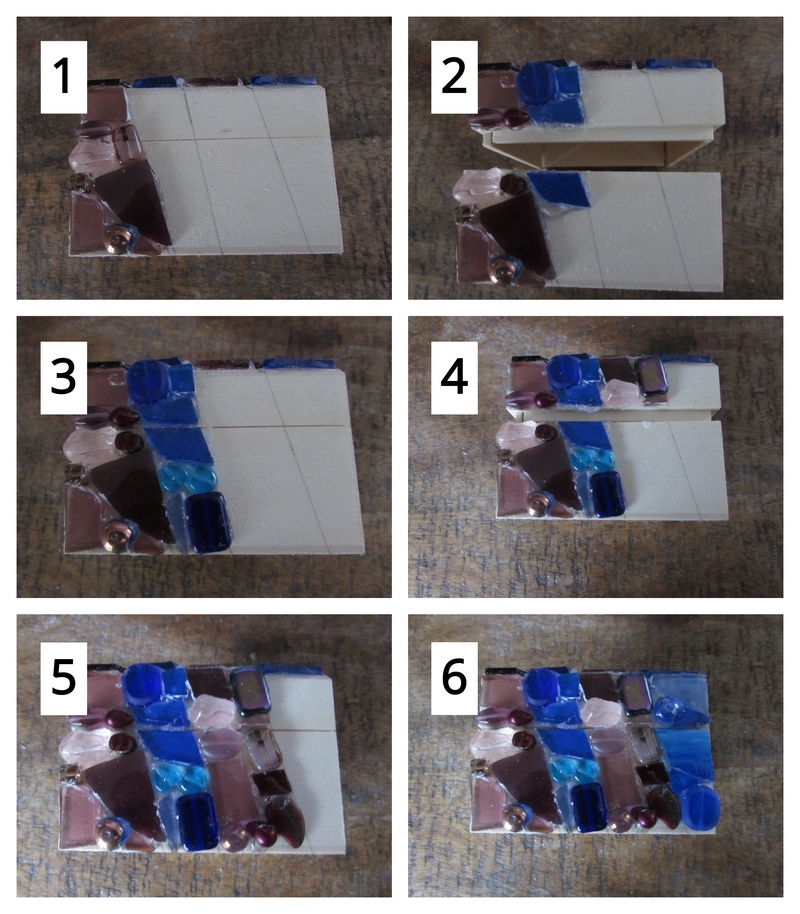
With the first side of your box completed, we can now move on to the second side.

Next, complete your third side.

And finally, repeat this process one last time for the fourth side of your box.
Full mosaic coverage achieved!

*Tip: It’s a good idea to remove any excess glue from between any of your pieces and along any joint line so that your grouting process goes smoothly. You don’t want to have to stop and remove excess glue when you’re in the middle of grouting.
Now, Time to Grout!
You’ve covered the entire outside of your box with pieces of glass and beads. It’s now time to grout it and turn your little wooden box into one that looks like it’s made of stone and glass.
We need to prepare our grout mixture, cover the top and all four sides with it and then clean it thoroughly.
If you’ve never grouted before, check out my post on how to grout your DIY mosaics here.
Step 5: Gather Your Grouting Materials
To grout, all you’ll need is your dry grout, latex additive, mixing bowl, spoon, old cloths or towels, garden gloves and water.
Cover the surface that you’ll be grouting on with an old towel or newspaper to prevent staining the surface with your grout.
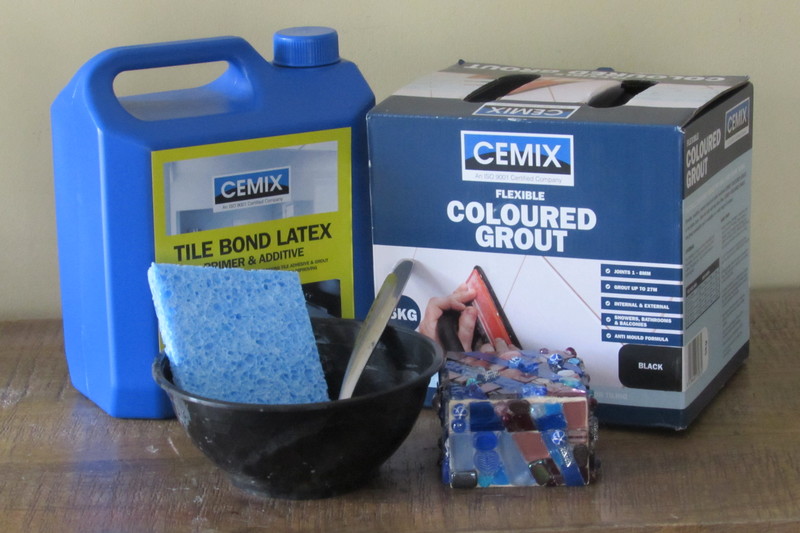
Step 6: Mix, Apply and Clean Off Your Excess Grout
Now you’re ready for the actual grouting process. First, place your dry grout into your mixing bowl and add enough liquid latex additive to achieve the consistency of oily peanut butter when it’s fully mixed.
Don’t worry if you make the mixture too soupy as you can always add more dry grout to the mixture to achieve the correct consistency.

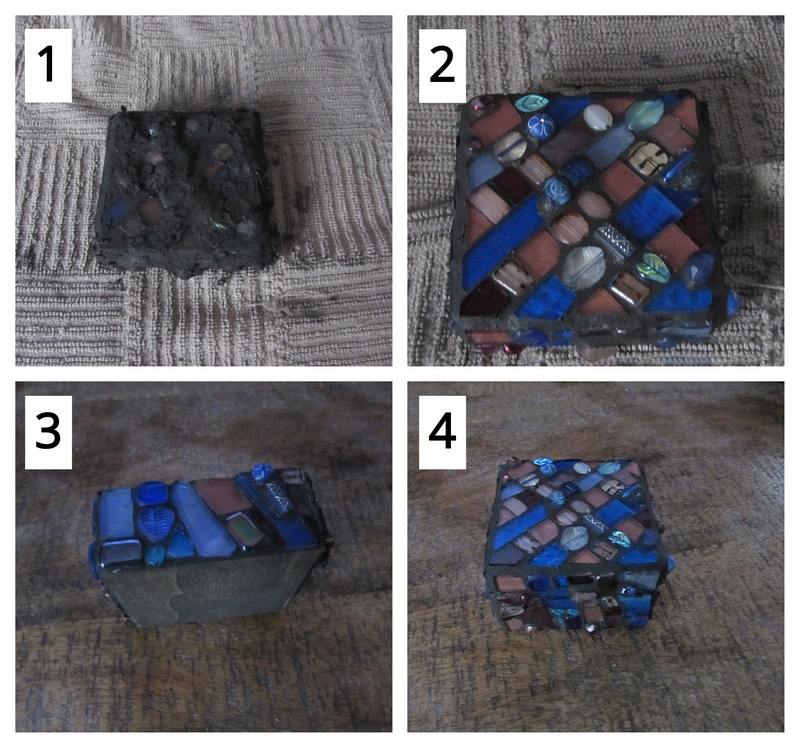
Once your grout mixture is ready, cover the outside of the top of your box with some of it.
Take your moistened sponge and clean off any excess grout. Make sure you’re near a water source as you’ll need to wash your sponge out repeatedly.
Then take an old towel or rag and finish cleaning the top.
Grout the top and base of your box separately as you want adequate time for cleaning both.
Make sure to take your time and create a nice smooth grout joint where the top and tops sides meet. Smooth the grout out with your finger tip.
Repeat this process for the base of your box also.
*Tip: I recommend a final cleaning of each piece of glass and gem with a microfiber cloth to make sure you’ve removed all the grout residue as you want the glass surface to shine.
Step 7: Paint the Other Surfaces of Your Box
Paint the inside of your box with a dark gray acrylic paint to match the color of your grout as black grout dries to a dark gray.
Paint the inside of your top and the bottom also.

Step 8: Line Your Box
Now let’s make this mosaic box even more special. Let’s line the inside with some special paper or fabric.
First the paper lining. Simply cut a piece of craft lining paper to fit both the bottom of your box and the inside of your lid.
Then simply glue the pieces in place.
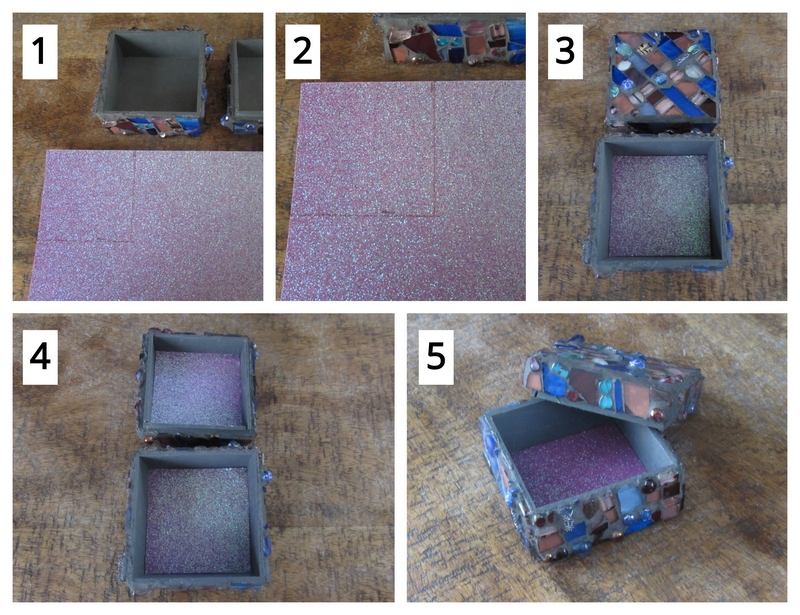
The other option is to line the box with velvet cloth.
Place some object the same size as the diameter of the bottom of the box on top of the fabric that you place inside your box. Cut diagonal slits on all four corners, as you would when wrapping a package, and glue your material neatly in the bottom of your box. Alternatively, you can line the bottom of the box with adhesive and simply fold the material in to fit.
Repeat these steps for lining your lid and embellish your velvet lining with some gems if you’d like or perhaps an engagement ring!

As you can see, by using black grout, which dries to a dark gray, and dark gray acrylic paint, you achieve the look of a stone box. It has a very vintage feel to it.
Great way to take a $2 craft box and create something extremely unique. The weight of the box changes too as a result of grouting it. It feels weighty an authentic. I personally love the velvet lining:) As I can only imagine a lovely pair of diamond earrings resting upon that deep burgundy velvet:) What a lovely way to deliver a special gift as such to someone very special!
I hope you enjoyed this project and it sparks up all kinds of creative ideas for resurfacing other objects besides boxes as the possibilities are completely endless.
Thanks so much for you interest in mosaics!!

Danielle is the mosaic artist and teacher behind Mosaics Mostly. She has been creating mosaics for over 25 years, and has taught hundreds of people to create their very own mosaic DIY projects at home. She has been featured in multiple galleries and magazines, and has even had her own beginner mosaics book published! She loves crafts, and is always working on something new!
