We all love to decorate our patios and gardens with beautiful things. Besides, our lovely plants deserve beautiful pots to live and grow in! Makes them happy!
Creating a gorgeous planter doesn’t have to be expensive or difficult and that’s what this project is all about.

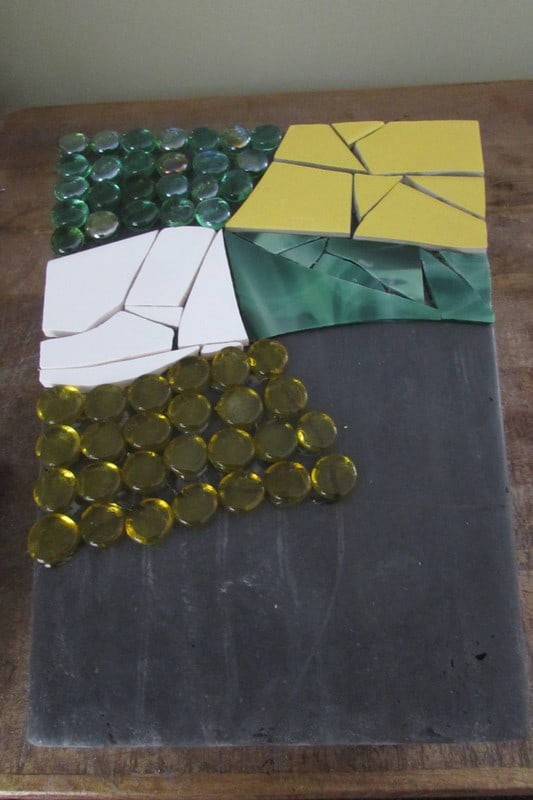
I’ll be combining three different materials for this project, ceramic tile, stained glass and glass half marbles. The contrast between the three different materials will create a very contemporary dynamic design!
Materials Needed for DIY Mosaic Planter
- Cement or Terracotta planter
- Scrap stained glass
- 2 different color of glass half marbles
- 2 different colors of ceramic tile
- Glass cutter
- Running pliers
- Mosaic cutter
- Glass grinder
- Clear water resistant adhesive
- Black grout
- Latex additive
- Mixing bowl, spoon, old rags, sponge, marker and pencil
- Safety glasses
How to Make Your Own DIY Mosaic Planter
Below you’ll find my step-by-step instructions on how to make your own lovely mosaic planter at home. Let’s get started!
Step 1: Gather Your Materials and Tools
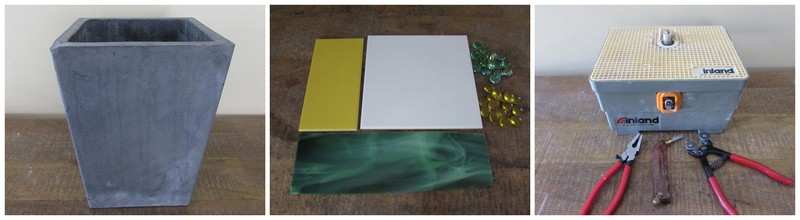
Before we get started, let’s gather together everything that we’ll be using for this project. I have a cement planter that I bought at my local home improvement store, my two different colors of ceramic tile, my stained glass and my two different colors of glass half marbles. My yellow, white and green theme is my daisy theme! All these colors already exist in most everyone’s garden, so this mosaic planter will fit right in!
*Tip: The glass half marbles can be purchased from most craft stores and stained glass shops in addition to Amazon having a wide selection to choose from. They’re available in different sizes and in a variety of finishes. I’ve select translucent green and yellow ones for this project but they’re also available in opaque finishes (meaning no light passes through) and opalescent finishes (meaning a pearl like sheen).
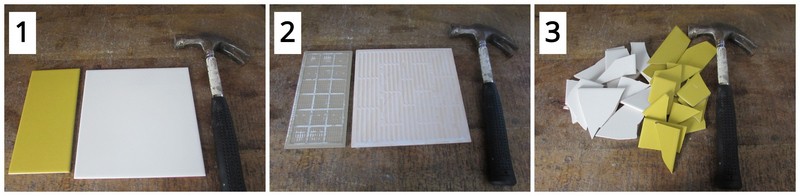
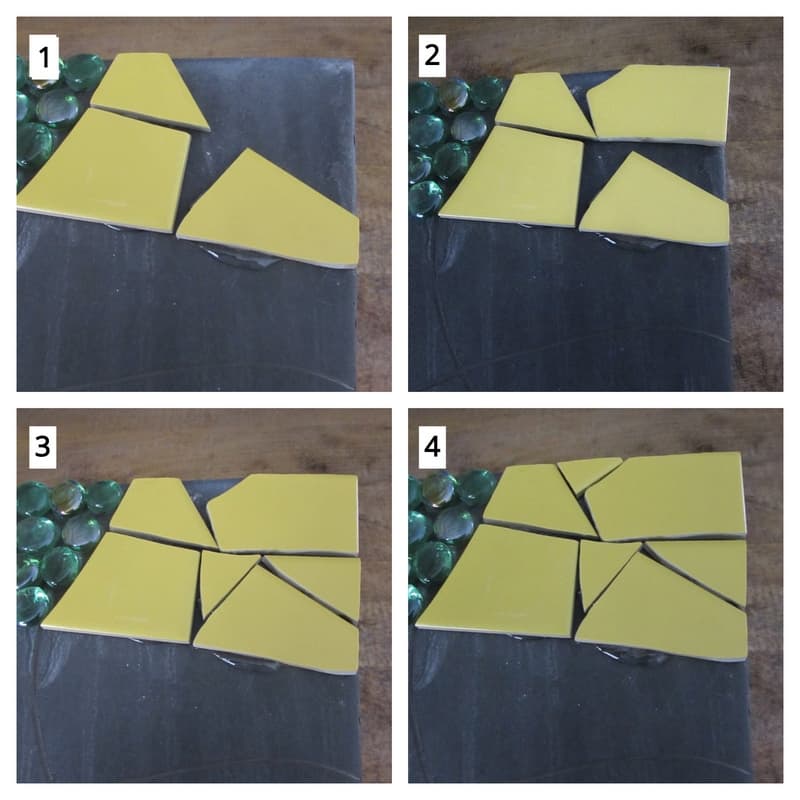
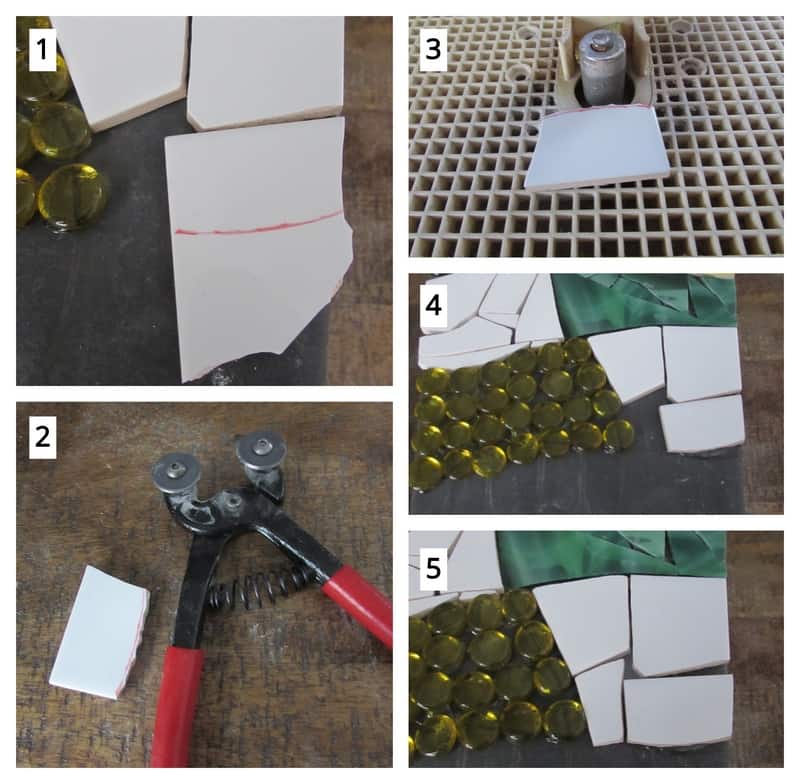
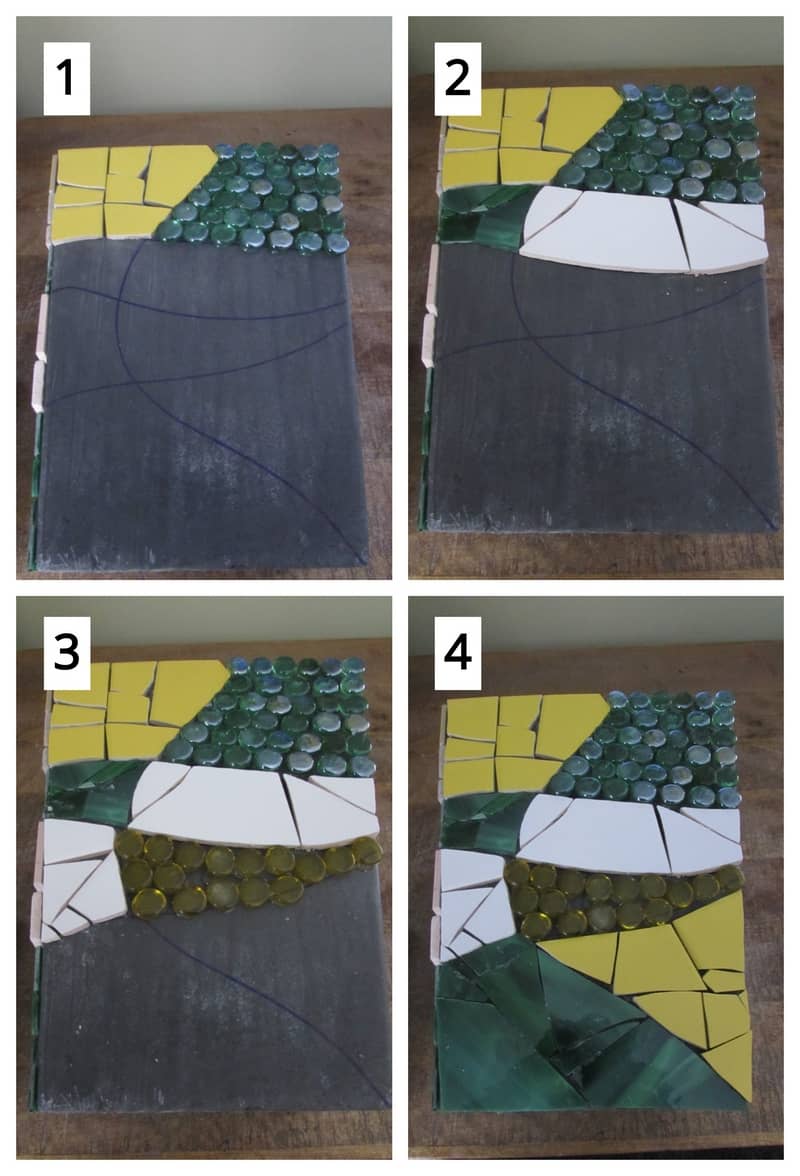
Step 2: Break Up Your Tiles
If you need to blow off any steam, a mosaic project using tile is the way to do it! Smashing your tiles up is quite therapeutic when you’re feeling tense!
You’re going to break up your tiles with a regular old hammer. Turn your tiles over so that you’re breaking them on their back side so as not to damage the surface finish.
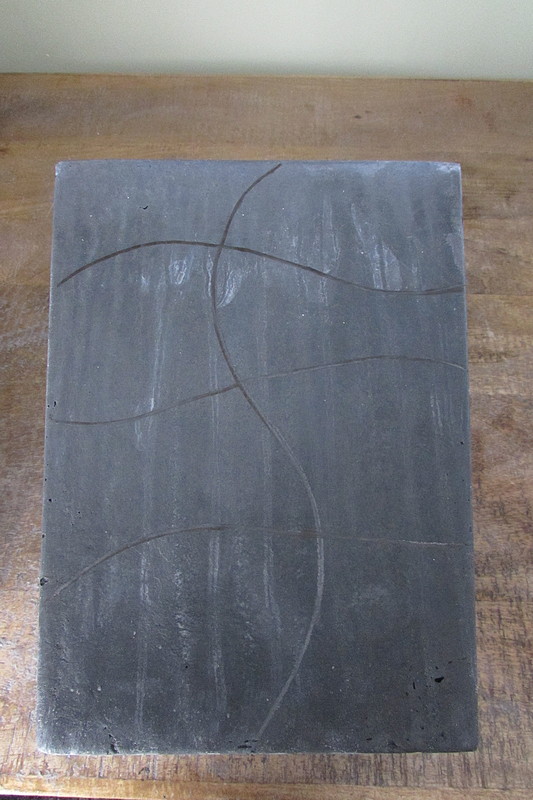
Step 3: Draw the Design on Your Pot
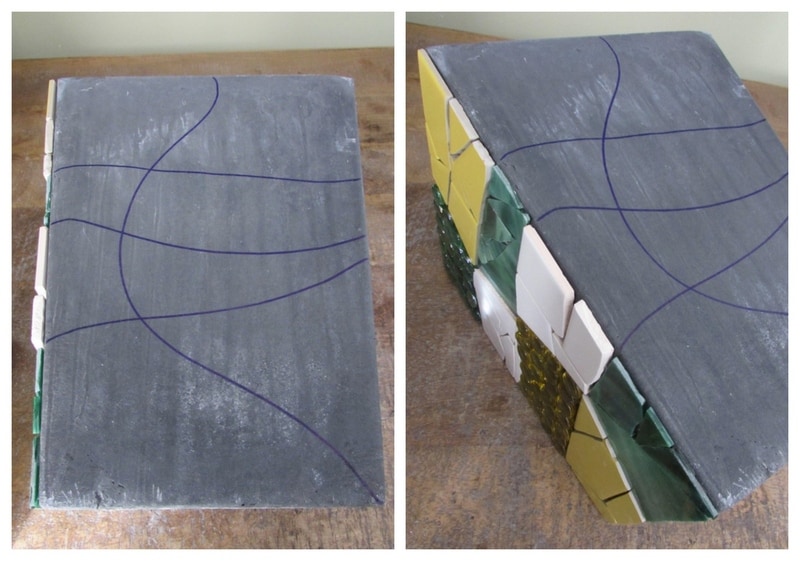
Take a carpenter’s pencil or marker and draw your design on the first side of your planter. I’ve decided to create a connected design meaning it will flow around the container in a pattern.
Step 4: Glue Your Materials Onto Your Planter
We’re going to start by gluing on green glass half marble in the first section of the design. You’re going to glue the marbles down with the flat side of the marble top side. This will give you a nice smooth flat surface to grout eventually.
The other reason for using these glass half marbles is that when they are glued on to a surface flat side up, they just happen to be the same thickness as floor tile. This creates an nice flush surface all over the exterior of your planter. I figured this out years ago when when working with both materials for an exterior patio project in South Carolina. SShhh! It’s a bit of a secret!
It’s critical that you use clear water resistant adhesive with all outdoor mosaic pieces as grout is porous and you don’t want water penetrating through the grout joints and getting underneath your individual pieces causing damage to your mosaic. I’ve seen this happen many many times to people attempting an outdoor mosaic project that use regular adhesive that is not water resistant with tragic results.

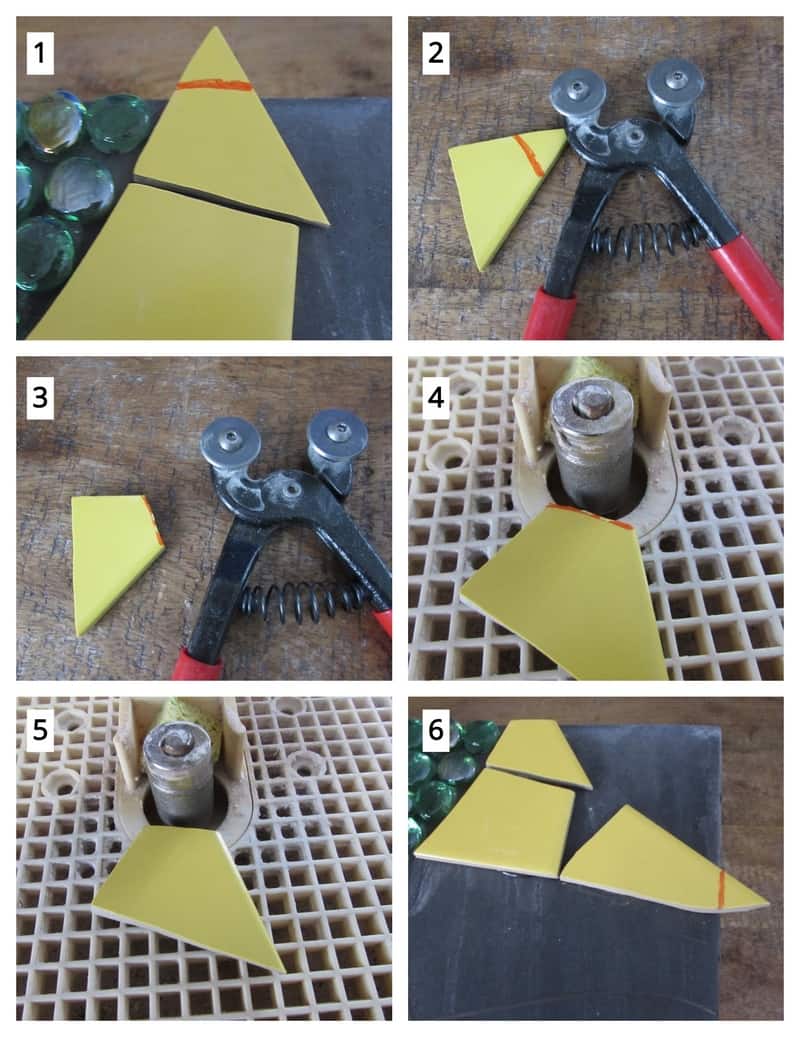
We’ll move on to the next section and begin gluing on pieces of your broken yellow tile. You’ll need to mark pieces to fit and cut them with your mosaic cutters. Then the piece is taken to the glass grinder when necessary for shaping and smoothing. The piece is then glued in place. This process will be repeated over and over until that section of the design is complete.
If you’ve never sculpted tile on a glass grinder, check out my post on how to sculpt tile on a glass grinder here.
*Tip: I use mosaic cutters to cut both tile and glass but you can use tile nippers if you feel more comfortable using them to cut your tile pieces.
I also use a coarser grinding bit on my glass grinder to shape and smooth tile verses glass.
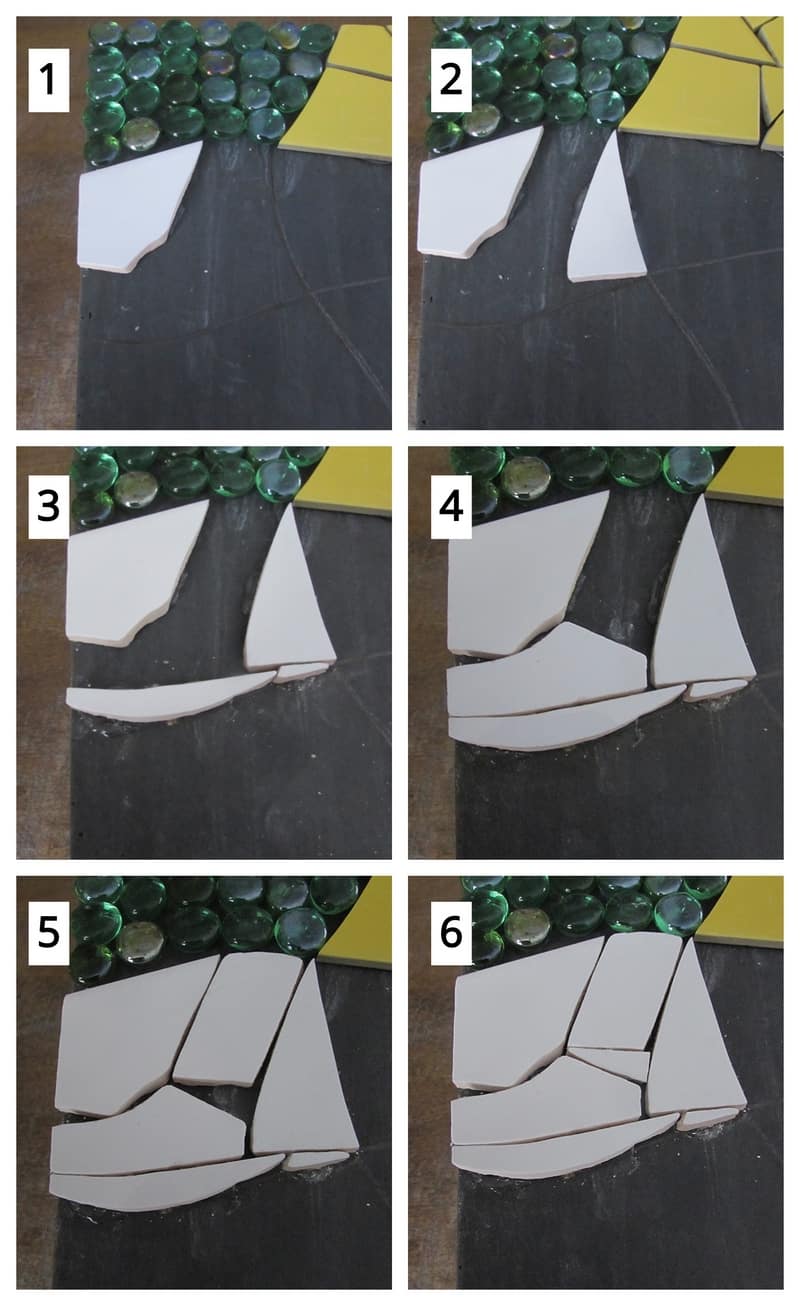
The same steps will be repeated for your white tile section.
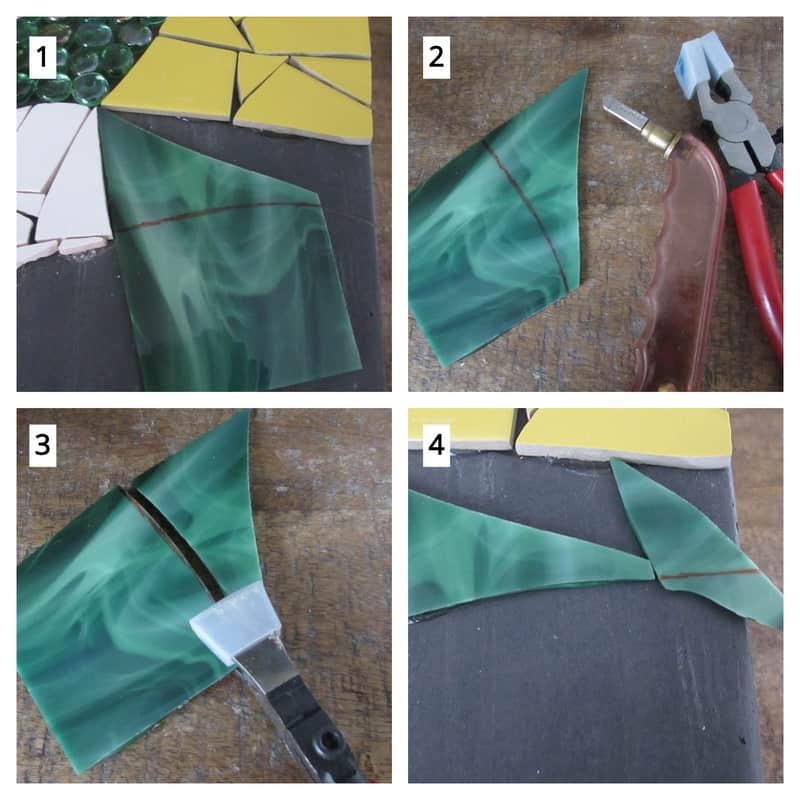
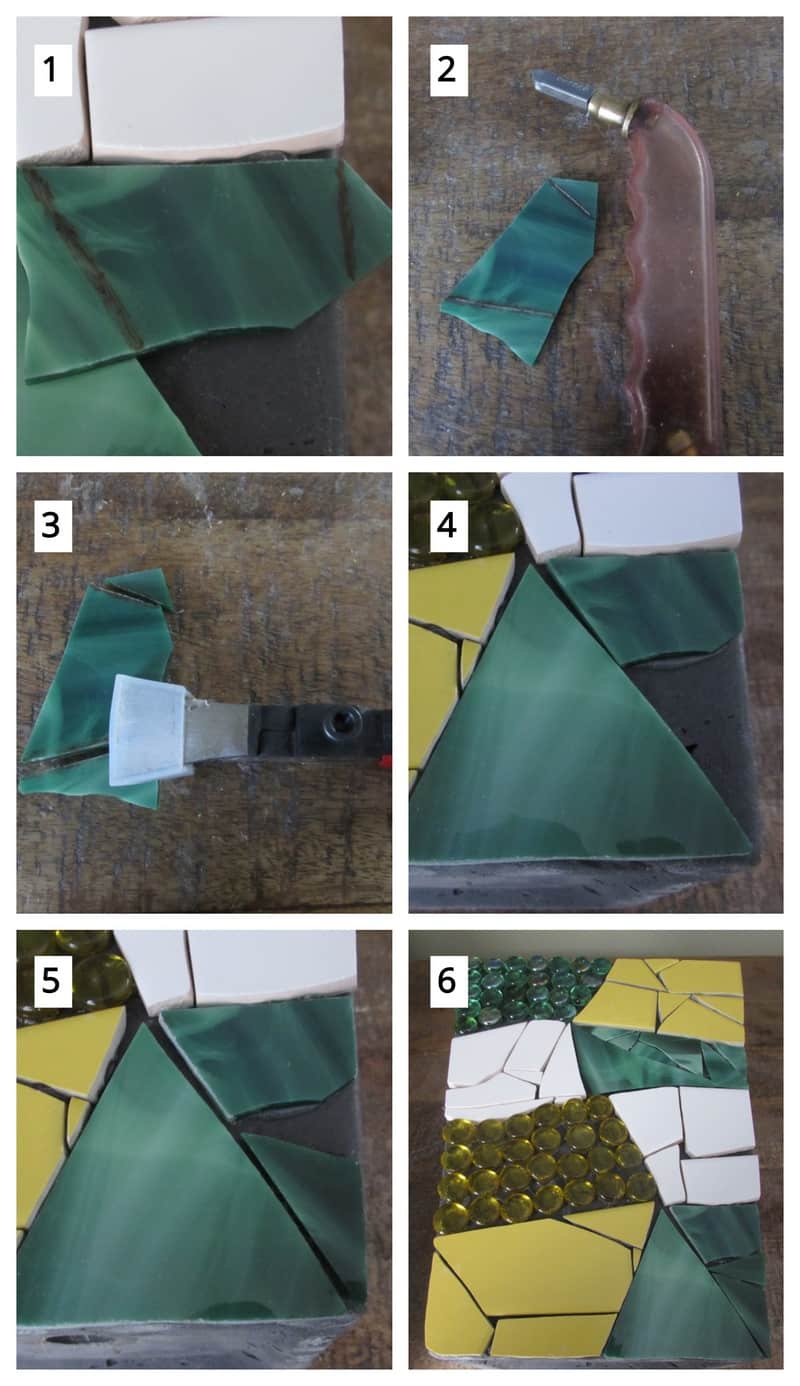
It’s now time for our stained glass section. Score the glass with your glass cutter. When scoring your glass make certain you slide the diamond head of your glass cutter across the surface of your glass in one direction. Never move across the glass in a back and forth direction as you confuse the glass by doing so and it may not break properly.
Break the score by lining up the center of the tip of your running pliers with the scored line and apply just enough pressure to break the score.
Glue the piece in place and mark another to fit. Continue this process of marking, scoring, breaking the score and gluing on until the entire stained glass section is completed.
If you’re new to creating mosaics and need to learn how to cut glass properly, check out my post on how to cut stained glass here.
Fill the next section with yellow half marbles. Remember to glue the marbles down with their flat side up.
Start your next white tile section. Mark pieces to fit, cut them with your mosaic cutter, smooth the edges with your glass grinder and glue the pieces in place.
Repeat this process again for your next yellow section.

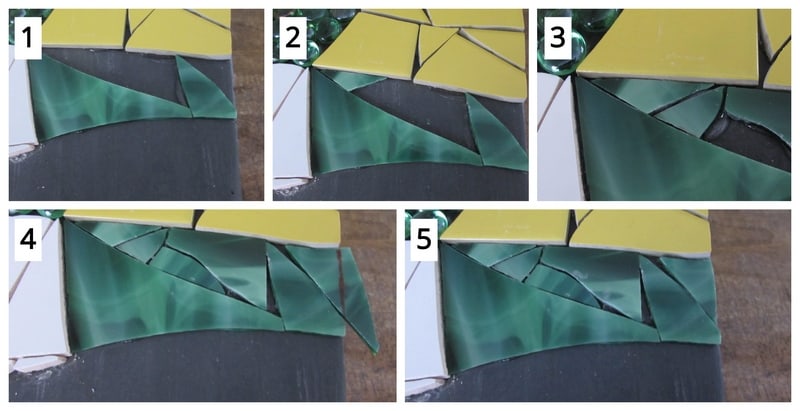
To finish the side we’ll now complete our final stained glass section. Repeat the same process as for the first stained glass section you covered.
First side of your planter has full mosaic coverage.
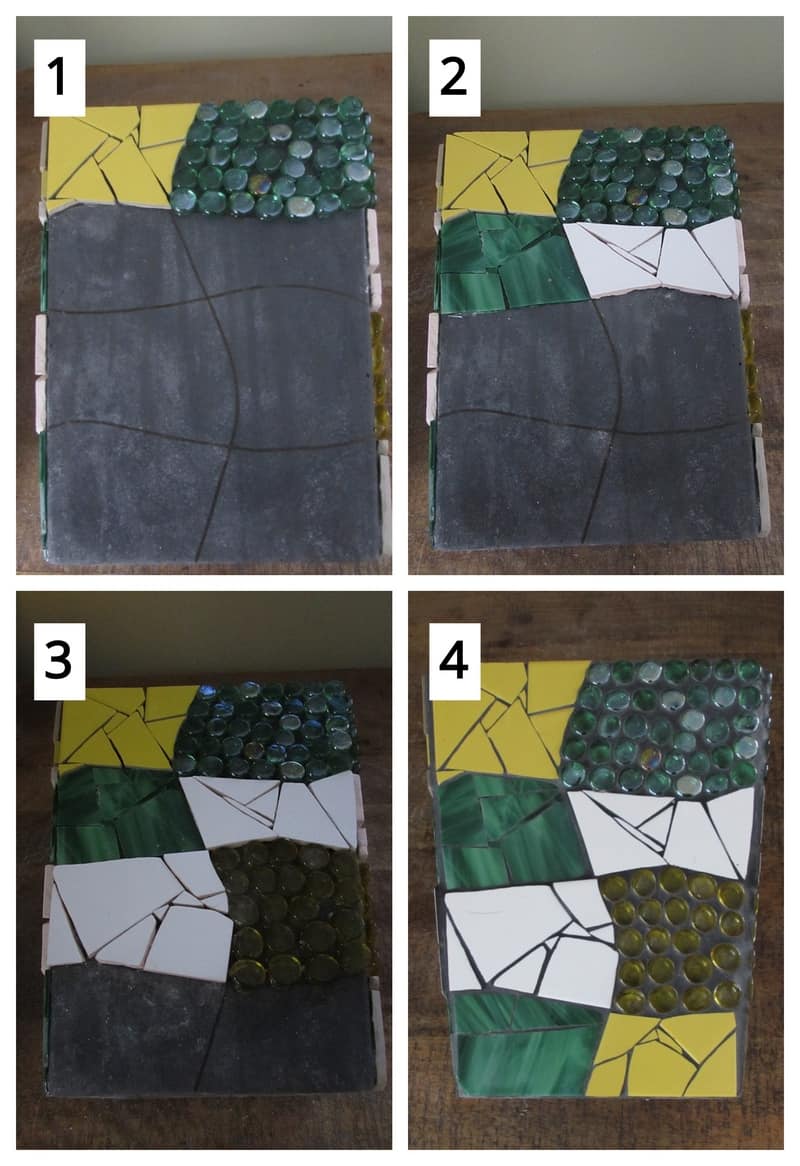
Repeat this process on the other three sides of your planter.
Draw a similar pattern on each side of your planter making sure to connect the sections horizontally.
Second section complete.
Third section complete.
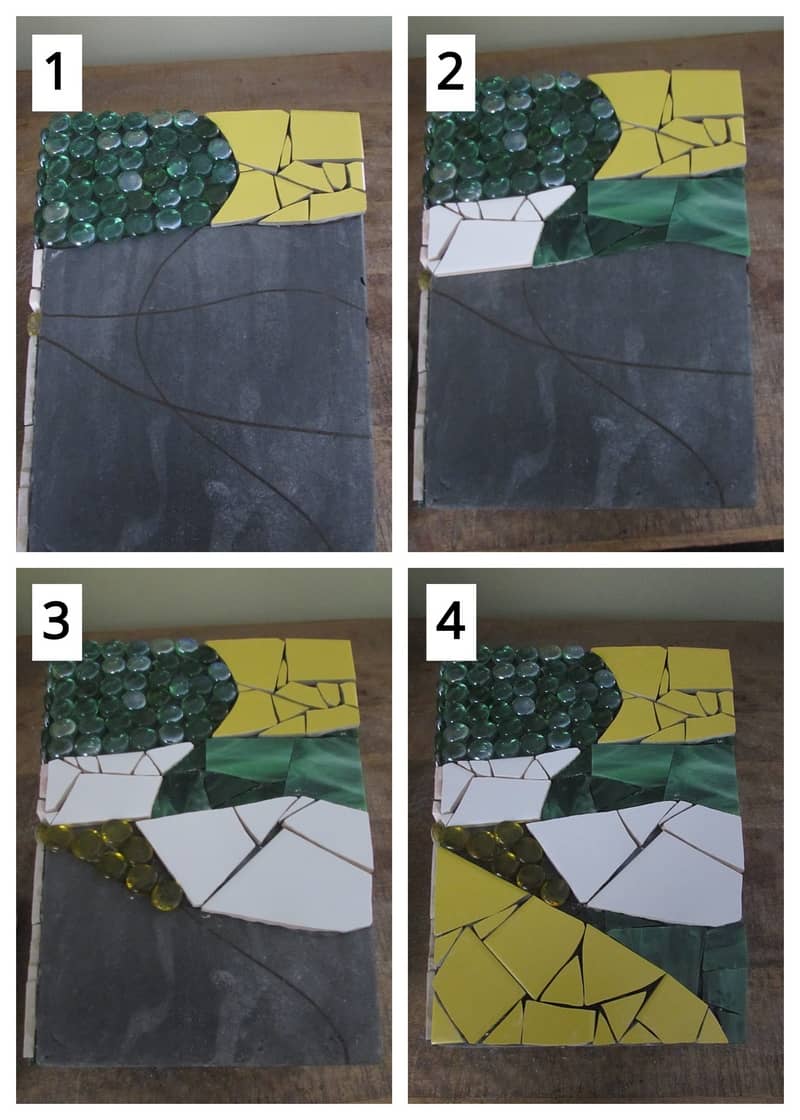
Fourth section complete.
Step 5: Gather Your Grouting Materials
To grout your planter you will need your grout, latex additive, mixing bowl, spoon, old cloths or towels, sponge, water and your planter. Make sure that you cover the surface where you will be grouting with old news paper or towels so as not to stain the surface.
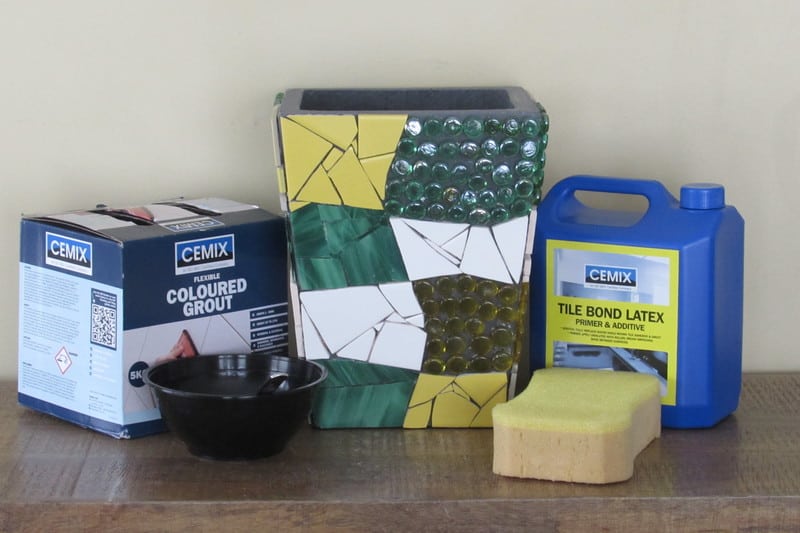
Step 6: Mix, Apply and Clean off Your Excess Grout
You’re now ready for the actual grouting process. Mix enough latex additive into our dry grout to achieve the consistency of oily peanut butter. Don’t worry if you’ve added to much additive, you can always add more grout to correct it.
The reason that you are using latex additive to create your grout mixture instead of water is so your lovely mosaic planter does not develop cracked grout lines due to the heat or the cold that the planter will be subjected to. The latex additive gives the grout mixture an elasticity so that it doesn’t crack during extreme temperature changes.

Once your grout mixture is ready, cover the surface of your first side with the mixture. Make sure you cover the entire surface.
Now take your dampened sponge and begin cleaning the excess grout off of the surface.
After you’ve removed the majority of the excess grout with your sponge, continue cleaning the surface with your old rags or towels.
Repeat this process for all 4 sides of your planter.
When you have all four sides cleaned, take time to grout the joints or the seams between each side. You don’t want a messy joint line on your planter, so take the time to add additional grout and smooth it out with your sponge and cloths.
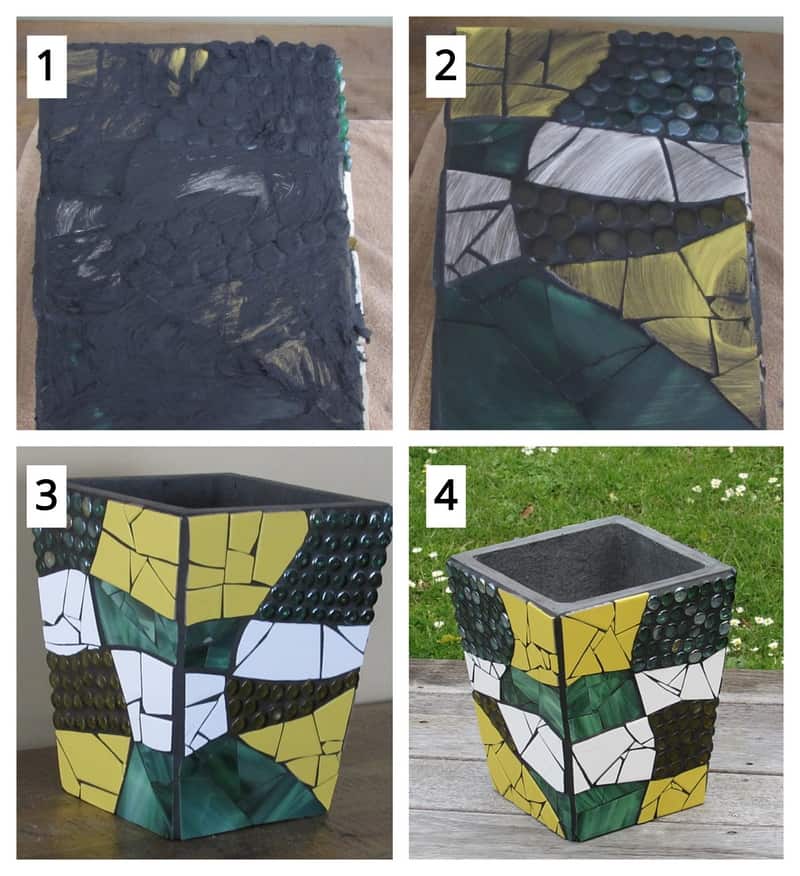
You’ve now created a lovely contemporary mosaic planter for your home. The black grout really makes this piece. By grouting the piece black you create that drama that only black grout can produce. The grout lines are bold and definitive. This planter would look absolutely different if, let’s say, we would have grouted it with white grout. All the white sections would have no definition between each piece as they do with the black grout. All the other sections would look extremely different also. It’s always your choice to use whatever color grout you’d like to. Just make sure you give it some good thought as to how you’d like the finished piece to look.
The other option you have is painting the exterior of the planter white before gluing on your pieces. If we would have done that for this project, the yellow glass half marbles would show up yellow instead of the subdued look that they have here because they were glued on to a dark gray surface.
i also decided on black grout because it blends well with the dark grey planter base. The joints between each side are basically the same color as the cement planter which creates a continuity throughout the piece which is what I was hoping to achieve by wrapping the design around the planter.
Note: If you were wanting the color of the glass half marbles to be more distinct – stand out more – you’d simply need to paint the cement planter white before gluing on all your pieces. My intent with this design was to achieve a more subdued contrast with the half marbles and the other materials I covered the planter with.

Danielle is the mosaic artist and teacher behind Mosaics Mostly. She has been creating mosaics for over 25 years, and has taught hundreds of people to create their very own mosaic DIY projects at home. She has been featured in multiple galleries and magazines, and has even had her own beginner mosaics book published! She loves crafts, and is always working on something new!

I take pleasure in, cause I found exactly what I was having a look for.
You have ended my 4 day long hunt! God Bless you man. Have a nice day.
Bye
My pleasure! Enjoy the site!