Mother’s Day is the one day of the year specifically dedicated to acknowledging Mom (or Mum as they say in New Zealand) as being very special to each and every one of us. We all have one, so why not take the time to make her something that she will treasure forever! I’m making my New Zealand mother-in-law something dazzling for her room in her rest home:)

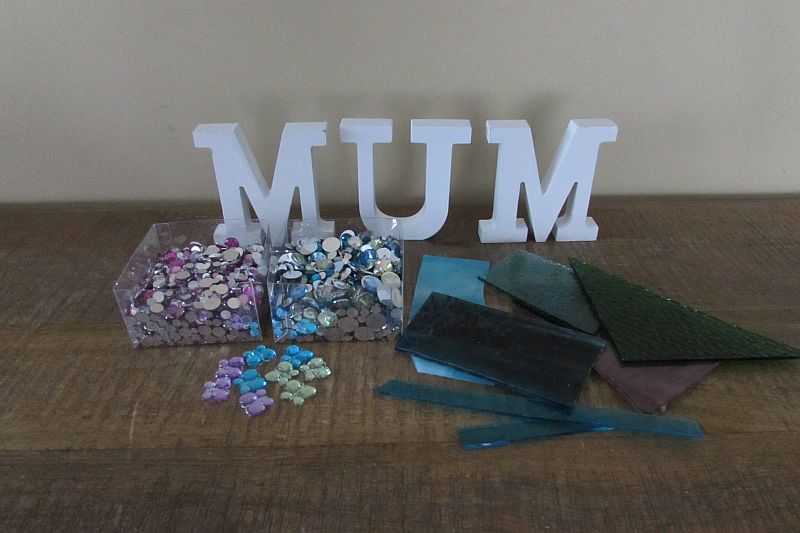
I found these wooden letters at a craft store for $2 each. I thought they needed some jazzing up so I brought out the acrylic gems and stained glass scraps I had on hand to do just that. I was going to spell out her name but decided to personalize it more by spelling out “MUM” which is what I’ve called her from the moment I met her.
Materials Needed for DIY Mosaic Mother’s Day Project
- Wooden letters
- Acrylic or glass gems
- Scrap stained glass
- Clear water resistant adhesive
- Mosaic cutters
- Running pliers
- Glass cutter
- Black paint
- Black grout
- Latex additive
- Sponges, cloths, paint brush, bowl and spoon
- Safety Glasses
- Garden Gloves
Step 1: Gather Your Materials and Tools
Before you get started, make sure that you have everything you need for your project within arms reach.
I decided to do a turquoise, blue-green and lavender-plum theme for these letters so I gathered together all the gems and scrap glass that I had in those colors to cover the letters with.
My mother-in-law loves butterflies:) So I’m using three acrylic butterfly gems on each one of the letters that I will then surround with scrap glass and other gems.
Tip: Scrap stained glass can be purchased by the pound or bag at all stained glass shops. Most craft shops sell bags of scrap glass now for mosaic projects and you can also order bags of scrap glass from Amazon.
Additionally, gorgeous acrylic and glass beads can be found at any craft shop and purchased off Amazon. When incorporating beads into your design, always select beads that can be glued down on their sides so that once grouted, the holes in each bead are not visible.
Step 2: Cut Your Glass
Time to cut your glass squares for your project.
Take your glass cutter and score the turquoise glass vertically and then horizontally.
Then take your running pliers and break out all of your horizontal scores leaving you with strips.
Then break out each individual vertical score leaving you with a pile of squares.
Repeat this process for the lavender, blue and blue-green glass.

Step 3: Glue on All of Your Gems and Glass Pieces.
Begin gluing on your glass squares and acrylic gems. Stagger the two different colors of stained glass to create a contrast between each piece.
Continue gluing on more stained glass piece and acrylic gems. Stagger the different colors of gems also to create a contrast between each piece.
Completely cover the surface of the letter.

Begin your lavender-plum second letter by gluing on your butterfly gems.
Begin gluing on your stained glass squares and gems staggering the colors to create a nice contrast.
Completely cover the surface of your second letter.

And finally, begin gluing blue-green glass and your acrylic gems on your third letter.
Stagger the glass squares and the acrylic gems to create a nice contrast between each piece.
Completely cover the surface of your third letter.
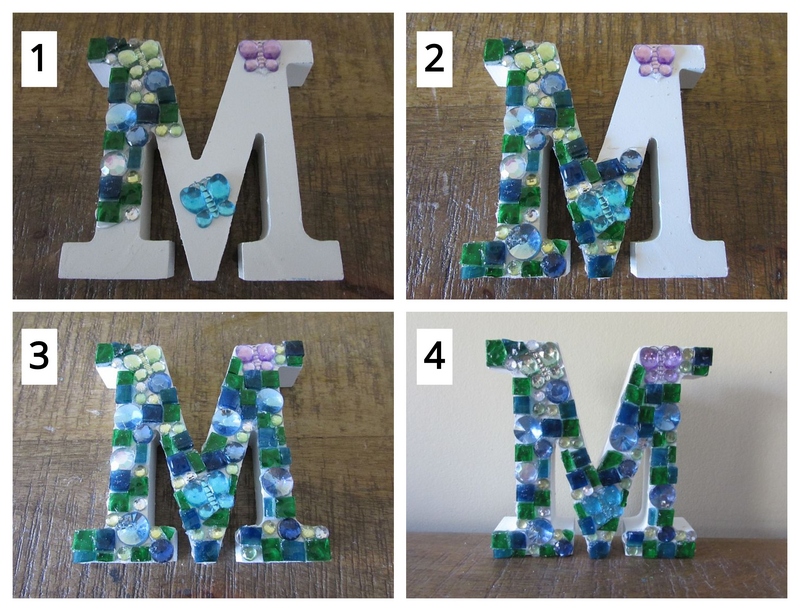
All three letters are now ready for grouting!

Time to Grout!
You’ve covered your letters with lovely glass and acrylic gems. You’re more than half way done! The last portion of this process involves grouting the surface of each letter and then finishing up with painting the remaining uncovered surfaces of each letter.
We’ll need to prepare our grouting mixture, apply it all over the front surface of each letter that we’ve covered with glass and acrylic gems and then clean those surfaces thoroughly.
If you’ve never grouted before, check out my post on how to grout your DIY mosaics here.
Step 4: Gather Your Grouting Materials
To grout, all you’ll need is your dry grout, latex additive, mixing bowl, spoon, old cloths or rags, garden gloves and water.
I recommend covering the surface that you’ll be grouting on with either newspaper or old towels to prevent any of the grout from staining your surface.

Step 5: Mix, Apply and Clean Off Your Excess Grout
Now you’re ready for the actual grouting process. First, you’ll want to pour some of your dry grout into your mixing bowl and then add enough latex additive to achieve the consistency of oily peanut butter.
Don’t worry if you make your mixture too soupy. Just add more dry grout until you achieve the proper consistency.

Cover the letters with your grout.
Begin cleaning the letters with your moistened sponge.
Continue with your cleaning until all the grout is removed from the surface of the glass and gem stones.
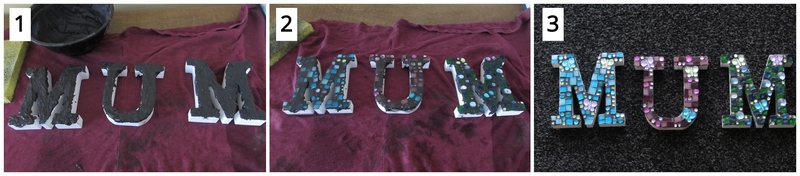
Step 6: Paint All the Other Surfaces of Each Letter
After the grout has dried, paint all the other surfaces of your letters black.
Your dazzling Mother’s Day present is now completed for either standing on a surface….
Or if you prefer, glue small rings on the back of each letter so the letter can be hung on small finishing nails.


Danielle is the mosaic artist and teacher behind Mosaics Mostly. She has been creating mosaics for over 25 years, and has taught hundreds of people to create their very own mosaic DIY projects at home. She has been featured in multiple galleries and magazines, and has even had her own beginner mosaics book published! She loves crafts, and is always working on something new!
