I love decorating for Halloween!! I saw this paper mache skull at my local craft shop for $2 and I thought I’d give it go to make it look creepy by covering it in bit of white scrap stained glass and inserting orange scrap stained glass in the open cavities and then lighting it up with fairy lights.
This projects is a great beginners project as it mostly requires your fitting the small mosaic pieces of glass in a tight pattern all around the skull with the use of a glass cutter, running pliers and mosaic cutters.
Materials Needed for DIY Mosaic Halloween Skull
- Paper mache skull
- White opaque scrap glass and orange translucent scrap glass
- Glass cutter
- Running pliers
- Mosaic cutters
- Clear water resistant adhesive
- Black grout
- Latex additive
- Mixing bowl, spoon, sponge and old rags
- Safety glasses
- Garden gloves
How to Make Your Very Own DIY Mosaic Halloween Skull
Below you’ll find my step-by-step instructions on how to make your own mosaic Halloween skull decoration! Let’s get started.
Step 1: Gather Your Materials and Tools

Before you get started, you want to make sure that everything you need for your project is close by.
For this particular project, I’m using a paper mache’ skull, opaque white scrap glass and some orange translucent glass for the eyes, nose and jaw sockets.
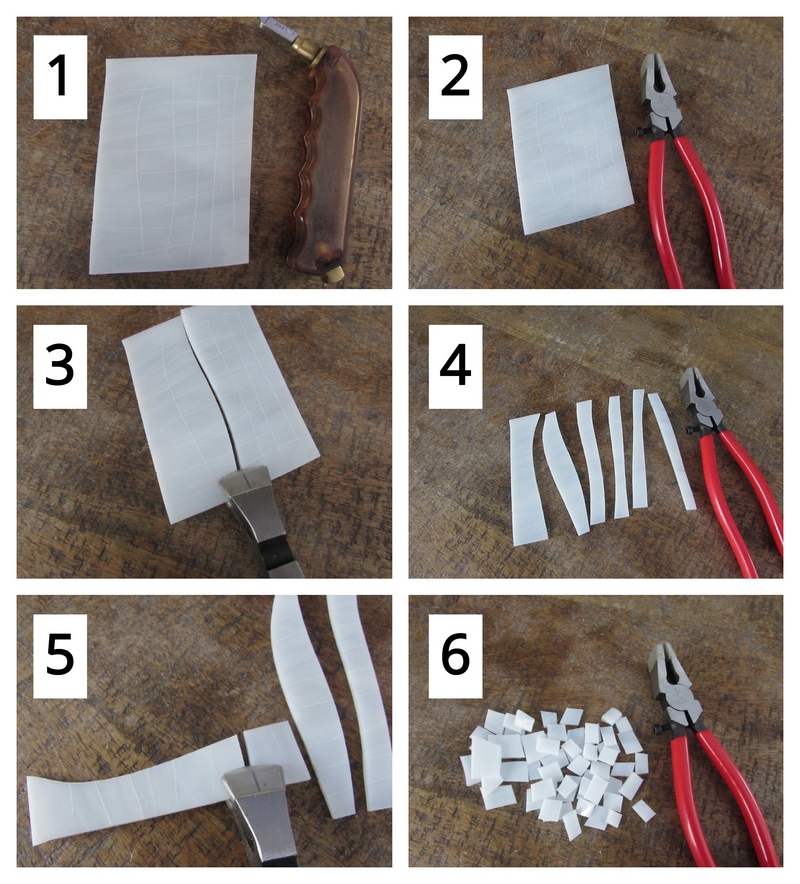
Step 2: Cut Your Glass
It’s time to create the pieces of white glass that will cover the skull.
Score your glass with your glass cutter with irregular vertical and horizontal lines. When moving your glass cutter across the glass, move in only one direction. Do not score the glass by moving your cutter backwards and forwards to create the score as this will confuse the glass and you may not be able to break out the score properly with your running pliers.
Take your running pliers and line up the center of the tip of the pliers with one of your vertical score lines. Apply just enough pressure to break the score.
Continue to break out all the vertical score lines.
Break out all the horizontal score lines in the same way. Center the tip of the running pliers on the score line and apply just enough pressure to break the score.
You wind up with a pile of irregular squares.
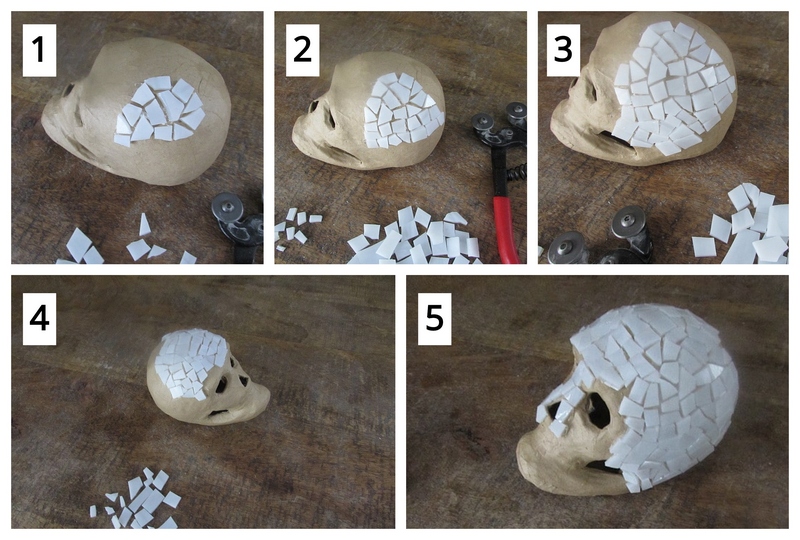
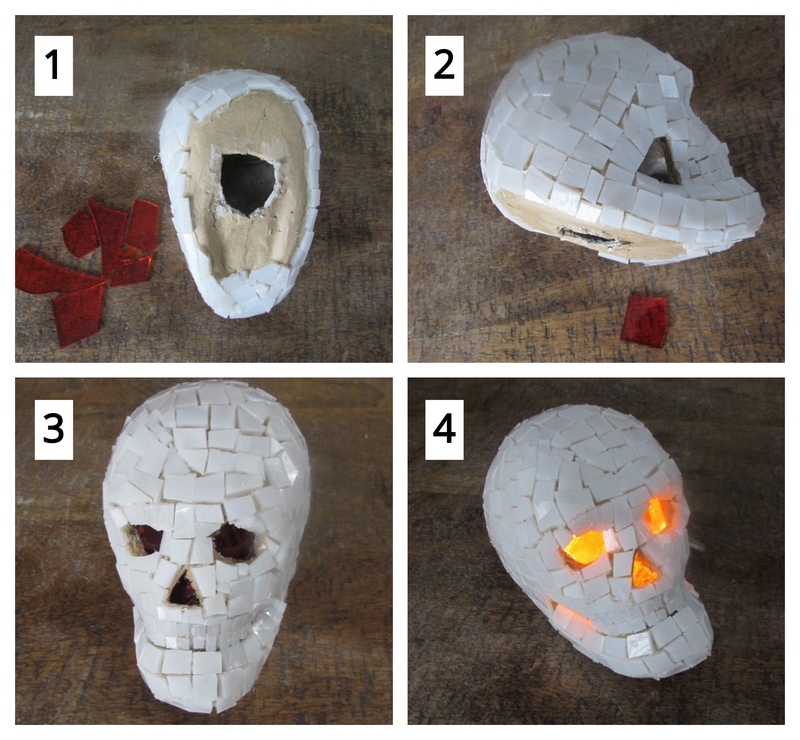
Step 3: Glue the White Glass on Your Skull
Cut the irregular squares into smaller irregular pieces with your mosaic cutters. Begin gluing on pieces on the top of the skull.
Move down the side of the skull and glue pieces on fitting the pieces tightly together in whatever pattern you’d like. Just remember that all these spaces that you’re creating between each piece of glass will be filled with black grout. In saying this, try and be as consistent as possible with your spacing.
Begin gluing on pieces on the other side of the skull.
Begin gluing on pieces on the front of the skull also.
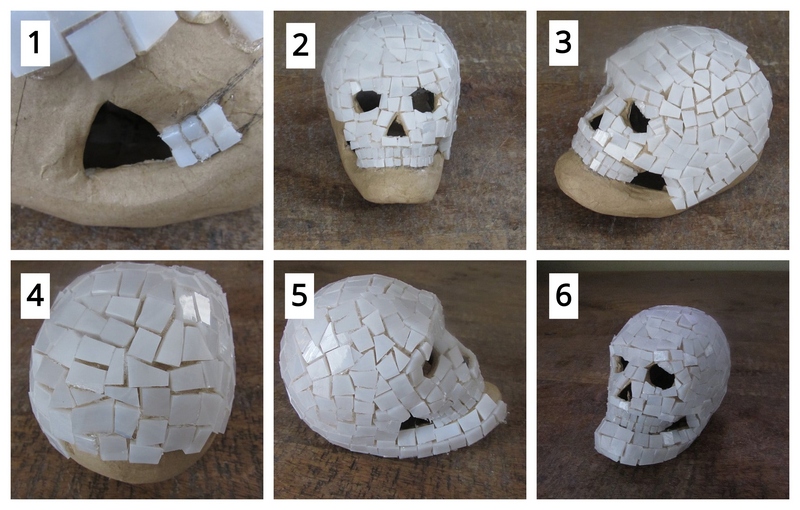
Draw the outline of the mouth so that you clearly see the area where teeth need to be glued on.
Using your mosaic cutters, cut some small square shaped pieces to represent the two rows of teeth. The teeth do not need to be perfectly square as the more irregular they are the creepier it will make the skull! This is for Halloween remember!
Complete the two rows of teeth.
Continue covering the rest of your skull.
Finish the mosaic coverage along the jaw line and the back of the skull.
Continue gluing on white pieces of glass until you achieve complete mosaic coverage.
Step 4: Cut and Insert Your Orange Glass
Cut a whole in the bottom of your skull so that you can insert the orange translucent scrap glass in the sockets.
Put clear water resistant adhesive around all the edges of each piece of orange scrap glass that will fit inside the skull and cover each open hole.
Insert a string of fairy lights and turn them on to see if you’ve covered the holes entirely.
Now, Time to Grout!
You’ve finished gluing on all your glass and now it’s time to grout your skull. You’ll need to prepare your grout mixture, cover your skull with the grout and then clean it thoroughly.
If you’ve never grouted before, check out my post on how to grout your DIY mosaics here.
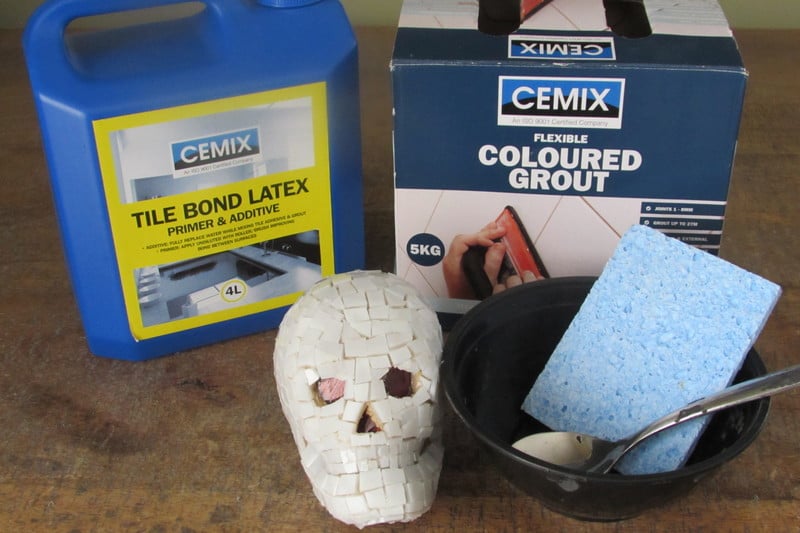
Step 5: Gather Your Grouting Materials
To grout, all you’ll need is your dry grout, latex additive, mixing bowl, spoon, sponge, old towels or rags, garden gloves and water.
I suggest covering the surface that you’ll be grouting on with either newspaper or old towels to prevent any of the grout from staining your surface.
Step 6: Mix, Apply and Clean Off Your Excess Grout
You’re now ready for the actual grouting process. First, put some dry grout in your bowl and pour in enough additive to reach the consistency of oily peanut butter after mixing.
Don’t worry if your mixture is too soupy, just add some additional dry grout until the proper consistency is achieved.

Completely cover the skull with the grout mixture leaving the sockets uncovered by grout.
Clean the grout off the skull with a moistened sponge. Make sure you’re near a water source as you will need to wash the sponge out several times. Use old cloths to clean the remainder of the grout off.
After your initial cleaning, light the skull so that you can see clearly what additional grout needs to be removed.


Danielle is the mosaic artist and teacher behind Mosaics Mostly. She has been creating mosaics for over 25 years, and has taught hundreds of people to create their very own mosaic DIY projects at home. She has been featured in multiple galleries and magazines, and has even had her own beginner mosaics book published! She loves crafts, and is always working on something new!

Greetings from Ohio! I’m bored at work so I decided to browse your site on my iphone during lunch break.
I enjoy the knowledge you provide here and can’t wait to
take a look when I get home. I’m amazed at how fast your blog loaded on my mobile ..
I’m not even using WIFI, just 3G .. Anyways, fantastic site!
You enjoy the site Meagan!!! Thanks for the compliment!