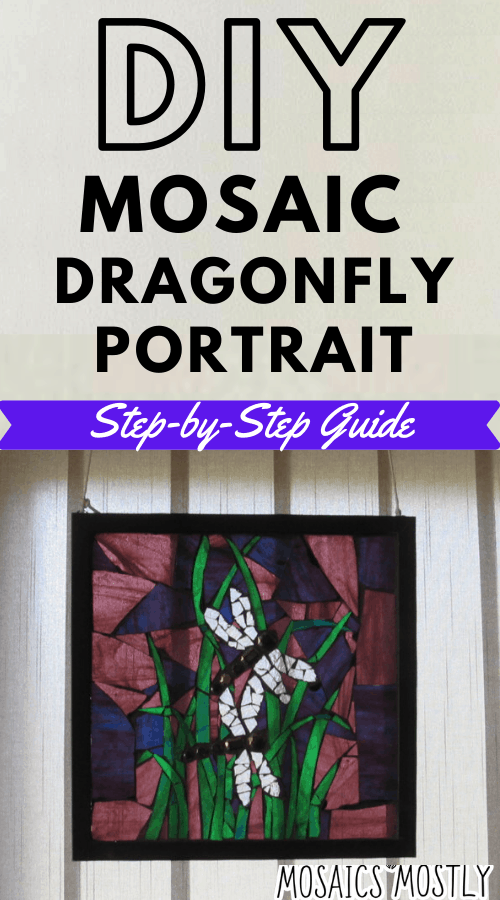
Your $5 picture frame doesn’t have to simply display your favorite photos. It can in fact act as a framed glass canvas for your own personal stained glass mosaic portrait. Using any image you’d like as your template behind the glass, you can create a stunning transparent mosaic, or non transparent mosaic if you so choose, with scrap stained glass and a variety of other materials.
So now, let me tell you exactly what you’ll need to make your very own mosaic dragonfly portrait.
*Tip: This process applies to any size portrait that you’d like to create. Old window panes can be used or larger picture frames. It’s all up to you.
Materials Needed for DIY Mosaic Dragonfly Portrait
- Inexpensive picture frame – your choice of style, color and size
- Your image – your template
- Clear cellophane tape
- Clear water resistant adhesive
- Scrap stained glass, beads, acrylic gems of whatever colors you chose. For this project I have selected 2 transparent shades of violet blue glass for the sky, a semi-translucent green glass for the grass, acrylic gems or beads for the body of the dragonfly or perhaps a brown semi-transparent stained glass for the body…haven’t decided.
- Glass cutter
- Running pliers
- Mosaic cutters
- Tweezers
- Grout
- Latex additive
- Sponge and microfiber cloth
- Mixing bowl and spoon
- Safety glasses
- Garden gloves
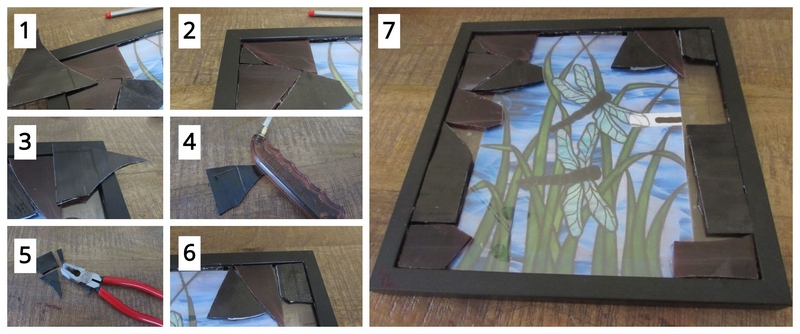
Step 1: Gather Your Materials and Tools and Prepare Your Base
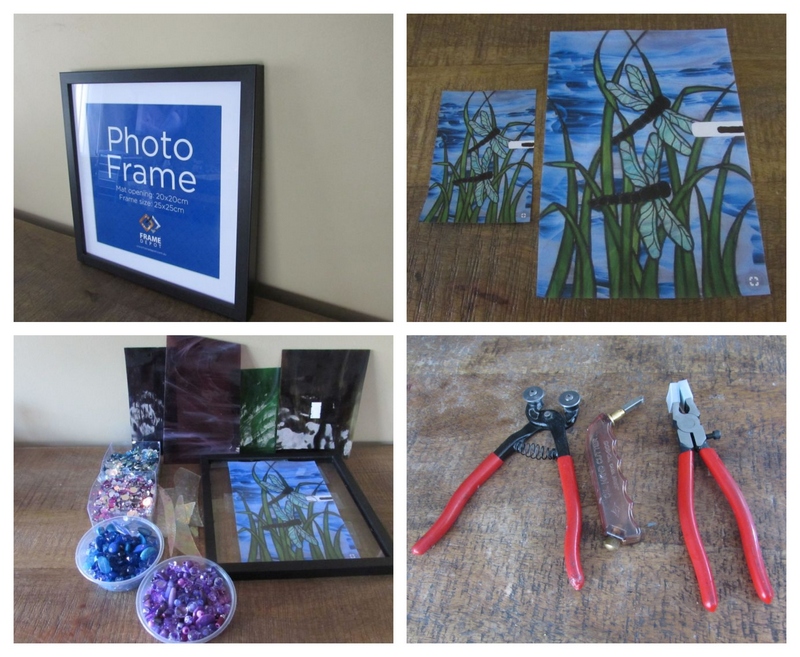
Before you get started, make sure you have everything you’re going to need close by.
I’ve decided to use two different colors of scrap stained glass for my sky background and some lovely acrylic beads for the body of the dragonflies. I found some opalescent lovely translucent glass for the wings.
Find your image and then enlarge or reduce it to fit your frame
Remove the back of the frame and the interior matting. Insert your enlarged image in the frame and tape it on.
Glue the glass into the frame with clear water resistant adhesive. I use clear water resistant liquid nails. This ensures that once the piece is grouted, your grout joint is sealed to prevent grout leaking through to the back of the frame.

The image is adhered to the glass and the glass sheet is glued into the frame. The materials are all gathered together that will be used for the mosaic. You’re ready to begin!
Step 2: Cut Your Glass for your Sky Background
I’ve decided to use violet and violet blue glass for the background.
First, we’ll start by scoring the lighter violet glass in an irregular way with your glass cutter and then breaking out the pieces with your running pliers. Make sure to line up the center of your running pliers with the score line on the glass. Apply just enough pressure to break the glass out.
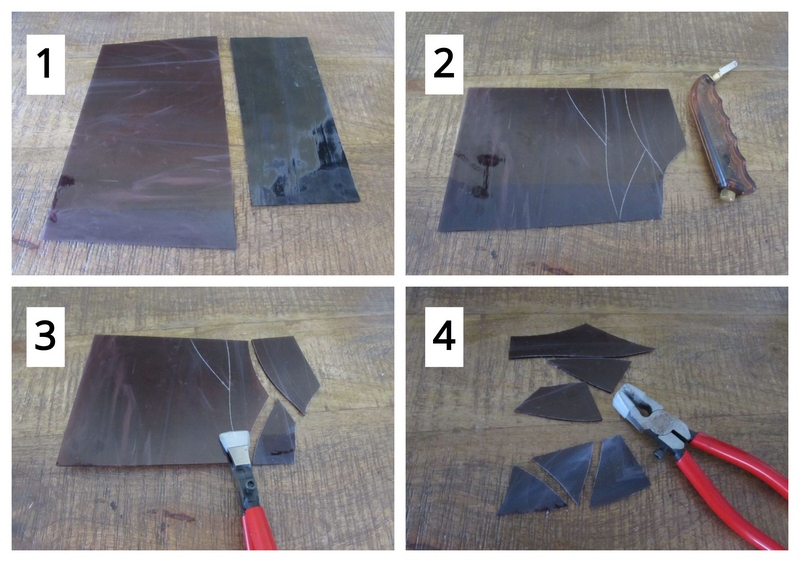
Next, repeat this process with your violet blue glass.

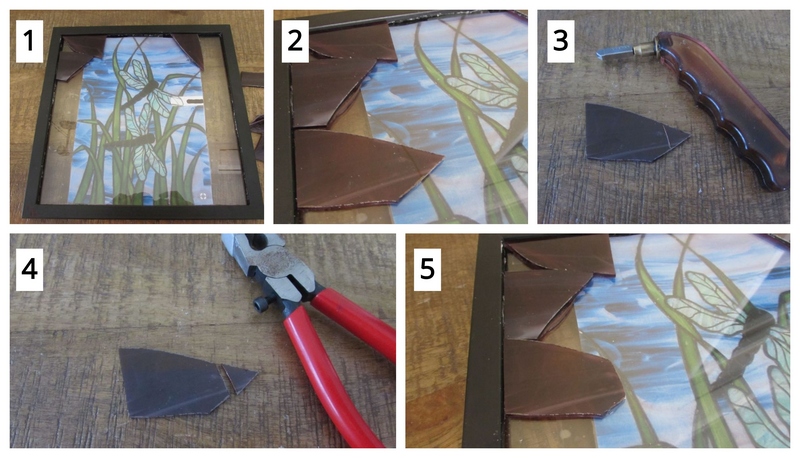
Step 3: Begin Gluing on Your Edge Pieces
Begin gluing the pieces in around the edge of your frame that will be the sky portion of your design. Note that I’m extending the sky out to either edge of the frame as my template didn’t fit the glass exactly.
Select a random piece that will need to be marked, scored with your glass cutter and then broken out with your running pliers.
Glue the trimmed piece in place.
The idea is to intermix the two shades of glass so that the sky or background is vibrant, interesting to the eye. I mean we all know that our sky has many different shades of color during all different times of the day right?
Mark a piece that will fill the triangular space at the top corner. Score the piece with your glass cutter, break the score line with your running pliers and glue the piece in place.
Mark a random piece of glass to fit into the corner of your portrait. Then use your glass cutter to score the marked lines. Use your running pliers to break the two score lines and then glue in your trimmed corner piece.
Continue this process of marking, cutting and gluing on your sky’s edge pieces.
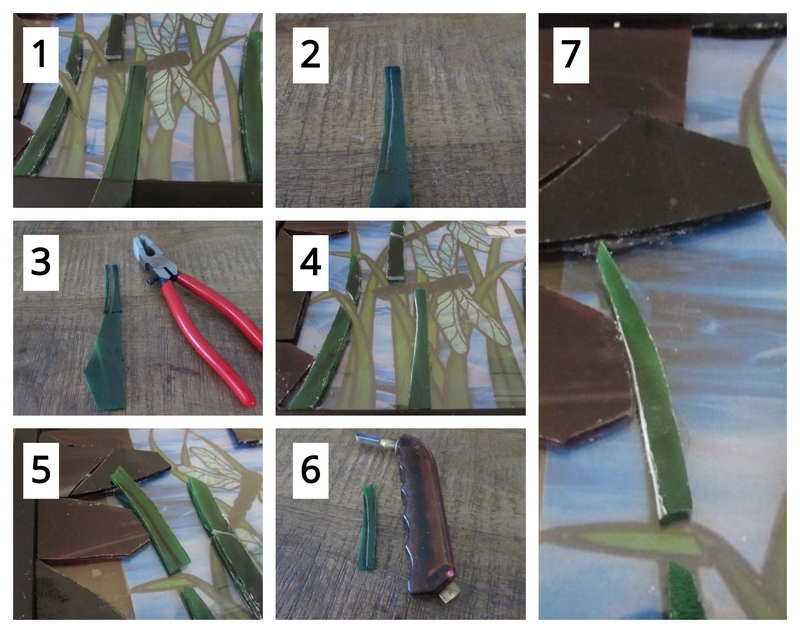
Step 4: Cut, Mark and Glue in Place the Green Glass for Your Grass
You’ll be cutting your glass for your grass pieces very differently than you did for your sky pieces.
You’e going to want to score a piece of green glass in a curved fashion. Do this as the blades of grass are curved.
Line up your running pliers with each score line and break the score by applying just enough pressure to cause the break.
Place the piece on the design and mark it accordingly to fit. Then cut the piece with your mosaic cutters to fit and glue it in place.
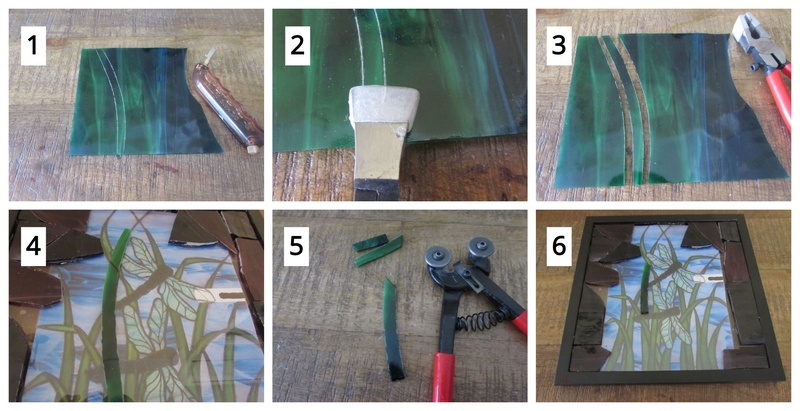
Continue marking and cutting pieces of grass to fit and then gluing them in place.
After cutting a piece, note that the piece also needs to be cut a second time in order to achieve the look of the one blade of grass being in front to the other. This piece must be cut out. Mark it accordingly and use mosaic cutters to cut the piece out. Now there’s two pieces to glue in place.
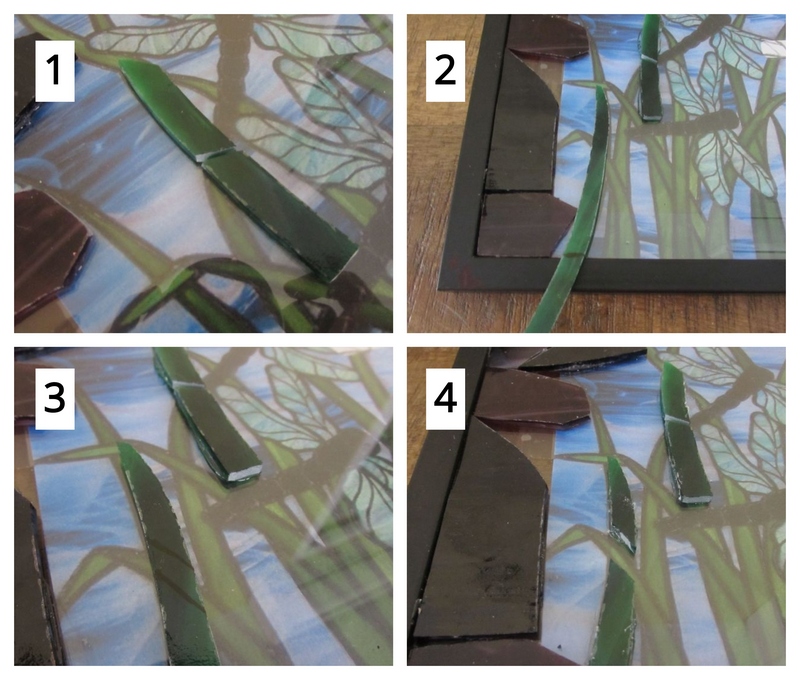
Continue this process for all your blades of grass.
Step 5: Create Your Dragonflies with Gems and Cut Glass
I’ve decided to use these gun metal finished acrylic gems for the body of the dragonfly. I glue the gems in place for both bodies of the dragonflies.

I’m using semi-translucent clear glass for the wings. I use my mosaic cutter to cut the glass into small pieces.
Take a few pieces and begin to fill in one of the wings with the glass bits. Once you have all the pieces you want to shape the wing with, glue them in place. Repeat this process for the other seven wings.

Continue marking, cutting and gluing on pieces until your design is complete.

Now, Time to Grout!
You’ve finished the first phase of your project. Now it’s time to finish up and get it grouted!
We’re now going to prepare the grout mixture, apply it to your glassed over surface and clean it thoroughly so it can be hung in a window and enjoyed.
If you’ve never grouted before, check out my post on how to grout your DIY mosaics here.
Step 6: Gather Your Grouting Materials
To grout, all you’ll need is your dry grout, latex additive, mixing bowl, spoon, old cloths or towels, sponge, garden gloves and water.
I recommend covering the surface you’ll be grouting on with other old newspapers or towels to prevent any of the grout from staining your surface.

Step 7: Mix, Apply and Clean Off Your Excess Grout
Now you’re ready for the actual grouting process. First, you want to mix enough latex additive into your dry grout to achieve the consistency of oily peanut butter. Don’t worry if you make the mixture too soupy by accidentally mixing in too much additive. Simply add more dry grout until the proper consistency is achieved.

Once you’re grout mixture is ready, spread it all over the surface of your piece.
Begin cleaning your mosaic dragonfly portrait.
Clean until all the excess grout is removed.

Your lovely mosaic dragonfly portrait is complete and ready to be hung!

*Tips regarding cleaning and detailing stained glass mosaic lit projects:
- Before ever grouting your piece, take a pair of tweezers and remove as much glue as you can from between the joints. This saves time having to do so after you grout your piece.
- Light your piece right after grouting so that you can see where there is glue blocking a joint where grout should be so that you can make your corrections by removing the glue with your tweezers and replacing grout in the joint.
- Even after grouting and cleaning with a moistened sponge and rag, go back to the piece a half hour later and clean with a both again as grout leaves a fine residue that needs to be removed.
- If you see the next day that you have left grout in place that you shouldn’t have, take a sharp edge or tweezers edge and remove the grout by scraping it off the glass pieces.
- It’s imperative that you use only latex additive mixed in to your grout when working with glass on glass mosaics. The latex additive allows the grout to adhere to the glass. Without it the grout would eventually pull away from the glass.
- It is also imperative that you use a clear water resistant adhesive. Attempt to cover each piece you glue on with full coverage on the underside. You will always get some seepage of grout under a few pieces of glass here and there but you can minimize this by making sure that you completely cover each piece prior to gluing it down.
Years ago, when I first opened my gallery in Richmond, Virginia, I had a local restaurant owner approach me with an issue he was having with the lighting. Apparently at certain times of the day, the sun would shine through a large window that was situated high up on a wall of the restaurant and was dispersing way too much light on 4 or 5 tables there while his patrons were attempting to enjoy their meals. He wasn’t interested in blocking out all the light with a shade or blind and plus the window was simply too high up on the wall to easily open and close a blind or shade. He had priced a leaded and soldered stained glass window, but the price was a bit higher than he was wanting to spend to correct this problem.
I suggested that I could resurface the window for him with scrap stained glass and grout the joints and create a lovely window that would look very similar to a leaded and soldered traditional stained glass window. He loved the idea and began sifting through my scrap glass for colors that would work with the theme of his restaurant. We agreed on an abstract design with nothing but rectangular shapes of different sizes and he agreed that the grout color should be black resembling the leaded soldered joints of traditional stained glass windows.
I cut all the glass before hand and brought everything I needed to the restaurant. After several hours high up on a ladder with all my materials on a ledge, I had resurfaced the entire window with scrap glass. After another few trips up and down the ladder mixing grout and washing sponges, the window was grouted and the restaurant owner’s problem with the 4 or 5 tables had disappeared! And as an added bonus, he had a lovely contemporary mosaic stained glass window enhancing the wall of his restaurant. A few weeks later I was receiving commissions from his local patrons to resurface windows in their homes, transoms over their doors and even their glass block walls! That’s how glass on glass mosaics began for me. I was hooked!
I hope you enjoy working glass on glass mosaics as much as I do.

Danielle is the mosaic artist and teacher behind Mosaics Mostly. She has been creating mosaics for over 25 years, and has taught hundreds of people to create their very own mosaic DIY projects at home. She has been featured in multiple galleries and magazines, and has even had her own beginner mosaics book published! She loves crafts, and is always working on something new!

Such detail and much needed. Thank you!! Also would love to see your window from that restaurant!!
You’re welcome Cheryl:) and I wish I had a pic of that window…it was lovely:) but unfortunately I don’t:( It was an abstract design with lots of color:)