This project is a favorite one of mine as I have always had a fascination with miniatures. Now granted, this is a bird house project, but this piece can also be enjoyed in your home as a lit little mosaic house if you prefer. Those battery operated fairy lights come in handy in so many ways.

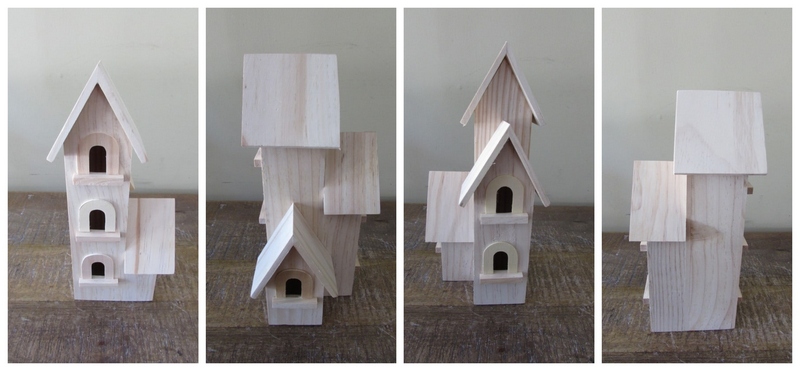
I bought this little bird house off Amazon of course for less than $12. I loved the style of it! So very unique, not your typical bird house. It’s meant to house our smaller feathered friends:)
Materials Needed for DIY Mosaic Bird House
- Pressure treated wood bird house
- 3 different colors of scrap stained glass
- Glass cutter
- Running pliers
- Mosaic cutters
- Glass grinder
- Clear water resistant adhesive
- Black grout
- Latex additive
- Mixing bowl, spoon, sponge and old rags
- Safety glasses
- Garden gloves
- Dark gray paint and brush
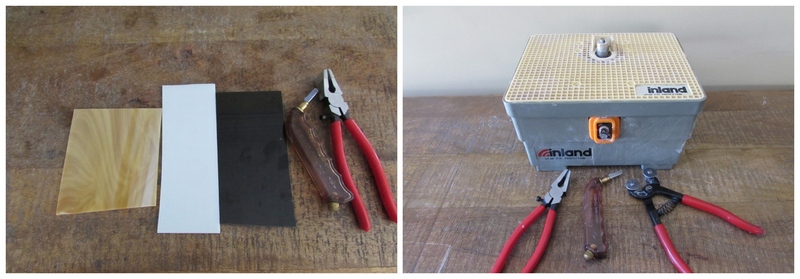
Step 1: Gather Your Materials and Tools
Before you get started, you want to make sure you have everything you’ll need for this project within reach. For this particular project, I decided to use what Amazon refers to as a “Manhattan Style” birdhouse. I thought it was very unique and amazingly affordable.
I’ve decided to use a tan glass for the “bricks” on the bird house, a white glass for the window trim and a black glass for the roof shingles.
I’ll also have my glass grinder handy to smooth edges and shape certain pieces in addition to my glass cutter, running pliers and mosaic cutters.
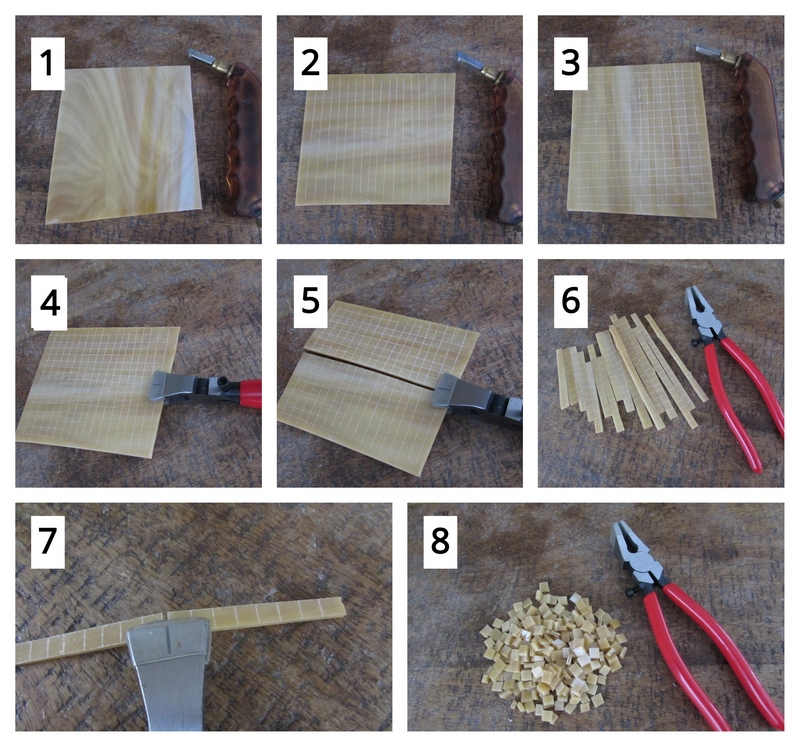
Step 2: Cut Your Glass Bricks for Your Bird House
So, in this project, we’re going to create little square bricks out of tan opaque stained glass. I thought it would be cool to use glass all over the birdhouse surface to glisten in the sun.
We’ll begin by scoring the tan glass vertically with the glass cutter creating long strips. When scoring the glass always remember to roll the head of your glass cutter in one direction only across the surface of the glass. Rolling your glass cutter back and forth on the surface of the glass confuses the glass. You may not be able to break out your score properly as a result.
Next score your glass horizontally with your glass cutter creating squares.
Line up the center of the head of your running pliers with one of the score lines and apply just enough pressure to break the score.
Break out all your vertical scores and then break out all of your horizontal scores.
These little squares of glass are the bricks for our bird house.
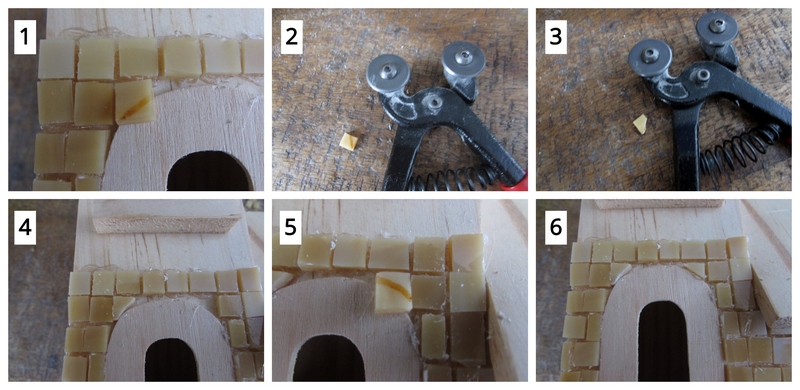
Step 3: Glue the Glass Bricks on Your Bird House
Begin gluing on your small tan squares in horizontal rows. When necessary, cut a piece to fit with your mosaic cutters and glue it in place.
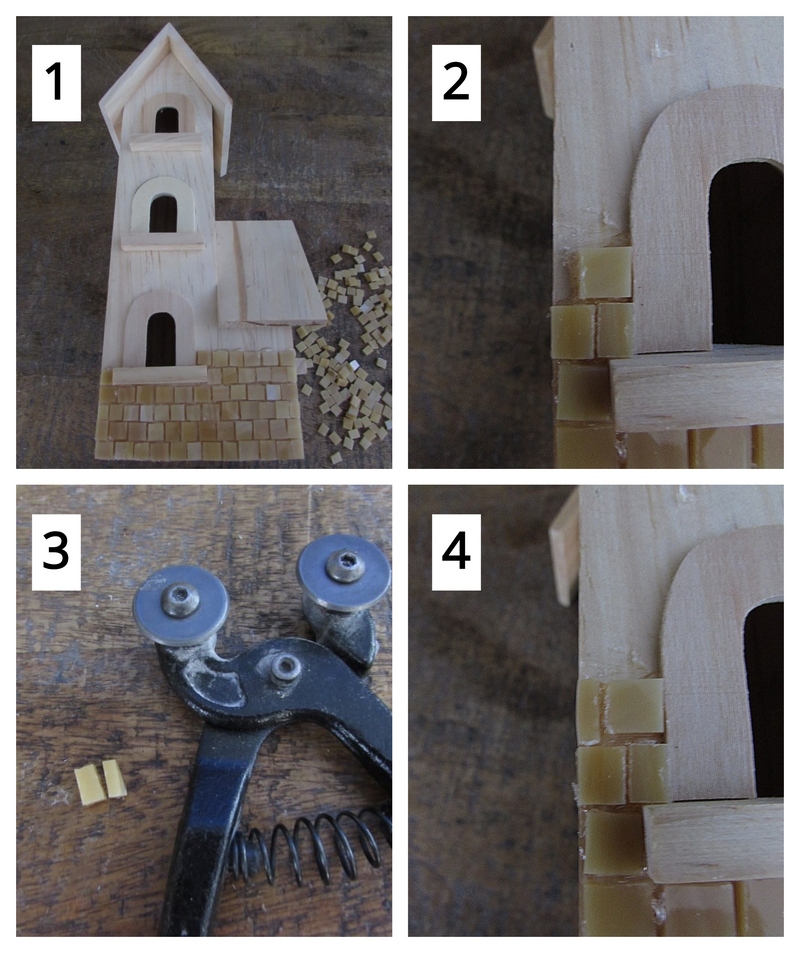
Mark a piece to fit around the bottom arched window.
Cut the piece with your mosaic cutter and glue the piece in place.
Do the same for the other side of the arched window.
Once you’ve surrounded your arched window you can move on to completing the window frame itself with your white glass.
Step 4: Cut and Glue on the Glass for Your Window Frames
The glass that needs to be cut to frame out your windows on this bird house will have to be measured accordingly for each sill and arch.
Vertically score a piece of white glass with your glass cutter creating a thin strip.
Line the center of the tip of your running pliers up with the score and apply just enough pressure to break the glass.
Mark the glass to fit the ledge of the window.
Cut the piece out with your mosaic cutters.
Glue the piece in place.

Now to create the arched frame. Mark a piece to fit within the arched frame.
Cut the piece out with your mosaic cutters and glue the piece in place. Continue this process.

Mark another piece to fit around the curve of your arch.
Cut the piece out with your mosaic cutters.
Take the piece to your glass grinder. Gently grind the cut edge until you achieve a curve. Then take the piece again to your glass grinder to create the inner curve of your arched piece. Glue the piece in place.
Continue this process of marking, cutting and shaping until all your pieces create the arched window frame.

Continue covering the walls of your birdhouse with your tan glass bricks
Glue on tan squares around the side of your second window. Stagger them as a brick mason would.
Using your mosaic cutters, cut smaller pieces to fit between the staggered pieces and glue the pieces in place.
Cut a square diagonally in half with your mosaic cutter when a triangular piece is needed.
Continue this process until the first side of your bird house has complete mosaic coverage.

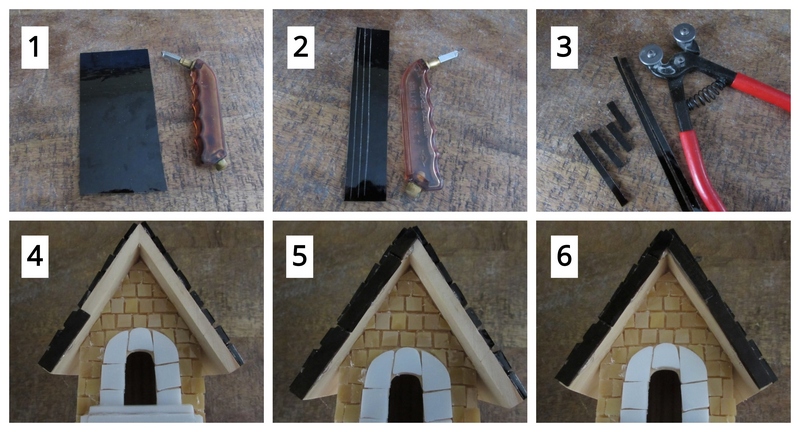
Step 5: Cut Your Glass Irregular Squares for Your Roof and Glue Them in Place
Time to shingle the roof now:) But first, we need to create the shingles.
Score the black glass with your glass cutter vertically and then horizontally remembering to roll the head of your glass cutter over the surface of the glass in only one direction.
Break out your vertical scores by lining up the center of the tip of your running pliers with the score line and applying just enough pressure to break the score.
Break out the horizontal scores creating irregular squares for the shingles of your roof.

Glue the black irregular squares on to your roof laying them in horizontal rows until your first roof surface is complete.
You’ll repeat this process for all of the roof surfaces of your bird house.

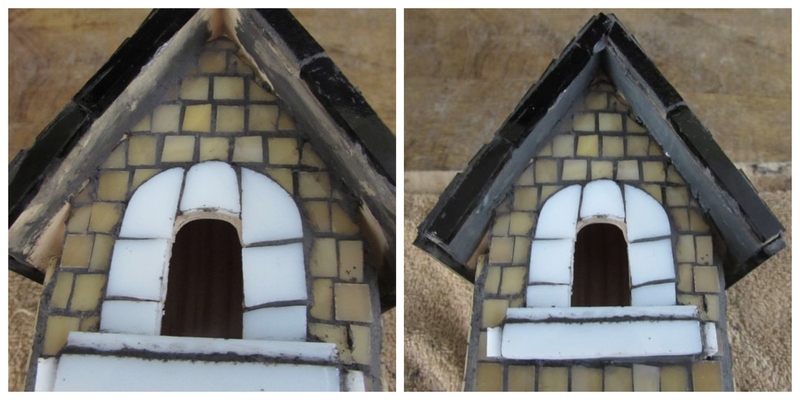
Step 6: Complete Your Window Ledges
The top and the sides of all the ledges need to be covered in white glass also.
Cut thin strips of white glass with your glass cutter. Measure and mark the piece to fit. Cut it with your mosaic cutter and glue the piece in place.
Do the same for the tiny side of ledge pieces.

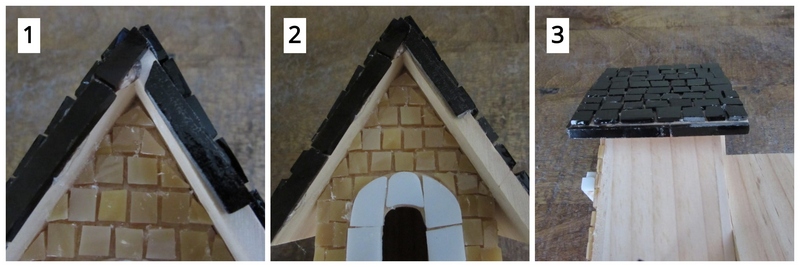
Step 7: Cut and Glue on Glass Strips for Your Roof Edges
All the edges of all the roofs also need to be covered in black glass.
Cut thin vertical strips of black glass by scoring the glass with your glass cutter and breaking the glass strips out with your running pliers.
Cut the pieces to fit with your mosaic cutters and glue the pieces in place.
Cut pieces at an angle with your mosaic cutters to fit whenever necessary and glue them in place.
Cut pieces for the underside edge of your roof trim also to fit.
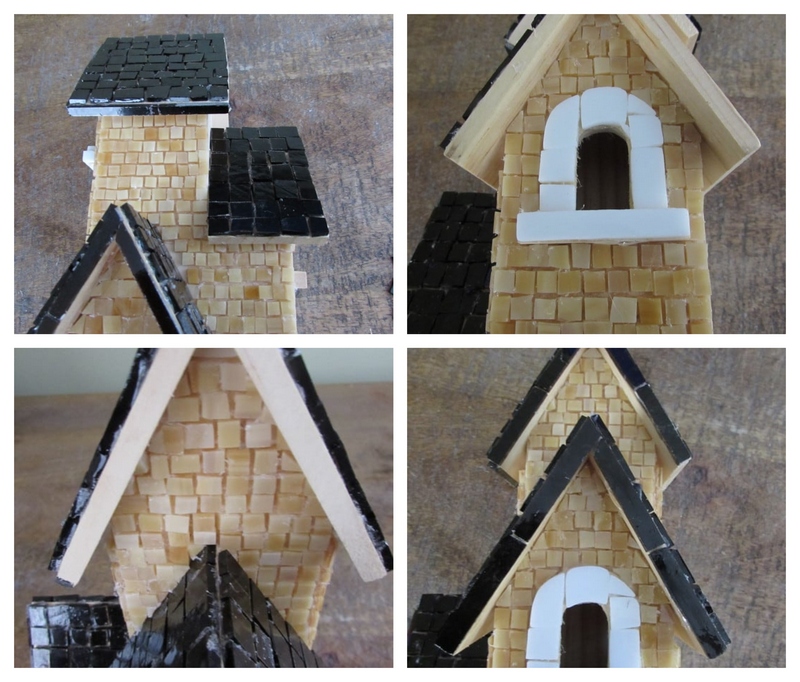
Step 8: Complete the Other Three Sides
Now repeat this process on the other sides!

Now, Time to Grout!
You’re almost done. The final steps to completing your birdhouse has now arrived!
You’ll be preparing your grout mixture, applying the grout to each side and cleaning the excess grout off each side.
If you have never grouted before, check out my post on how to grout DIY mosaics here.
Step 9: Gather Your Grouting Materials
To grout, all you’ll need is your dry grout, latex additive, mixing bowl, spoon, sponge, old towels and cloths and water. And of course your bird house!
I recommend covering the surface you’re going to be grouting on with either old newspapers or old towels to prevent the grout from staining the surface your working on.

Step 10: Mix, Apply and Clean Off Your Excess Grout
Now you’re ready for the actual grouting process.
First, mix enough of your latex additive into your dry grout to achieve the consistency of oily peanut butter. Don’t worry if you mix too much additive in and your mixture is soupy. Just add some additional dry grout until you achieve the proper consistency.

Cover the surfaces of your birdhouse with the grout mixture.
Remove the excess grout with a moistened sponge.
Clean the remaining grout residue off with old rags and move on to your next three sides.

Step 11: Finish by Painting the Undersides of Each Roof
Paint the underside of the roof eaves with dark grey acrylic paint.
There’s a bit of detailing required with cleaning it properly and painting the underside of the roof eves but it all pays off once the piece is complete.
The four completed sides of your lovely mosaic bird house!
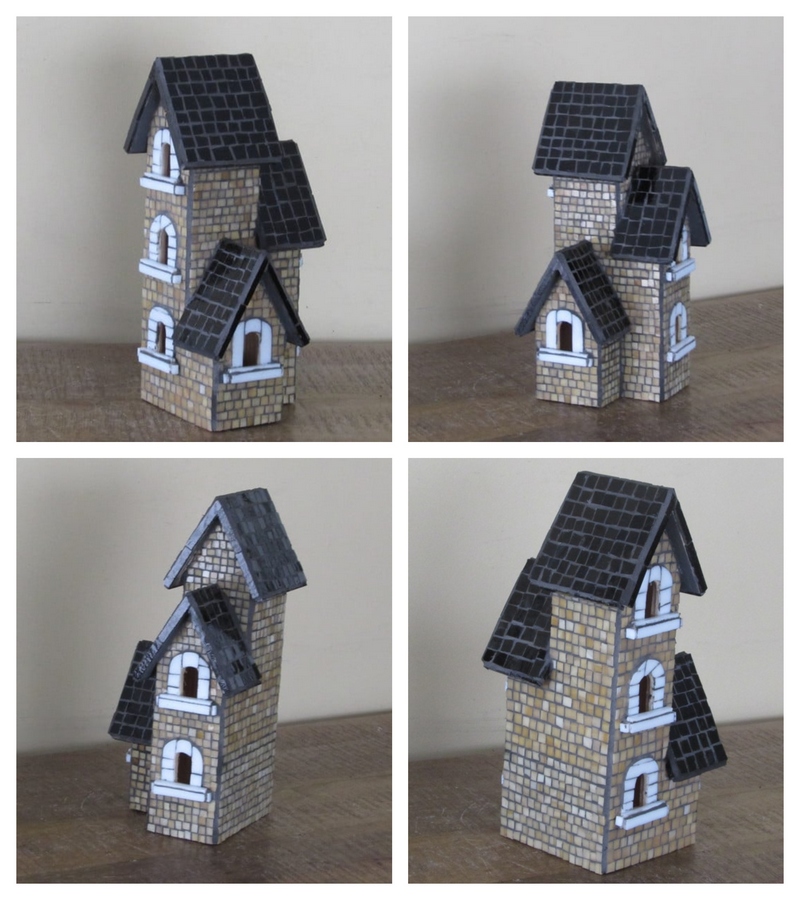
And this is only one possible mosaic design for your lovely bird house! Design possibilities are simply endless.
I could have used red stained glass instead of tan and achieved a brick house look. Or I could have cut long slender pieces of glass instead of squares and achieved another look. And even still, I could have covered it with just random off cuts of different colors of glass all intermixed to create vibrant, colorful, artsy design.
Stained glass is also not the only material you could have used to resurface your bird house. Small pebbles, glass beads and sea shells are only a few other possibilities.
So before starting a project like this, let you mind run wild with multiple resurfacing ideas before settling on the one you’ve decided on to transform your plain old wooden bird house into a piece that our little feathered friends will all fight over to nest in!

Danielle is the mosaic artist and teacher behind Mosaics Mostly. She has been creating mosaics for over 25 years, and has taught hundreds of people to create their very own mosaic DIY projects at home. She has been featured in multiple galleries and magazines, and has even had her own beginner mosaics book published! She loves crafts, and is always working on something new!
