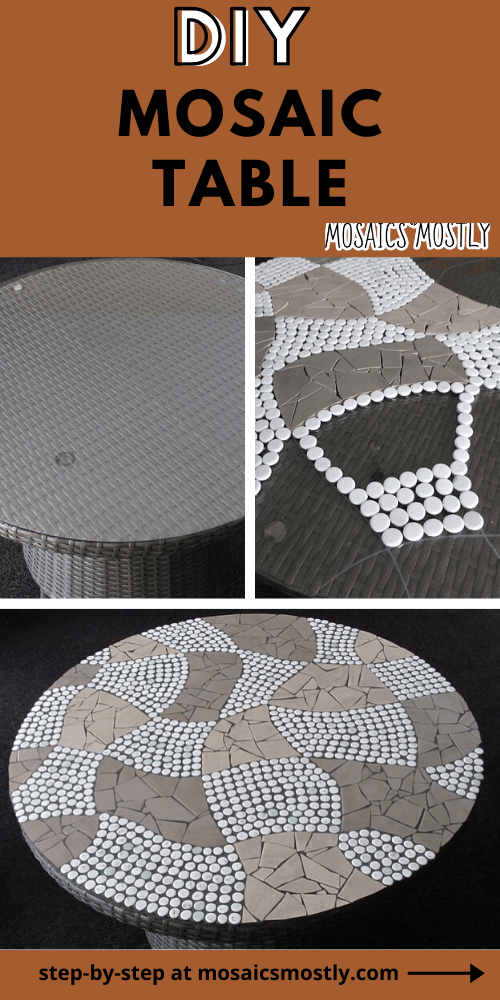
I bought my outdoor patio table for under $100 several months ago at our local home improvement center. I selected it specifically because of the removable glass top with the intention of resurfacing it with either a glass or tile mosaic. I then remembered that years ago when I had my gallery/mosaic design center in Richmond, Virginia that I resurfaced a large dining room table and bar top to match for a local affluent family. I combined glass and tile to create a very special mosaic design for them that they truly loved.
While experimenting with different resurfacing materials years ago, I stumbled across a very interesting coincidence. Those half marbles that you can buy at any craft store, in all different colors and sizes, when turned flat side up and glued to a base they are the exact same thickness as floor tile. I combined these two resurfacing materials for several commissions that I received to include outdoor patios, bathroom floors, shower stalls, fireplaces and even glass block walls.
The surface is not only visually stunning but also has quite a luxurious feel as you move from smooth floor tile to cool slick glass. It’s a truly unique means of resurfacing with a lovely mosaic pattern.
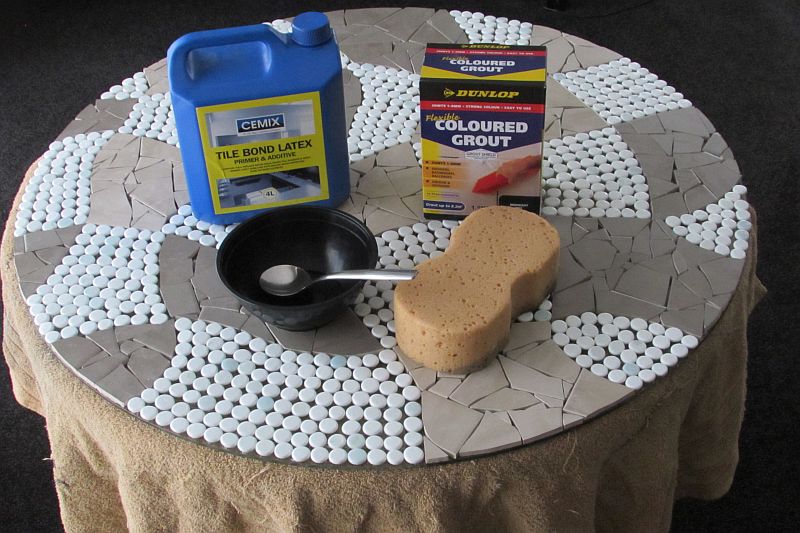
Materials Needed for DIY Mosaic Table
- An outdoor table with a smooth surface either made of pressure treated wood, glass or cement.
- Floor tiles
- Glass half marbles or Luster Gems as they are sometimes referred to
- Clear water resistant adhesive
- Mosaic cutters
- Glass grinder (optional)
- Permanent Marker
- Black Grout
- Latex Additive
- Mixing bowl and spoon
- Sponges, rags, microfiber cloth and gloves.
- Safety Glasses
- Garden gloves
How to Make Your Very Own DIY Mosaic Table
Below you’ll find my step-by-step instructions on how to make your own lovely mosaic table at home.
Step 1: Gather Your Materials and Tools

Before you get started, make sure you have everything you need for your project close by. For this project I’m using a glass topped outdoor patio table that I purchased at my nearby home improvement center. I decided I wanted a monotone color scheme and will be using opaque white glass half marbles and two different brown shades of floor tiles to create my mosaic design on the glass top of the table.
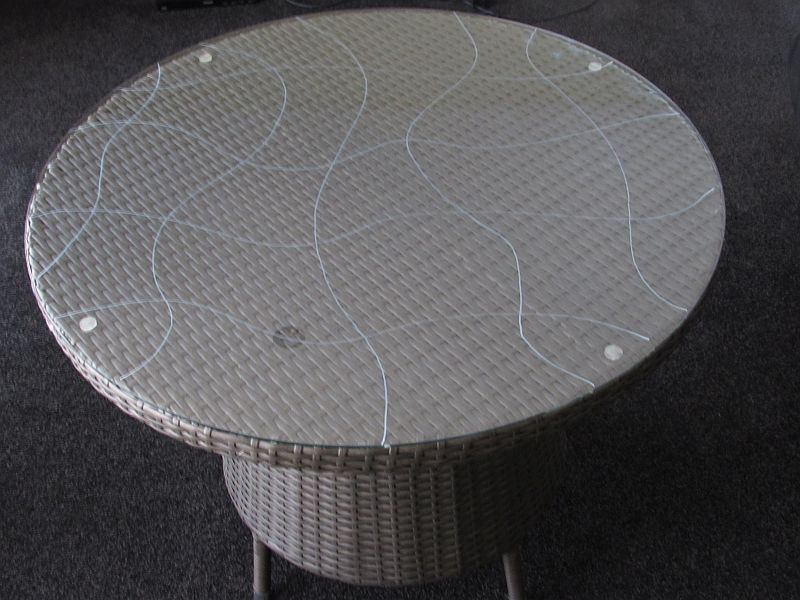
Step 2: Draw Your Design on Your Table Top
Draw your design on your table top with a permanent marker. I originally was going to simply check the table, and I have, but instead of using straight lines I decided to use wavy lines. Using wavy lines makes the design more intriguing, more interesting to the eye. It also lends more flexibility when creating your mosaic as you’re not creating strict straight lines but irregular ones.
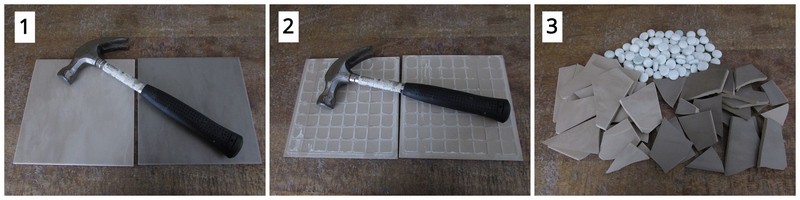
Step 3: Break Your Tiles
Take a hammer to your tiles and begin breaking them up. Make sure you turn your tiles over and break them on the back side so as not to damage the surface finish.
Also, break the tiles in the center initially and don’t break them into small tiny pieces as you’ll be using some larger pieces in this project. Plus, you can always cut them with your mosaic cutters if the piece is slightly larger.
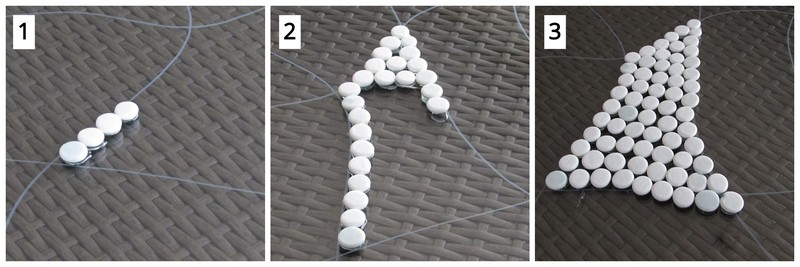
Step 4: Glue Your Tiles and Glass Half Marbles on Your Table Top
Begin by gluing white half marbles in your first square. Continue until the square is completed. Remember, this is a flexible design. You’re really just using the drawn lines as a guideline for each section, so it’s o.k. if you widen the section or narrow it. Simply work with the half marbles to fit in that section the best way they can. You have control of your design with your tiles pieces that you can shape on your glass grinder.
*Tip: Always remember to use clear water resistant adhesive as this is an outdoor table that will be exposed to the elements. Grout is porous when this table is rained on, that water will eventually seep under the tile and half marble pieces and eventually lift them. This cannot happen if you use a water resistant adhesive, therefore no damage can occur to the mosaic.
Begin gluing dark brown tile pieces in your next square. Remember, we’re checking the table. Glue tiles in following the outline and creating the shape of that square with the edges of the tile.
Mark a tile to fit the right bottom edge. Use your mosaic cutters to nip the piece to achieve the desired shape.
If using a glass grinder for smoothing, take the nipped piece to the grinder head and smooth out the edge. The look you achieve with a glass grinder is a more finished and professional look but the design can still be achieved without smoothing each edge. It’s your choice. Then glue the piece in place.
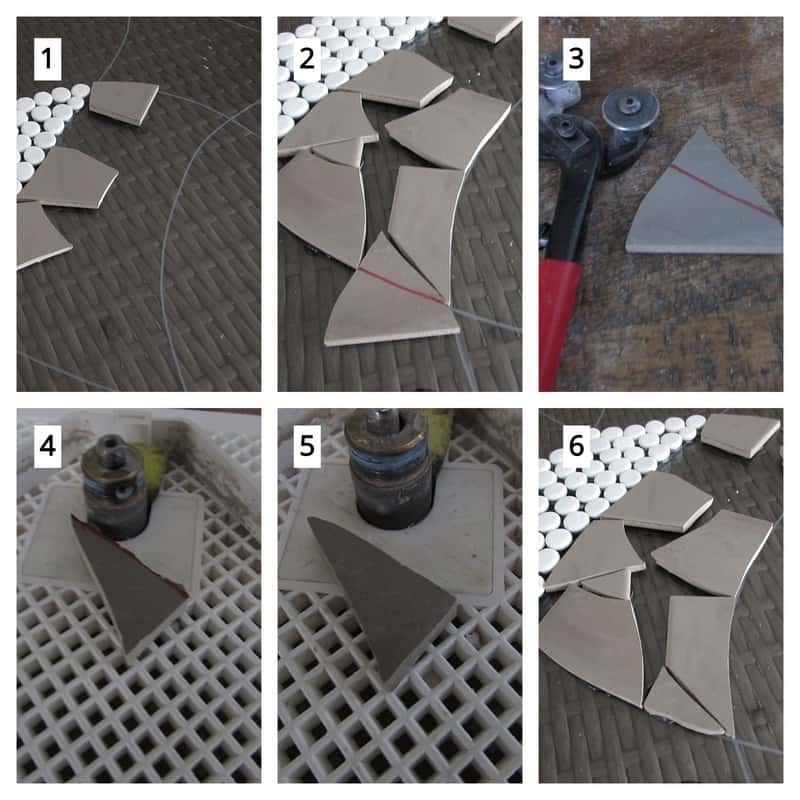
To create interior pieces, you use the same process of marking the piece to fit, nipping it with your mosaic cutters, smooth and shape it on the glass grinder and then glue the piece in place.

You’ll be staggering your two different tile colors around your white glass half marble sections. Use the same process to create a lighter brown square on the other side of your glass half marble section.
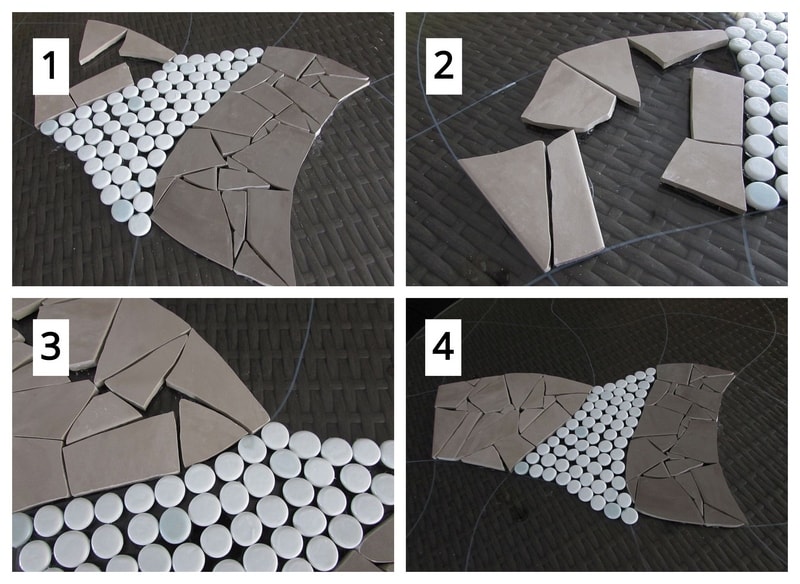
12. Begin your fourth square by gluing on your white half marbles. Continue until the square is completely filled in. I typically outline my section first and then fill in.
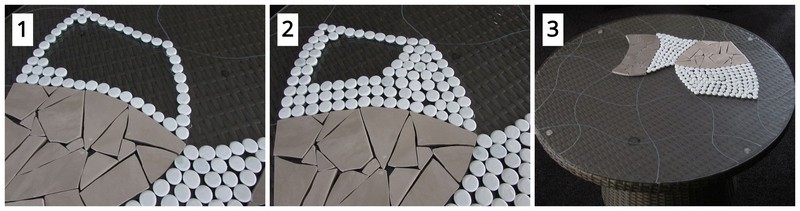
Work the rest of the table top section by section until the surface is completely covered.

The entire surface is completely covered.
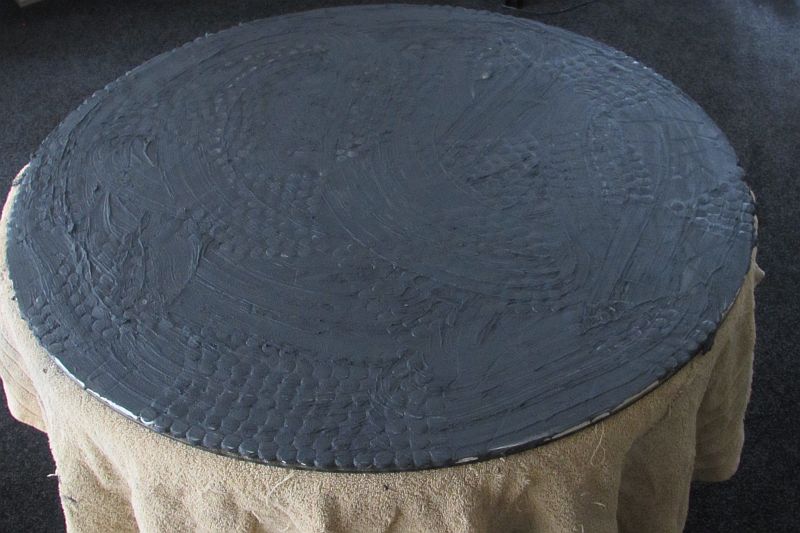
Now, Time to Grout!
Almost done! The last part of the process involves preparing your grouting mixture, applying it to the table’s mosaic surface and cleaning it thoroughly.
Step 5: Gather Your Grouting Materials
To grout, you will need your dry grout mix, latex additive, mixing bowl, spoon, sponge, old rags and towels and water. I also but some old towels underneath the table top to prevent the table base from getting stained with grout.
I’ve selected black grout for this project as the base of the table is very dark brown (almost black) and I want to see the definition between all the spaces between each glass half marble and between each piece of my tile. You could grout this table a tan or light gray, it’s up to you. I just like to use black grout because of the dramatic effect it provides.
Step 6: Mix, Apply and Clean Off Your Excess Grout
Now you’e all ready for the actual grouting process. Firstly, you want to mix the dry grout with your latex additive and attempt to achieve the consistency of oily peanut butter. Don’t worry if you add to much latex additive and the mixture is runny, just add more dry grout mixture.

Completely cover the surface with your grout mixture.
Begin cleaning your surface with your moistened sponge.
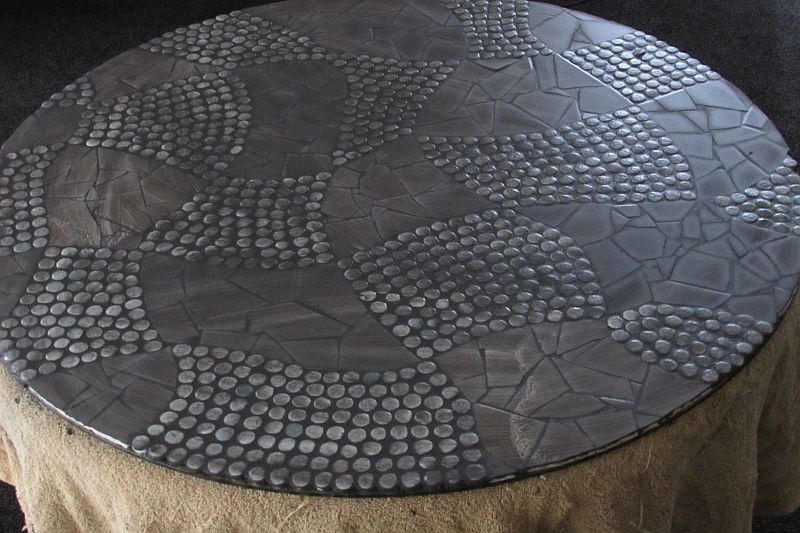
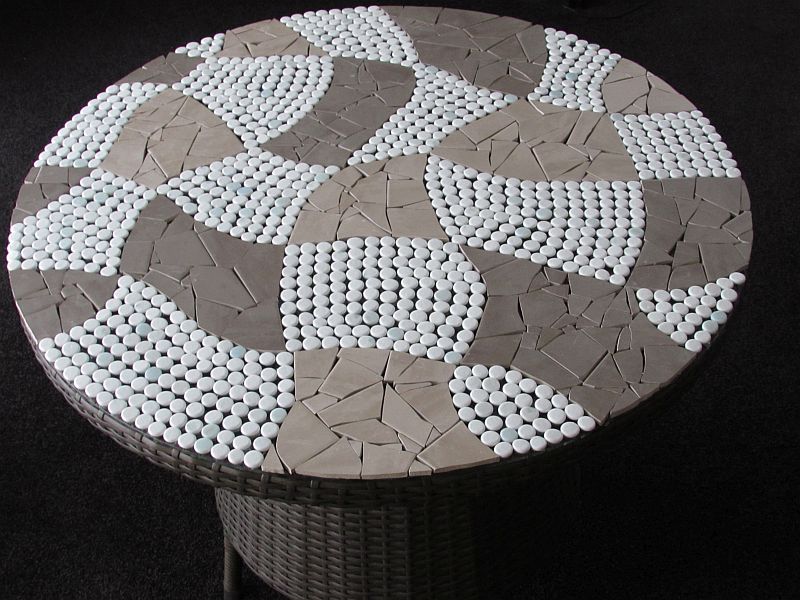
Your lovely mosaic table is completed. Allow to dry for at least 24 hours before exposing it to the elements outside.
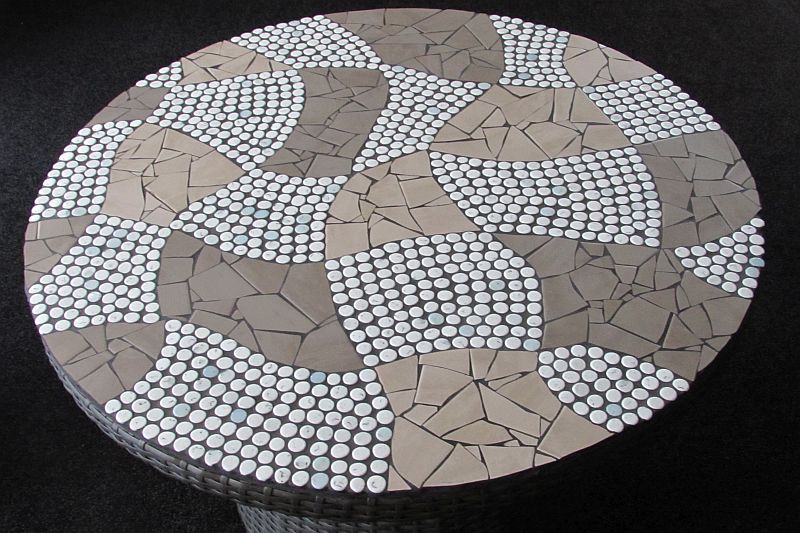
What an incredible difference! Plain old patio table to an artsy mosaic addition to your home.
After the table was all cleaned, I used the remaining bit of grout in my bowl to go around the edge of the table, the lip, and apply grout. I then took my time and smoothed the grout out as it was drying to create a nice smooth edge.
After the grout dries completely, you typically have to clean it yet again as there is always a fine fine layer of grout dust that exists after drying.
Another little tip, be close to your water source when grouting your table top as you’re going to need to rinse your sponge out many times while cleaning the initial wet surface. Once that surface is mostly cleaned, take your old rags or towels and remove the grout film that is left. Use your microfiber cloth for your last wipe and polishing. Make sure that you’re wearing garden gloves, the gloves with the vinyl or plastic on your inside hand as grout does stain. In saying that, also make sure that the clothing that you’re wearing is expendable…so no wearing your favorite slippers or pajamas when grouting.
What’s also great about this resurfacing idea is that it’s so inexpensive! Bags of glass half marbles cost less to nothing and so do standard 12 x12 floor tiles. The material cost to resurface this table was right around $50 – $75 to include all of your adhesive, grout, latex additive, tiles and half marbles. Heck, if you have a decent relationship with a tile supplier or even your home improvement center, you could ask them to save any boxes of broken tiles that they might have in their warehouse for your project. They typically don’t even charge you for them as the broken boxes of tiles get thrown out. You’re helping them out by taking them off their hands!
This resurfacing process is absolutely stunning on floors and it is incredibly durable. It is also quite lovely as a back splash for your kitchen.

Danielle is the mosaic artist and teacher behind Mosaics Mostly. She has been creating mosaics for over 25 years, and has taught hundreds of people to create their very own mosaic DIY projects at home. She has been featured in multiple galleries and magazines, and has even had her own beginner mosaics book published! She loves crafts, and is always working on something new!
