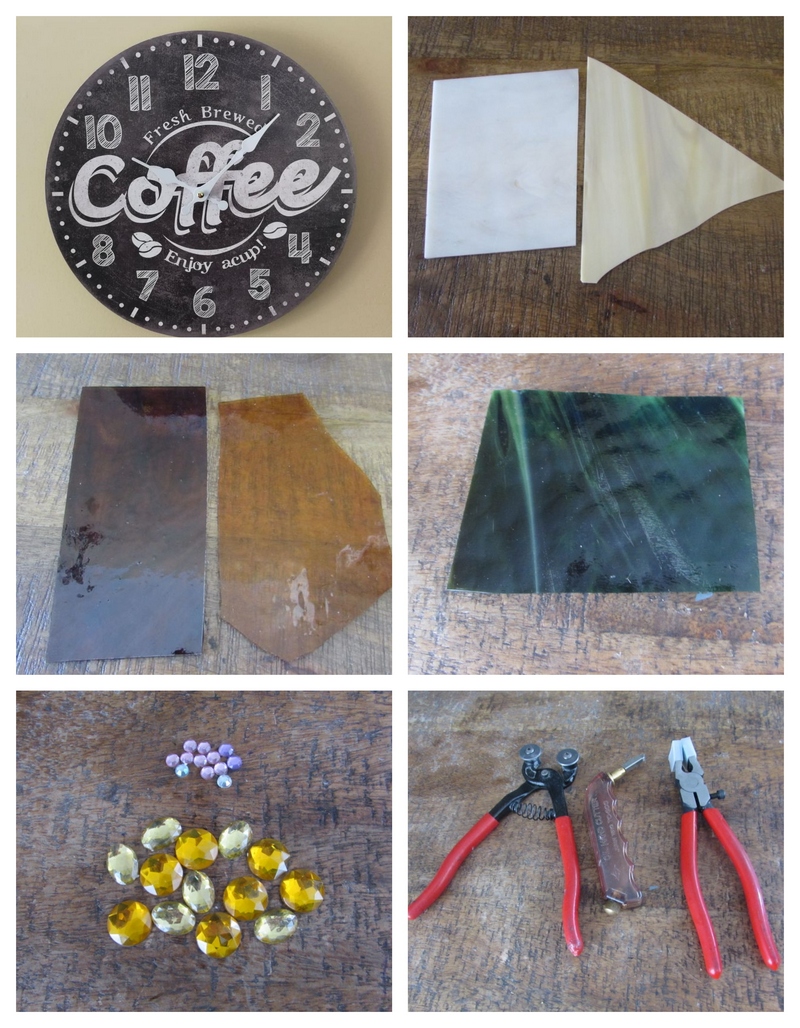
It’s always fun to find a base that is already functioning but needs your special touch to personalize it so it becomes exceptional! Nowadays, clocks such as this one are so easy to find and so very affordable! This clock cost under $10 and is easily disassembled to work on for your mosaic clock project.
Always make certain that the material that you will be resurfacing the clock base with is not too thick as to impede the hands from moving across the surface once the mosaic material is glued on. I made certain of this before selecting my scrap stained glass materials. I also made certain that if I were to use a material within the design that was a bit thicker (that the hands of the clock could not clear) that I placed them in an area of the clock that the hands did not come into contact with.
I’ve also decided to use scrap stained glass because of how light weight this material is in addition to the acrylic gems being light weight also. Ceramic tile would not only be too heavy to use but tile is also thicker than stained glass and therefore could not be used for this project because the hands of the clock would not be able to clear the resurfacing material and function properly.
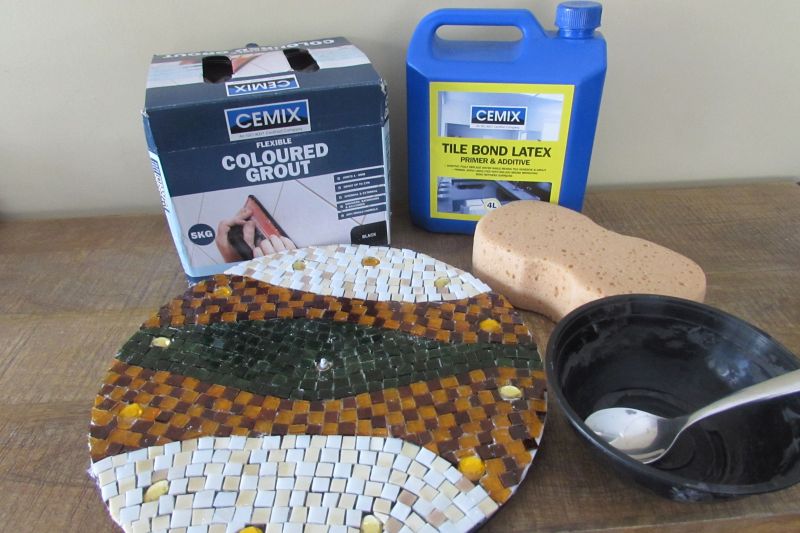
Materials Needed for DIY Mosaic Clock
- Clock made of a firm composite material
- Scrap stained glass – your choice of colors of course – but with this project I’ll be using 2 shades of amber translucent glass, green semi-translucent glass and 2 shades of opaque off-white glass
- Amber colored gems to signify numbers on the clock and 12 tiny gems to mark the edge of the clock where each of the amber gems are to be placed.
- Glass cutter
- Running pliers
- Mosaic cutters
- Clear water resistant adhesive
- Grout – Black
- Latex additive
- Sponge
- Mixing bowl and spoon
- Micro fiber cloth
- Tweezers
- Black and white paint
- Garden Gloves
How to Make Your Own DIY Mosaic Clock
Below you’ll find my step-by-step instruction on how to make your own mosaic clock at home.
Step 1: Gather Your Materials and Tools
Before we get started, let’s gather together everything we need for the project in one spot.
I’ve got my clock, the different stained glass scrap glass that we’ll be using, out tools and the gems to represent the numbers.
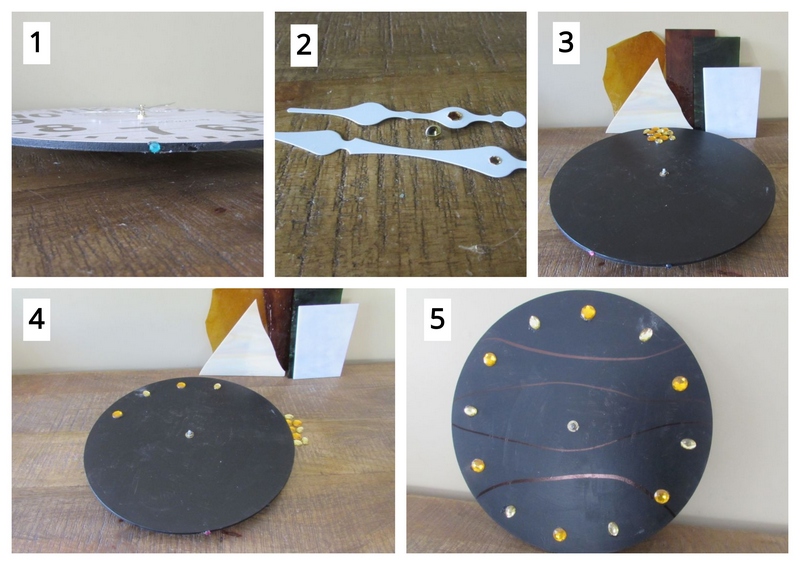
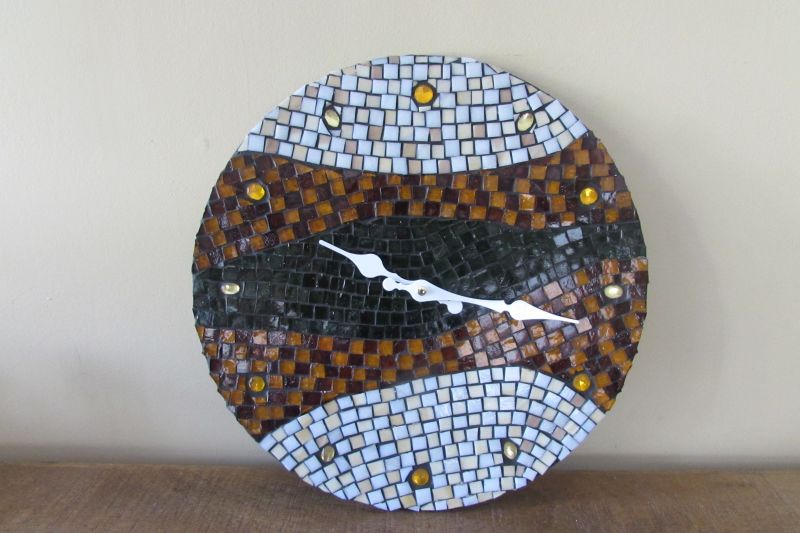
I selected a clock with white hands as I want to create a mosaic with a dark center that the hands will stand out against.
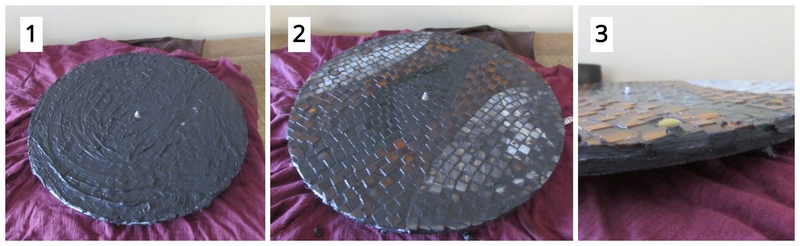
Step 2: Prepare the Surface of Your Clock for Your Mosaic
We’re going to be painting the clocks face black so that none of the numbers show through your translucent pieces of glass that you’ll be gluing on the face.
Glue on small gems on the side edge of the clock base to mark where each number is to be located on the face.
Remove the hands of the clock carefully and set them aside.
Paint the face of the clock black so that you’re beginning with a fresh palette.
Glue on the amber gems to represent each of the 12 numbers on the face of the clock.
Draw the design on the face of the clock. I decided that I wanted to take a symmetrical base and create a mosaic design that wasn’t symmetrical..one that kind of plays on the eye because it’s off balance. Like I mentioned above, I want the center of the clock to be dark so that the white hands stand out against the dark glass. Therefore, my opaque off-white sections will be on the top and bottom portion of the design and the dark green section will be directly in the center with mixed amber glass above and below the dark green section.
Step 3: Cut Your Glass
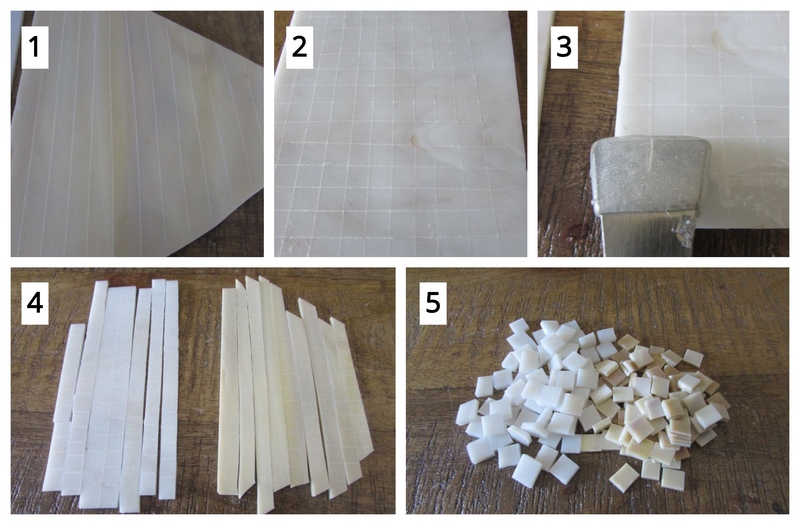
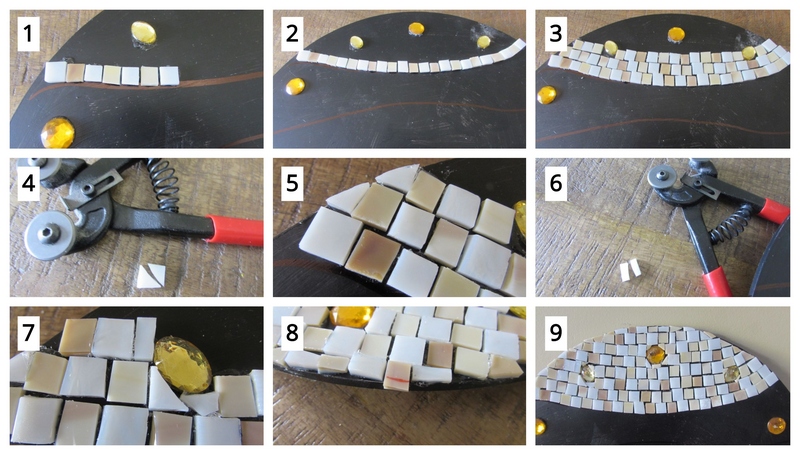
I’ve decided to create small glass squares out of each of the colors of scrap glass that I will be using and fill each section of the design with them.
For the first section, get the 2 different pieces of off-white opaque glass ready for scoring. Score both pieces of glass vertically with your glass cutter.
Score both pieces of off-white opaque glass horizontally or cross wise to create squares.
Break the scores with running pliers length wise first. Remember to line up the center of the head of your running pliers with the score line itself. Apply just enough pressure to break the score. You wind up with long strips.
Now, break out the squares with your running pliers.
You’ll be repeating this process with the other three colors of stained scrap glass.
If you’ve never cut glass before, check out my post on How to cut stained glass (insert link) here.
Step 4: Glue on Your Glass
Begin gluing on the off-white squares of stained glass in the top portion of your mosaic clock base. Remember to intermix the two different shades of glass.
Cut an off-white square in half with your mosaic cutters to create triangles. Glue the triangles in place where needed.
Also, cut the off-white square in half with your mosaic cutters. Glue on the rectangular piece of off-white glass wher needed.
Mark and cut all pieces needed to complete the top portion of the mosaic clock with off-white glass.
You’ll repeat this process for your next amber section.
I decided after creating squares with both shades of amber glass that the dark painted surface wasn’t going to achieve the look I wanted under the light shade of amber glass so I painted the next three sections white.
When necessary, score amber squares diagonally to create 2 triangles then break the score with your running pliers. Glue the triangles in place. You can also create triangles by cutting a square in half with your mosaic cutters…you simply achieve a more perfect triangle when using your glass cutter and running pliers. It’s completely up to you.
Cut other irregular amber pieces where needed with mosaic cutters to complete the amber section.
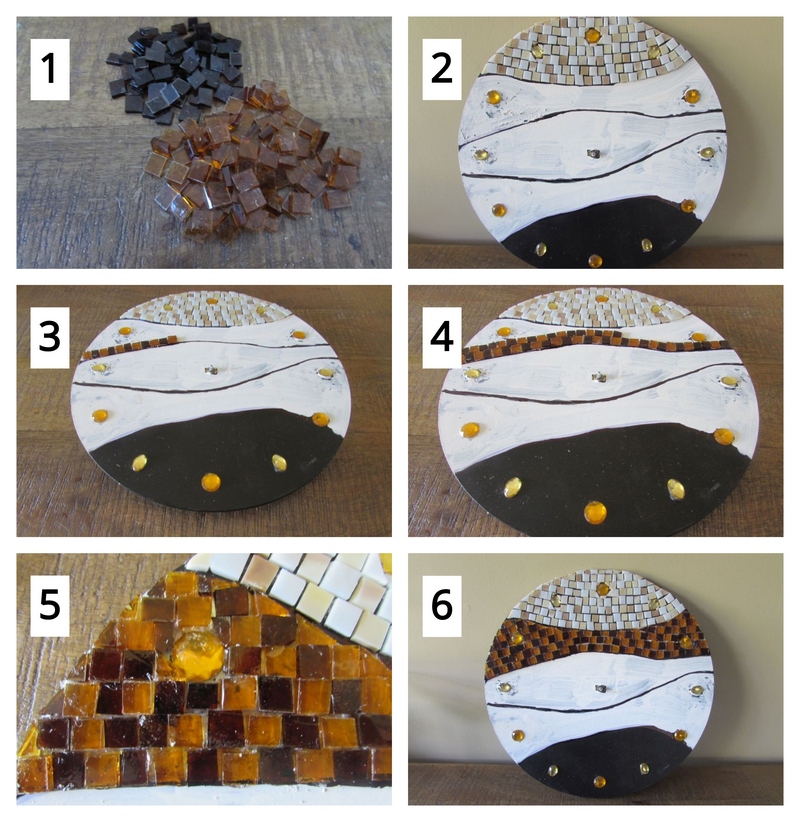
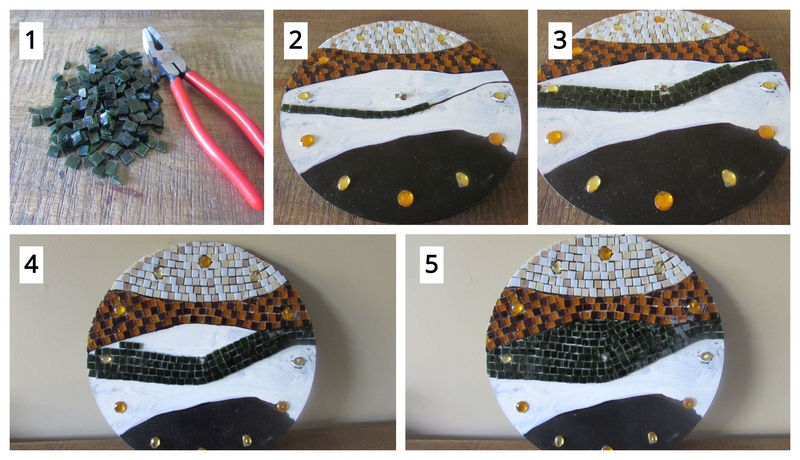
Complete your next section by gluing on the green squares.
Begin gluing on the amber glass for the 4th section of the design.
Mark a piece of amber glass to be nipped with mosaic cutters to fit. Glue the nipped piece in place.
Mark another piece of amber glass in 2 places to be nipped with mosaic cutters to fit. The piece needs to be nipped to fit under the amber gem and even with the two pieces of darker amber glass on either side of it. Glue the piece in place.
Continue marking and nipping pieces with mosaic cutters to fit until the 4th amber section is completed.
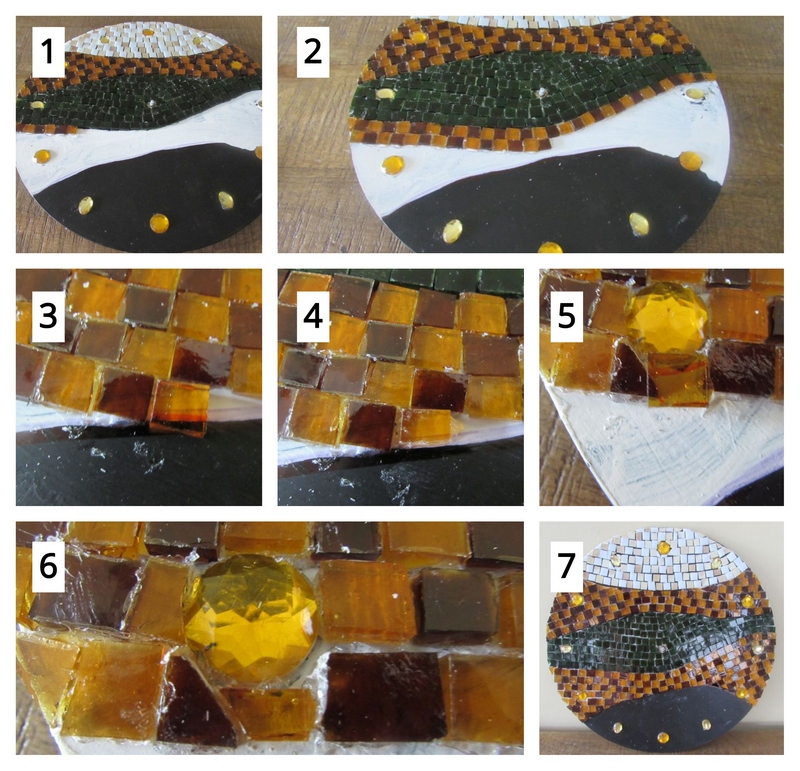
Complete your mosaic by gluing off-white glass squares in the last section of the design.
Mosaic coverage completed!
Step 5: Gather Your Gouting Materials
To grout the surface of your clock, all you’ll need is your dry grout, latex additive, mixing bowl, sponge, spoon, old towels or rags, garden gloves and water.
Cover the surface that you’ll be grouting on with old newspaper or old towels to prevent the grout from staining your surface.
Step 6: Mix, Apply and Clean off Your Excess Grout
Now you’re ready to grout your surface. First, you want to mix your latex additive into your dry grout. You want to achieve the consistency of oil peanut butter. If by chance you add too much latex additive and the mixture is soupy, just add more dry grout until you get it right.

Once your grout is mixed to the correct consistency, apply it to the face of your clock completely covering it. Be careful not to cover the center mechanism that the hands will be reattached to.
Next, take your moistened sponge and begin removing your excess grout. Continue cleaning with both your sponge and old towels or rags until the surface is completely cleaned.
Make sure to cover the circular edge with grout. Take the time to smooth out this edge as it’s drying with an almost dry sponge.
*Tip: The back of the clock can be painted with black paint for a completely finished product.
Reattach the hands, install a battery and “oila” a lovely and personalized mosaic clock.
Clock mechanism kits can also be purchased from a variety of sources and attached to a base that you have made yourself. Possibilities are again endless as far as the material you chose to make the base out of such as wood, glass, some composite material etc. You have to have the means, of course, of cutting your base and shaping it and to also be able to create a whole for the clock mechanism to fit into, but all of this is possible with the proper tools. Years ago I created my own glass base and created a whole in the center of the base with my glass grinder and a special head used for drilling wholes in glass. The piece was quite lovely as it hung in a window with light shining through it:) I believe I’ll have to make that another project to share with all of you:)
The other base I used once was a large terracotta base for a very large pot. It was approximately 30 inches or 764mm in diameter. I drilled a whole through the center of the base for the clock mechanism and created a “table clock” out of this base where the clock base rested on a wrought iron 3 legged base. I worked the mosaic in stained glass. It came out rather stunning and was quite the conversation piece at the gallery where I had it displayed. Doubly functional piece of art that was not only a clock but a side table.
That’s what the mosaic process is all about, transformation. Taking an ordinary, mundane or boring surface and revitalizing it with a lovely design achieved with materials of your choice. So when you’re at that garage sale rummaging around or you’re browsing through the craft store searching for some unique something to create, don’t limit yourself to your traditional “blank surfaces” to work your mosaic on. Keep in mind that you can transform existing surfaces with paint to create that “blank palette” that you need in order for you to work your mosaic magic.

Danielle is the mosaic artist and teacher behind Mosaics Mostly. She has been creating mosaics for over 25 years, and has taught hundreds of people to create their very own mosaic DIY projects at home. She has been featured in multiple galleries and magazines, and has even had her own beginner mosaics book published! She loves crafts, and is always working on something new!
