We all love a lovely vase to display somewhere in our home, but let’s face it, we don’t always have fresh flowers given to us in order to utilize that lovely vase. Why not display a lovely vase in your home that can be lit with a couple strands of battery operated lights and becomes a beautiful visual piece to be enjoyed by all when flowers are scarce.
I tried different light sources but the most lovely were fairy lights strung on copper wire with an on off switch that I purchased off Amazon. They’re about $1 a strand and the replacement button batteries are approximately .30 cents each. Each strand of lights takes 2 batteries that last approximately 48 hours. So, they’re not just the most lovely, they’re the least expensive option too.
Materials Needed for DIY Mosaic Vase
- Glass vase
- Mosaic cutters
- Glass cutter
- Running pliers
- Clear water resistant adhesive
- Black grout
- Latex fortified additive
- 3 different colors of scrap stained glass
- Bowl, spoon, sponge and rags
- Safety glasses
- Garden gloves
- Dark gray acrylic paint
- 2 strands of battery operated fairy lights and some replacement button batteries #2032
How to Make Your Very Own DIY Mosaic Vase
Below you’ll find my step-by-step instructions on how to make your very own beautiful mosaic vase at home. Let’s get started!
Step 1: Gather Your Materials and Tools
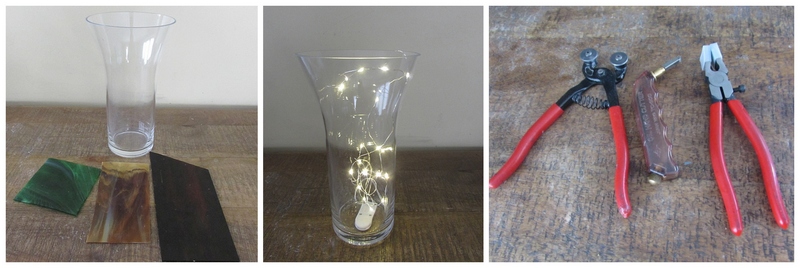
Before you get started, you want to make sure you have everything you need for your project within arms reach.
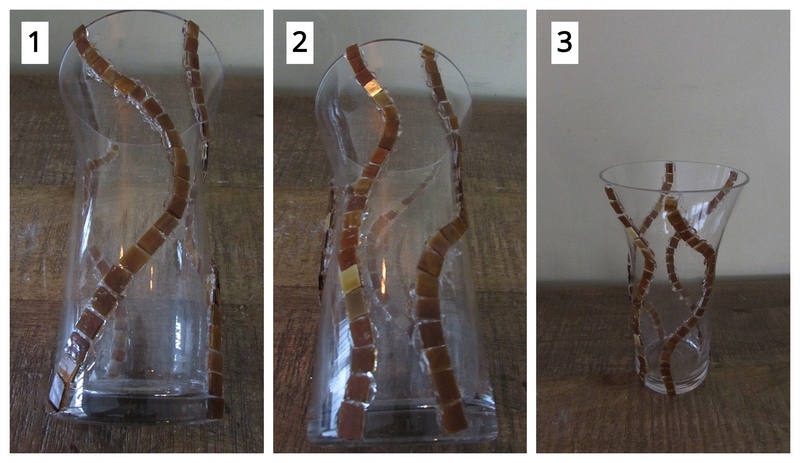
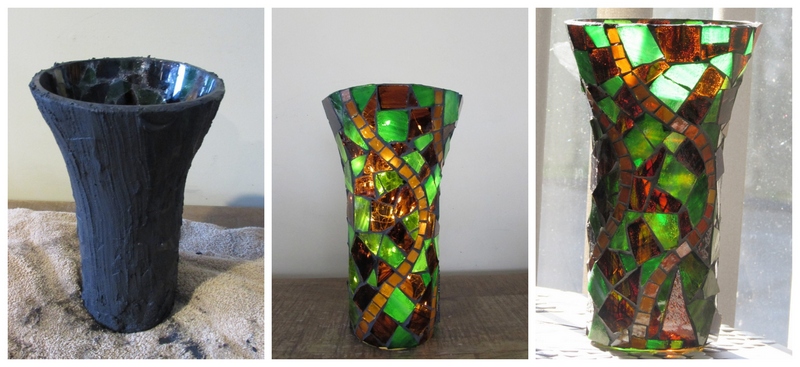
I loved the shape of this vase and plus it was on clearance. A match made in heaven!
I’ve decided to use semi translucent dark brown and deep green glass and tan opaque glass. The tan opaque glass will light a bit differently compared to the semi translucent dark brown and deep green glass creating a lovely visual effect.
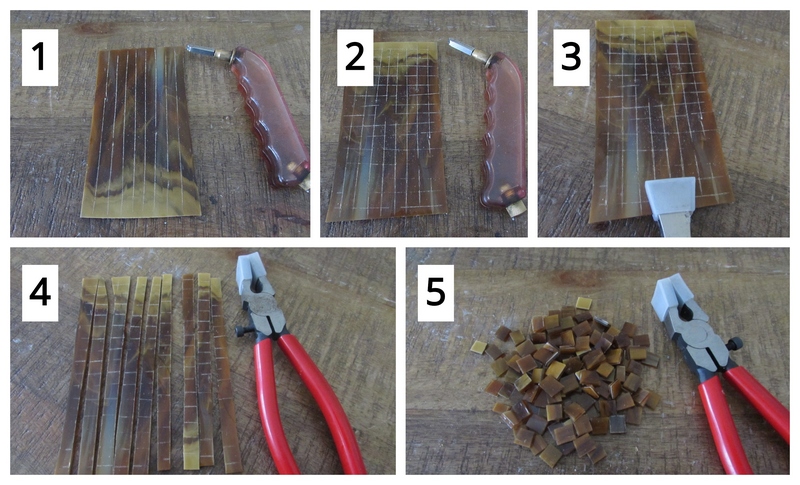
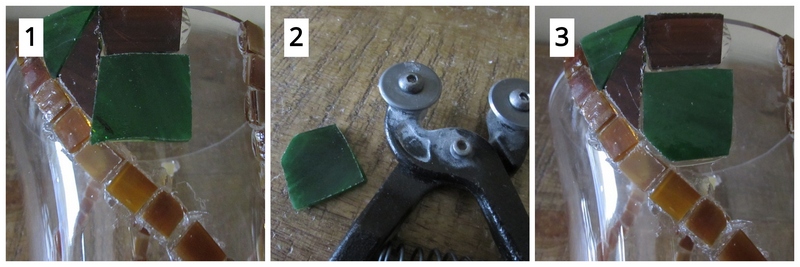
Step 2: Cut Your Opaque Tan Glass
Time to cut our glass. Start off by vertically scoring the tan glass with your glass cutter.
Score the glass horizontally also to create squares.
Take your running pliers and break out the vertical scores.
Line the center of the head of your running pliers up with the score line and apply just enough pressure to break the score.
Break the horizontal score line out to create squares.
Step 2: Glue on Your Opaque Tan Glass
Begin gluing on the tan squares vertically down your vase in a wavy rows. Complete your first row of tan squares on one side of your vase.
Repeat this process on the opposite side of your vase.
If necessary, cut a square in half with your mosaic cutters to create a triangle to fit at the base of your tan row.
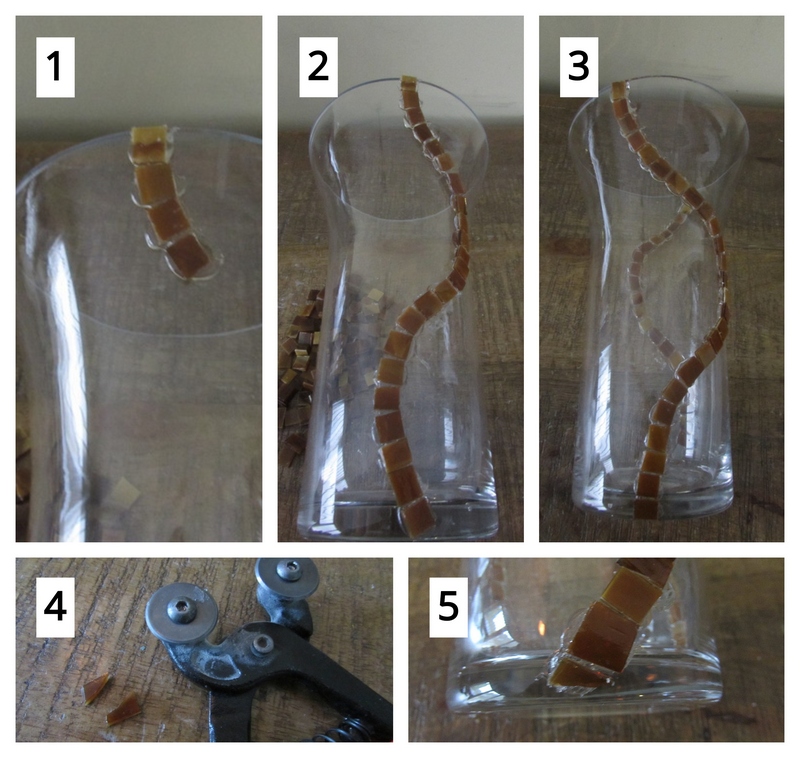
Glue on a 3rd row of tan squares between these first two rows and a 4th tan row opposite that row.
These rows of tan squares create movement within your design.
Step 3: Cut Your Glass for the Rest of the Surface of Your Vase
The rest of the vase will be covered in the dark brown and deep green semi translucent glass.
Score both pieces of glass with glass cutter in an irregular pattern creating interesting shapes/pieces to work with.
Take your running pliers and break out your score lines. Remember to line the center of the head of your running pliers up with the score line and apply just enough pressure to break the score.
Once you’ve broke out the vertical score lines, it’s time to break the horizontal ones creating irregular pieces.
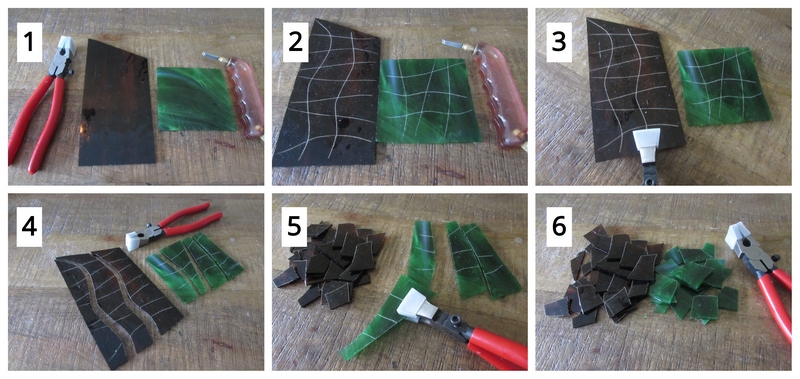
You’ll be cutting these pieces with your mosaic cutters to lay all over the rest of your vase.

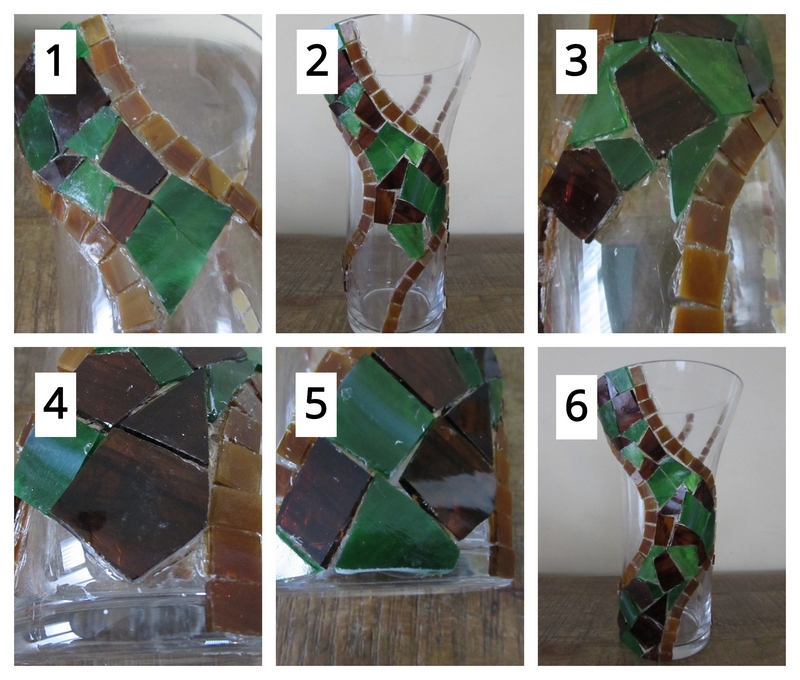
Step 4: Glue the Green and Brown Glass on your Vase
It’s time to glue the green and brown glass pieces on to your vase intermixing both colors as we go.
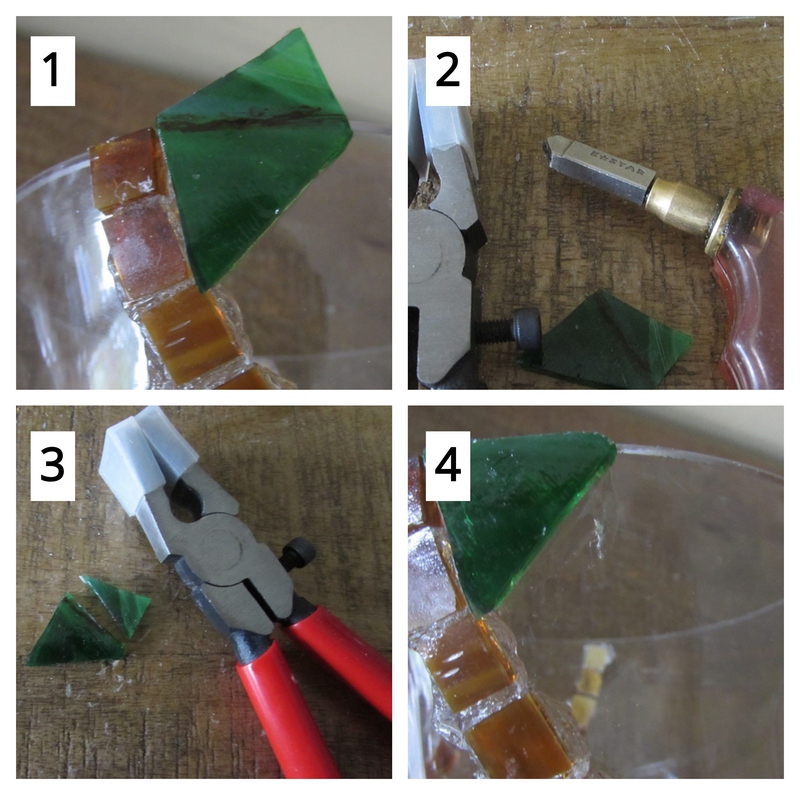
Mark a piece of green glass to fit the top edge of your vase.
Score your mark with your glass cutter and break the score with your running pliers.
Glue the piece in place.
Next, mark a brown piece to fit within your design.
Score your mark with your glass cutter and break the score with your running pliers.
Glue the piece in place.
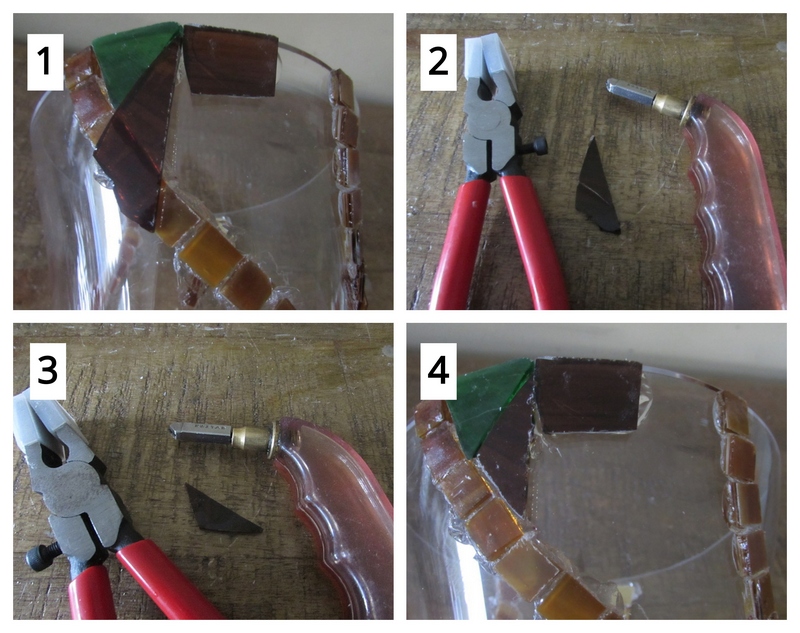
Use your mosaic cutters to nip off the tips of pieces when necessary to fit.
*Tip: Make sure that each piece that you cut and glue on lays flush on the surface of your vase. If the piece doesn’t lay flush, simply cut it into two pieces before gluing it on.
Continue this process of marking your pieces to fit, cutting them with either your glass cutter or mosaic cutters and then gluing them in place until your first section is complete.
Repeat this same process covering the other three section of your vase.
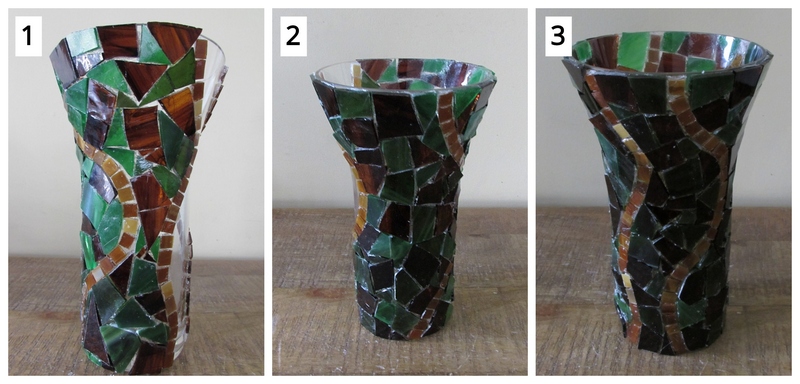
Full mosaic coverage achieved.
Now, Time to Grout!
You’re almost done! We just need to fill all our empty spaces up with grout. We simply need to prepare our grout mixture, apply it all over the surface of your vase and clean it thoroughly.
If you’ve never grouted before, check out my post on how to grout your DIY mosaics here (insert link).
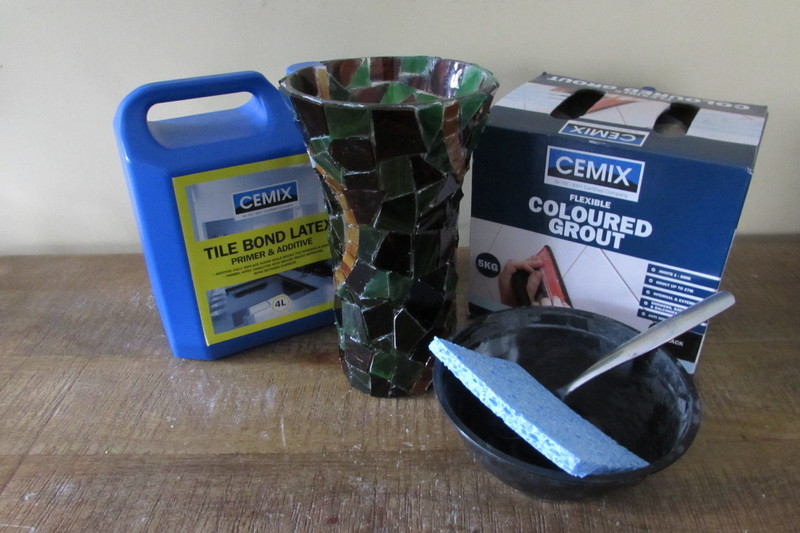
Step 5: Gather Your Grouting Materials
All you’ll need to grout is your dry grout mixture, latex additive, mixing bowl, spoon, sponge, old rags or towels, garden gloves and water.
Make sure you cover the surface that you’ll be grouting your vase on with old towels or newspaper to prevent any of the grout from staining your surface.
Step 6: Mix, Apply and Clean Off Your Excess Grout
Now You’re ready for the actual grouting process.
Firstly, you want to mix your latex additive into your bowl with your dry grout. You want to achieve the consistency of oily peanut butter. If by chance you pour in too much additive, don’t worry, just add more dry grout until you achieve the proper consistency.
Now, apply the mixture to the surface that you just covered with glass.
Work in sections as you’ll wan to allow yourself time to clean it thoroughly before moving on to the next section.
Take your wet sponge and squeeze out the majority of the water. Wipe it across the surface of your vase removing any excess grout.
Make sure you’re close to your water source as you’ll need to rinse out the sponge repeatedly.
Finally, use old towels or rags to finish the cleaning process. I suggest taking a microfiber cloth and wiping each piece of glass off individually, basically polishing each piece of glass after grouting.
*Tips regarding cleaning and detailing stained glass mosaic lit projects:
- Before ever grouting your piece, take a pair of tweezers and remove as much glue as you can from between the joints. This saves time having to do so after you grout your piece.
- Light your piece right after grouting so that you can see where there is glue blocking a joint where grout should be so that you can make your corrections by removing the glue with your tweezers and replacing grout in the joint.
- Even after grouting and cleaning with a moistened sponge and rag, go back to the piece a half hour later and clean with a both again as grout leaves a fine residue that needs to be removed.
- Make certain to create a nice grout line on the top and bottom edges of your piece. If need be, paint the edges to complete the piece with acrylic paint and a sealer.
- If you see the next day that you have left grout in place that you shouldn’t have, take a sharp edge or tweezers edge and remove the grout by scraping it off the glass pieces.
- It’s imperative that you use only latex additive mixed in to your grout when working with glass on glass mosaics. The latex additive allows the grout to adhere to the glass. Without it the grout would eventually pull away from the glass.
- It is also imperative that you use a clear water resistant adhesive. Attempt to cover each piece you glue on with full coverage on the underside. You will always get some seepage of grout under a few pieces of glass here and there but you can minimize this by making sure that you completely cover each piece prior to gluing it down.
- Select glass that isn’t overly textured as this will cause much work with the cleaning process after grouting. It’s also more difficult to score and break. For beginners, work with glass that is lovely but easy to score and break and clean after grouting.
- When cleaning up after the grouting process, make sure to place any left over grout in your mixing bowl in the garbage before rinsing your bowl. It’s always a good idea to rinse the least amount of grout down your drain. Just being environmentally conscious:)
In ending this post, open your minds to the amazing possibilities of what you can create with scrap stained glass on glass bases and some cheap battery operated fairy lights. Any time you’re at your craft store or at a garage sale, keep your eyes wide open to that glass object that could become your next potential gorgeous stained glass mosaic lit piece!

Danielle is the mosaic artist and teacher behind Mosaics Mostly. She has been creating mosaics for over 25 years, and has taught hundreds of people to create their very own mosaic DIY projects at home. She has been featured in multiple galleries and magazines, and has even had her own beginner mosaics book published! She loves crafts, and is always working on something new!

Awesome website man, looks very nice. Been searching for a site like this.
Thank you!!! Enjoy the site!
Thank you!!! Enjoy the site!