Beautifying your garden is one of the most satisfying tasks any home owner takes on. Watching our lovely plants and herbs flourish in our gardens during spring and summer is so very rewarding. It’s also rewarding to create lovely outdoor mosaic pieces to scatter around your garden in those particular places needing a bit of “dressing up” or “pizzazz”!

Now garden pavers or stepping stones are typically a necessity in certain areas of your yard or garden where a transition area is needed, connecting a grassy area with another across a gravel or dirt surface difficult to walk on. These stepping stones don’t have to be boring transitions though as we can jazz them up with lovely mosaic art!
Years ago I stumbled across a bit of a secret regarding an everyday material that can be used in coordination with floor tile to create brilliant surfaces. I was playing around with some glass half marbles that were sitting in a glass jar on top of my coffee table while attempting to design a table top for a client where white floor tiles were going to be used as part of the design to match her kitchen floor. I loved the idea of incorporating glass with tile to resurface her table but the table surface needed to be level and stained glass and floor tile are different thicknesses so that simply wouldn’t work.
I took a few half marbles and turned them flat side up and low and behold they were exactly the same thickness as the floor tile! Now the possibilities were endless in creating designs combining glass and floor tile! Over the next few years we resurfaced tub surrounds, back-splashes, table tops, patios, foyers and even glass block walls using these half marbles either by themselves or in combination with floor tile.
Creating mosaic stepping stones for your garden using these two materials is not only simple but extremely affordable and they wind up looking like you spent a small fortune for a decorative piece for your garden.
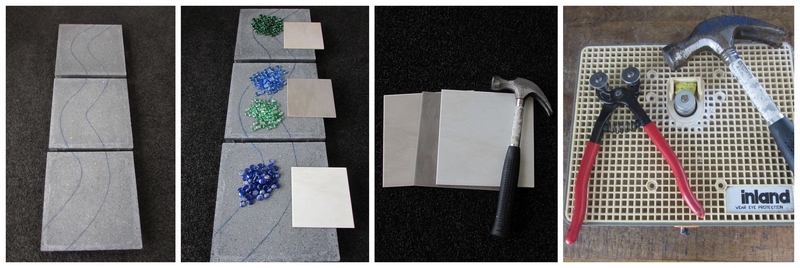
Materials Needed for DIY Mosaic Stepping Stones
- 3 cement stepping stones ( I’ll leave the size up to you but I used 400mm x400mm pavers or 16″ x 16″)
- 6 (300m x 300mm or 12″ x 12″) floor tiles of 3 different colors. Your leftover tile can be used for another project but having 2 tiles of each color will provide you with more of a selection of random pieces for each stepping stone.
- 12 bags of glass half marbles (6 of one color and 6 of another) Each bag contains approximately 50 half marbles
- A hammer
- Mosaic cutters
- Glass grinder (optional)
- Clear water resistant adhesive ( I use clear liquid nails)
- Marker for drawing design outline
- Black grout
- Latex additive
- Garden gloves
- Safety glasses
- Sponge, microfiber cloth, spoon, mixing bowl, gloves and rags or old towels for cleaning and for protecting the surface you’re grouting the stepping stones on.
How to Make Your Very Own DIY Mosaic Stepping Stones
Below you’ll find my step-by-step instructions on how to make your own beautiful mosaic stepping stones at home. Let’s get to it!
Step 1: Gather Your Materials and Tools
Before you get started, make sure everything you’re going to be needing for your project is close by.
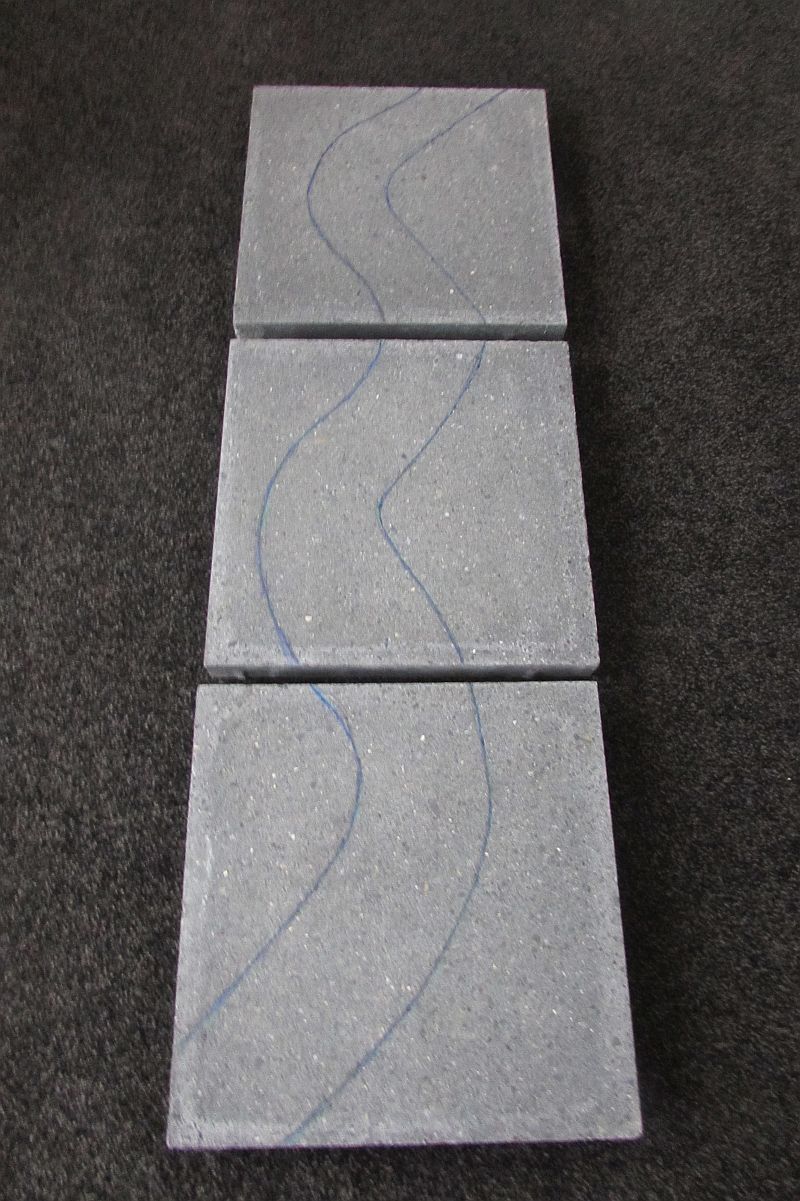
I decided to use cement square stepping stones for this project that I purchased at my local home and garden center but feel free to use whatever stepping stones you’d like.
My design is going to wind across the three cement stones in glass and tile symbolizing a stream connecting them together.
Step 2: Draw Your Stream Design Across the Three Pavers
This design is a contemporary mosaic design symbolizing 2 natural elements, a stream and grass. The stream will run across the center of all three stepping stones with the grass sections on either side of it. Both stream and grassy sections will be combined with three different colors of floor tile.
Draw the stream across the three stones.
Step 3: Break Up Your Tiles
Let’s break up our tiles!
Turn your tiles backside up so as not to damage the surface finish when you smash them with your hammer.
Break the tiles with your hammer into many pieces.

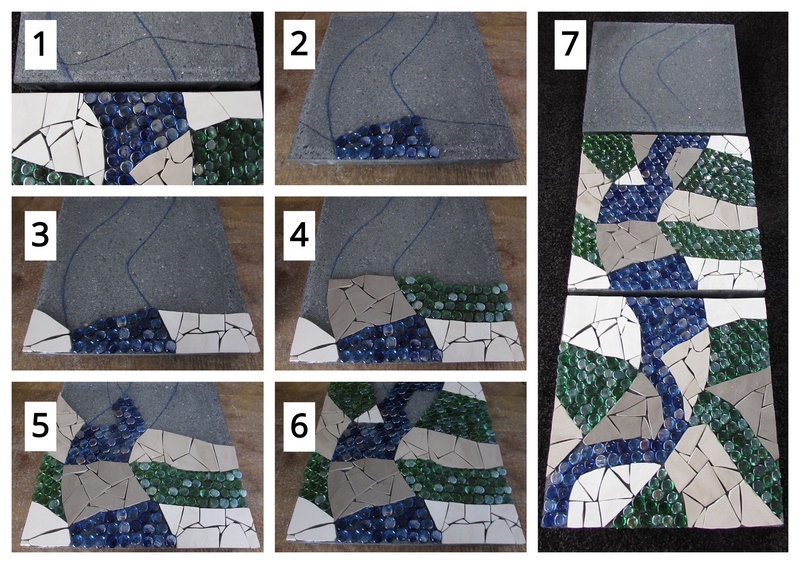
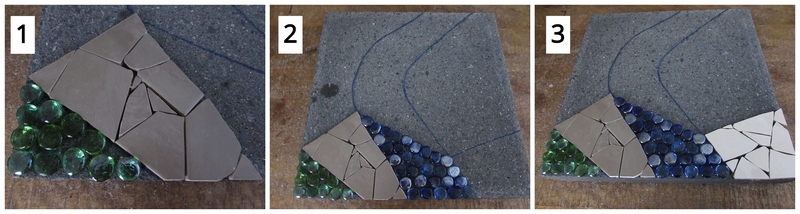
Step 4: Glue Your Tile Pieces and Glass on Your First Stepping Stone
So the idea is that a blue glass stream will run down the center of each stepping stone which will be combined with tile and on either sides of this stream with be grassy sections created by green glass combined also with tile.
Begin by gluing on some blue glass half marbles. Remember to glue them on flat side up.
Then glue on random pieces of white tile within the stream lining the blue glass half marbles but staying within the drawn outline of the stream.
Mark tile pieces to fit and cut them with your mosaic cutters. When necessary, take the cut piece to the glass grinder to smooth and shape the edges.
If you’ve never shaped tile on a glass grinder, check out my post on How to sculpt tile on a glass grinder here.
Note: If you choose to create these stepping stones with out a glass grinder, then you’ll simply need to cut random smaller pieces to work the design. The glass grinder allows you to use larger pieces that need to be nipped out and sometimes smoothed and shaped before using the piece within your design. Your grinder head should be a gritty one as floor tile is more difficult to grind than glass.

Mark and cut additional tile pieces to fit and complete the section.
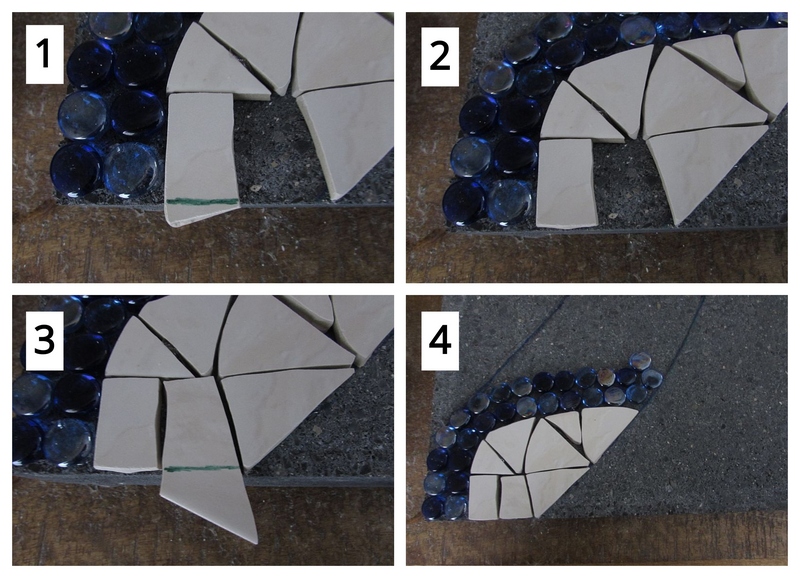
Alternate your three different colors of tile while creating both the stream section and the grass sections.
Continue with this process of marking, cutting and gluing on your tiles in combination with gluing on your glass half marbles to complete your first stepping stone.

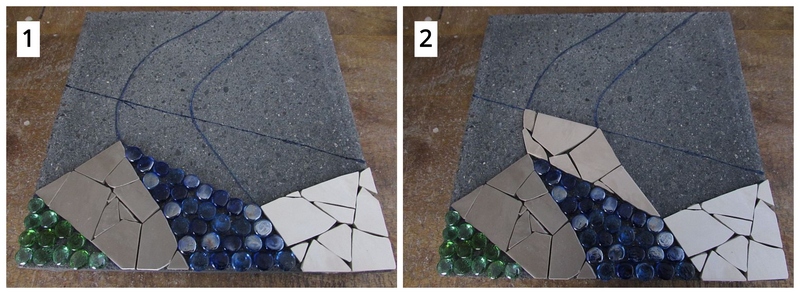
Step 5: Glue Your Tile Pieces and Glass on Your Second Stepping Stone
Line the first stepping stone up with the second one and create a line to continue the design.
Begin the second stepping stone by gluing on the section of blue half marbles. Then work both areas next to the blue glass with white tile to pull the design from the first stepping stone on to the second stepping stone.
Create whatever size sections you’d like on either side of the stream. There’s no need to define the sections. You can simply create the sections as you go along.
Continue to alternate your three different colors of tile within the stream section and the grassy sections.
Repeat the process of marking pieces to fit, cutting them with your mosaic cutter, shaping them on your glass grinder and gluing the piece in place until the second stepping stone is complete.
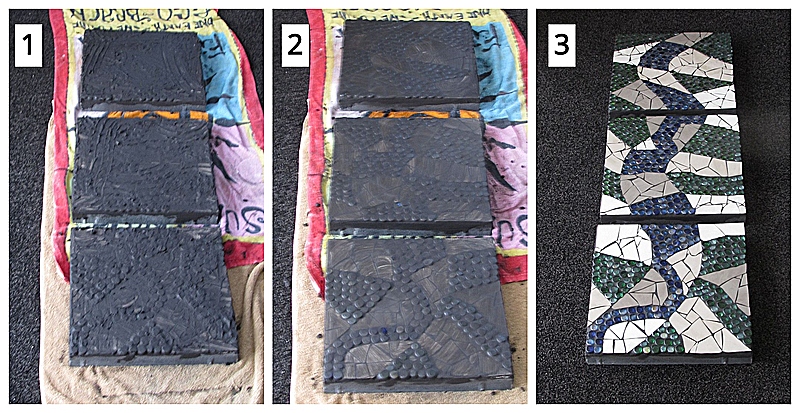
Step 6: Glue Your Tile Pieces and Glass on Your Third Stepping Stone
Line the 3rd stepping stone up with the 2nd stepping stone and draw a design to continue the design on the top of the second stepping stone with the bottom of the 3rd stepping stone.
Begin by continuing the green glass half pebbles on the bottom of the 3rd stepping stone and then continue with the dark brown tile section next to it. You’re simply pulling the design on to the 3rd stepping stone.
Then complete a blue section of the stream and a white tile section on the right side of the stream. Mark, cut and glue in place all tile pieces to complete the white bottom section.
You’ve now carried the design from the second stepping stone to the third stepping stone.
This time we’ll create another six sections by drawing a diagonal line across the stepping stone creating the areas to fill with glass and tile instead of just free handing it as we did on the last stepping stone. It’s your option though.
Continue this process and complete your third stepping stone.
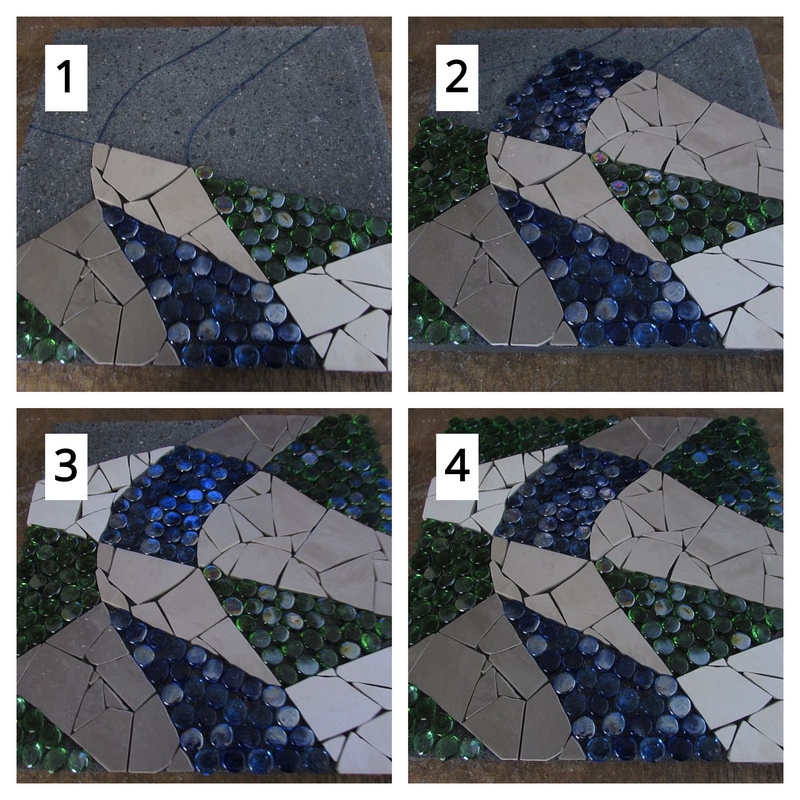
Full mosaic coverage on all three stepping stones!
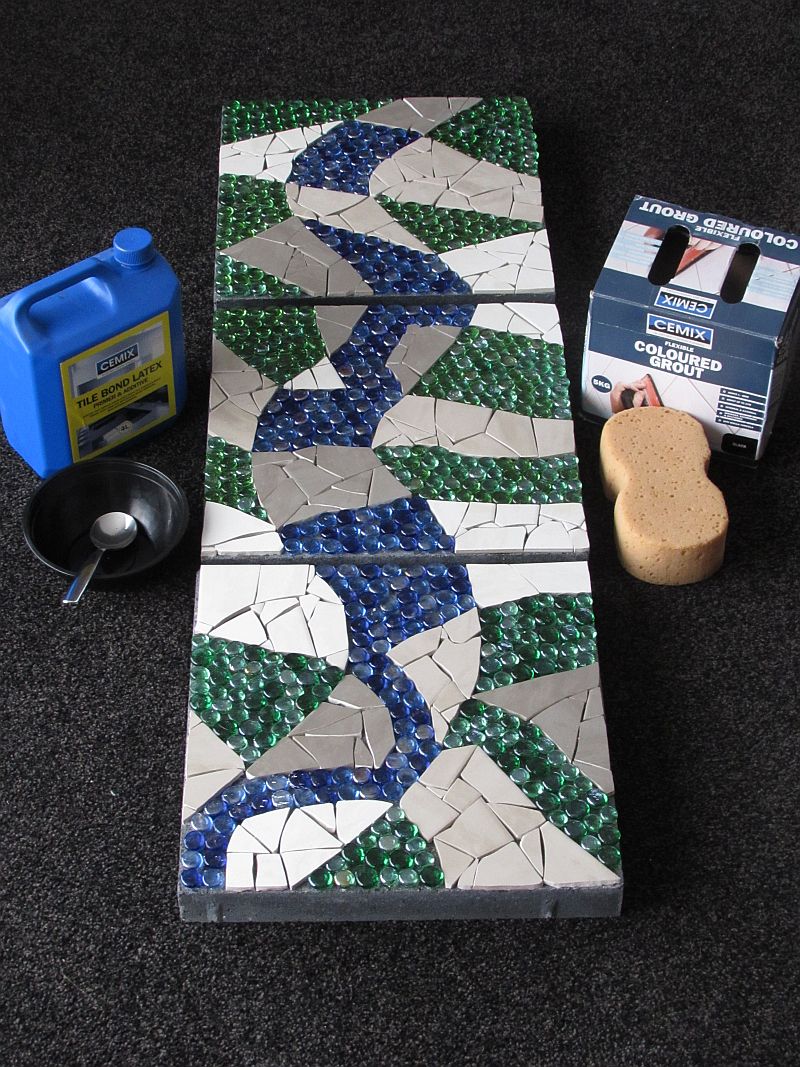
Now, It’s Time to Grout!
You’ve created your lovely mosaic stepping stone path out of glass and tile. Now it’s grouting time.
The last part of this process is preparing your grouting mixture, applying the grout to each stepping stone surface and cleaning each surface thoroughly.
If you’ve never grouted before, check out my post on how to grout your DIY mosaics here.
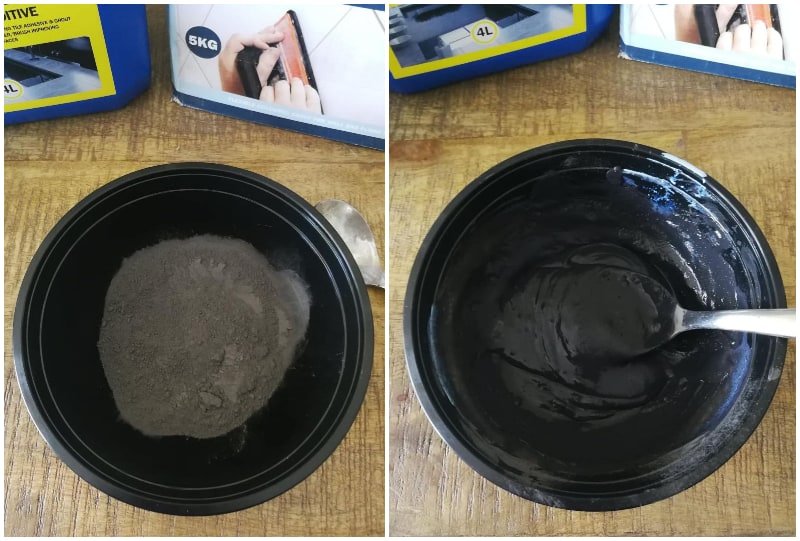
Step 7: Gather Your Grouting Materials
To grout, all you’ll need is your dry grout, latex additive, mixing bowl, spoon, sponge, garden gloves, old rags and towels and water.
I recommend covering the surface you are going to grout on with either newspaper or old rags to prevent any of the grout from staining your surface.
Step 8: Mix, Apply and Clean Off Your Excess Grout
Now you’re ready for the actual grouting process.
Mix the liquid latex additive into your dry grout to achieve the consistency of oily peanut butter. Don’t worry if you accidentally mix too much in and your mixture is soupy. Simply add a bit more dry grout until the proper consistency is achieved.
Cover all three surfaces of the stepping stones with the grout mixture and clean off the excess grout with a moistened sponge. Rinse out the sponge repeatedly until all the grout is removed from the surface of your mosaic stepping stones.
Place your stepping stones in that perfect area of your garden.

I hope you enjoyed creating these lovely glass and tile mosaic stepping stones. Keep in mind that this resurfacing process can be used to create many other beautiful pieces for your garden such as outdoor tables, birdbaths, planters and benches. Check out my post on DIY Mosaic Table, DIY Mosaic Bench and DIY Mosaic Birdbath for some other ideas for beautifying your garden.

Danielle is the mosaic artist and teacher behind Mosaics Mostly. She has been creating mosaics for over 25 years, and has taught hundreds of people to create their very own mosaic DIY projects at home. She has been featured in multiple galleries and magazines, and has even had her own beginner mosaics book published! She loves crafts, and is always working on something new!
